This is a great post. My problem is I have the 1.6 DOHC Protege. My question is, are the parts going to be the same? I'm new to the Mazda world, I usually drive Honda's and for me a Honda is pretty cut and dry about what is needed. I'm not asking if the part numbers are the same, just the parts. Thanks in advance for any and all information that you provide.

You are using an out of date browser. It may not display this or other websites correctly.
You should upgrade or use an alternative browser.
You should upgrade or use an alternative browser.
DIY Protege Timing Belt Change (How-To)
- Thread starter livelyjay
- Start date
boostedprotege
Member
- :
- 2003 mazda protege dx/2003 mazda protege5
the parts i don't think are the same but the actual process of changing the timing belt is the same. iirc
I am planning on this project right now. I got a few questions:
1. I got the idea about using the starter to unbolt the crankshaft, but how about tightening it? Is there anything to wedge against? My buddy borrowed the special tool from autozone when he did it, but using the starter is such a good idea.
2. I was comparing the list to the kit on Amazon:
https://www.amazon.com (commissions earned)
In your list there is no crankshaft/camshaft seals. Are those needed?
Also there is no timing belt tensioner spring, does it come with the tensioner?
Thanks! It's a nice thread!
1: I have air tools, so I just used an impact gun. You could see if AutoZone has an electric impact gun you could taker out on loan. Another option is to have someone push the brakes as hard as possible while you tighten it down. A third trick I have heard about, but never tried, is you stuff a prybar into the starter hole (you'd have to remove the starter), catch a tooth of the flywheel, and wedge the prybar against the side of the transmission housing.
2. The cam seals are not needed from what I gather. I didn't replace mine and my car is still running") The spring did not come with the kit, and mine still held plenty of pressure, I saw no need to replace it.
The spring did not come with the kit, and mine still held plenty of pressure, I saw no need to replace it.
2. The cam seals are not needed from what I gather. I didn't replace mine and my car is still running
The spring did not come with the kit, and mine still held plenty of pressure, I saw no need to replace it.boostedprotege
Member
- :
- 2003 mazda protege dx/2003 mazda protege5
the crank pulley needs to be removed.. but its very easy.. and in the instructions
Break loose crank bolt
•Put 21mm socket and breaker bar on crank bolt
•Wedge breaker bar into the ground facing towards front of car
•Unplug your coil packs
•Crank the motor for one second and check crank bolt, should be loose now
•Finger tighten the crank bolt and set breaker bar aside
Break loose crank bolt
•Put 21mm socket and breaker bar on crank bolt
•Wedge breaker bar into the ground facing towards front of car
•Unplug your coil packs
•Crank the motor for one second and check crank bolt, should be loose now
•Finger tighten the crank bolt and set breaker bar aside
- :
- 1989 RX-7 GXL Blaze Red
sub
- :
- 2018 Mazda 3
Oh I got an idea! About tighening the crankshaft pulley bolt...
How about put the wheels on, lower the car, put into 1st gear, and put a wheel chocks in the front? That would work wouldn't it?
This is what I did. Except I had mine on ramps with the back wheel chalked so I could have more room underneath. There wasn't enough room in the engine topside.
jerry.stoangi
Member
Great thread, helped me immensely doing my timing belt. I have the mazda factory manual and it is a waste of time. Good work with the write up.
boostedprotege
Member
- :
- 2003 mazda protege dx/2003 mazda protege5
cam shaft seal. might aswell change the water pump to.. and make sure you get new idlers and tensioners..
kanuter valve
Member
- :
- 03.5 msp
did this after putting 122k on the original timing belt.
Gates kit tck228. includes belt, tensioner, idler, and tensioner spring.
Water Pump: new oem made by NPW, mazda part # FS0115010F. the same part for less through napa is part # 1521301.
Power Steering/AC Belt: Bando 5pk1170
Alternator/Water Pump Belt: Bando 4pk920 or Gates Racing K040360RB
Valve Cover Gasket: FEL-PRO VS50574R
Front Crankshaft Seal: Mazda FS0210602
Cam Seals (2): Mazda FS05-10-602A
Tensioner Spring: Mazda FS01-12-711 (if you want oem)
PCV Grommet: Mazda E301-13-338A
Coolant: Zerex Asian or Mazda FL22. 0000-77-508E-20
Last edited:
OK I just put in the new water pump. My old one doesn't look to be a very good shape, even though there is no leak.
Some tips for the water pump:
There IS a gasket. It's actually a piece of metal coated with rubber. Does forget to take that off if by peeling it from the tab Mazda provide on the side. I don't think people would miss it when they see the new gasket but just figure I would mention it here.
Also I didn't have trouble putting the new water pump on with those rubber blocks. I used three bolts to secure the gasket while I wedged it in, so I know the gasket is always in the right place.
Also if you are going to replace the water pump, you might as well take those two bolts holding the P/S pump off when you are taking off the belt, then move the P/S pump to the side without disconnecting the hoses. This way gives you some more room to work with. Room is precious when working on this timing belt.
Both of my camshaft seals and crankshaft seal are good. The spring of mine has less tension than the new one, but it doesn't seem to too weak.
The car has 125845 miles on it.
When you take off the water pump, coolant WILL come out. it's a mess...by ready with towel.
I found out that every time I put on the timing belt and check timing against the timing cover, the yellow mark is always somewhat to the right. You really have to turn the crankshaft clockwise for 720 degree to make sure the timing is correct, like it says on the manual. This will get rid of all the looseness in the belt and give you the accurate timing. I put the crankshaft bolt back on to turn it, and break it loose is as easy as using the starter to bump it with a breaker bar.
Also fill the radiator and the reservoir before firing up the car.
Still waiting for parts to come (my upper timing cover is broken). Hopefully my car will run when I finish.
Just wrapped this up yesterday. Awesome write-up. I've done this job on a 93 Protege and a Mitsu Lancer and I'd say this is a little easier than those two, especially with OP's how-to at my side.
I had two hiccups in the process:
I went against the OP's advice of securing the cams so they don't move and paid for it with wasted time... just like he said would happen. Without a belt, the cams insist on turning just a half tooth each and I just couldn't get them to stay put AND put the belt on. My awesome wife ended up holding them still while I put the belt on correctly. I suggest doing as the OP stated or else have a steady handed helper ready with two 14 mm wrenches. Once on, rotate the engine 720 degrees several times checking the timing again and again just to be sure. :/
Secondly after I put the timing covers back on, a bit of a pain with a couple of those bolts, I realized I wasn't sure I had fully tightened the tensioner pulley down. Back off they came
Otherwise, everything went great and I saved a ton of cash.
My valve cover gasket was cracking up, so I'd suggest replacing if you never have. My kit came with it but didn't come with any silicon for the 4 points that call for it in the manual. Blister packs for sale at auto parts shops. Also, the plugs in to the coil packs lost the little tab that the plug clicks tight into. Ended up just using some heavy drop ceiling wire to wire it tightly together. Seems like a lot of little plastic and rubber bits are drying out and getting brittle on our cars, so be gentle and ready with a few cuss words when they break.
lol this reminds me the work I did half year ago. I have to say it was painful but fun. The timing thing is annoying. I didn't have a helper so I spent hours trying to get it right. Eventually I figured out a way to hold the cam shaft...by using a 14mm wrench and my 5 feet cheater bar...using the weight of the steel cheater bar to hold is against the belt tension while I put the belt on...then turn the crankshaft 720 degree to find out it is one teeth off and try it again lol
I also had the most trouble tightening the crankshaft bolt to the set torque. Putting it on a ramp helped a little but not enough. With that much torque the flex in the mechanical system absorbs a lot of torque, and the car would actually move forward with e-brake on on the ramp when I reach around 110 ft-lb of torque...that was scary. I ended up tighten it as much as I can, then left it until I replaced my clutch...to jam the flywheel so I can torque the crankshaft bolt right...now I have an impact wrench maybe that would have helped, but I like to torque everything to the manual spec.
I also had the most trouble tightening the crankshaft bolt to the set torque. Putting it on a ramp helped a little but not enough. With that much torque the flex in the mechanical system absorbs a lot of torque, and the car would actually move forward with e-brake on on the ramp when I reach around 110 ft-lb of torque...that was scary. I ended up tighten it as much as I can, then left it until I replaced my clutch...to jam the flywheel so I can torque the crankshaft bolt right...now I have an impact wrench maybe that would have helped, but I like to torque everything to the manual spec.
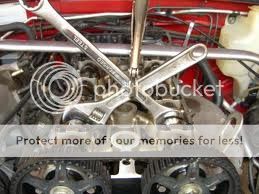
Your thread really needs this picture,... It would have saved me about four hours and eight attempts at putting the T-belt on.
The cams won't stay still and want to "spring" to the wrong position.
I had read this over and over and didn't know what he meant:
You can use two crescent wrenches, one on each cam
Then span the handles with a box wrench and zip tie into place
This will help immensely later on
http://www.mazdas247.com/forum/showthread.php?123826433-In-need-of-advice-for-a-Timing-Belt-Install
Last edited:
New Posts and Comments
- Replies
- 161
- Views
- 17K

- Replies
- 46
- Views
- 50K
- Replies
- 0
- Views
- 22


- Replies
- 33
- Views
- 3K