Guide 2016~2021 CX-9 DIY Transmission Fluid Drain and Fill + Filter Change

So as a person who is awful at arts & crafts, using a gasket (instead of RTV) is really appealing to me.

So why didn't Mazda use a gasket in the first place? Is there a downside to using a gasket if I choose to do a filter replacement?
In old days car manufactures use cork gasket for the ATF pan buy it’s terrible to prevent leaks. Now most aftermarket ATF pan gaskets use synthetic rubber and they should be much better preventing leaks.
 
I dabbed a *tiny* amount of Hondabond HT at the four corners just to hold the gasket in place while I reinstall the pan. Other than that, goes on dry.

For torque, I use my Milwaukee M12 1/4" ratchet and snug them until the ratchet has given all it's got. And trust me it pretty worn out, so it's not much. Brand New it's only rated like 30 ft.lbs, so I guess I'm getting 25-28 out of it.

I do this on all my cars, nothing anywhere leaks, and no pan deformations.
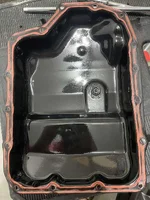
The torque spec on those ATF pan bolts from Mazda is 71~97 in-lbs (5.9~8.1 ft-lbs). So 25~28 lb/ft putting out by your worn-out Milwaukee ratchet is too strong on torque for the ATF pan bolts.

Of course by using ATF pan gasket the torque requirement could be (and should be) different from the factory spec, but thread stripping on the soft aluminum transmission case could happen with the torque which is 4X higher than the designed spec.
 
Last edited:
At 8 ft.lbs, the only thing holding the pan on is the RTV itself, acting as a glue.
Trying torque this low with a gasket would be nightmare fuel.
And even at 30, you still don't have to worry about the threads. True aluminum is soft, but it ain't that soft.
 
At 8 ft.lbs, the only thing holding the pan on is the RTV itself, acting as a glue.
Trying torque this low with a gasket would be nightmare fuel.
And even at 30, you still don't have to worry about the threads. True aluminum is soft, but it ain't that soft.
Like I said earlier the torque value on pan bolts should be different with a pan gasket. If someone has decided to use an ATF pan gasket and still uses 8 ft-lbs torque on pan bolts as listed on the spec, that could be problematic. And we really don’t know what the proper spec on the torque value is if one uses a pan gasket instead of the RTV.
 
Most pan gaskets industry wide, be it oil, transmission, or differentials, are all right at 28-32. This is also true for drain plugs that thread into pans. That's how I came up with my number.
 
At 8 ft.lbs, the only thing holding the pan on is the RTV itself, acting as a glue. ....
90-120 in-lbs is the FSM torque spec for all of the motor/trans oil pans that I've done over the years, and those specs are what I've always used, with no leaks or other issues. IMO it's the large number of bolts (usually 14-18) which provides the holding power - strength in numbers. And I also use an inch torque wrench for these jobs, because most tool makers caution against using the very upper and lower torque settings of their wrench (which 8-10 would be on ft-lb wrenches).

One thing that surprises me is that Mazda doesn't specify multiple passes and a criss-cross sequence pattern for the pan bolts, which I've always considered an important part of these jobs. When the time comes, I'll just go with an inside-out pattern similar to what most of the other automakers use.

Now with all of that said, I'm not someone who tries to push what I do on anyone else, so by all means continue to do whatever you like and has worked well for you.
 
Most pan gaskets industry wide, be it oil, transmission, or differentials, are all right at 28-32. This is also true for drain plugs that thread into pans. That's how I came up with my number.
The torque spec for the drain plug on the ATF pan is 23—30 ft·lbf. But it’s a much bigger bolt than the pan bolt, and it’s screwing into a steel nut. Using 28~32 ft·lbf torque is safe. But I’d think screwing into the aluminum case with much smaller bolt is more dangerous of stripping with 4X stronger torque.
 
90-120 in-lbs is the FSM torque spec for all of the motor/trans oil pans that I've done over the years, and those specs are what I've always used, with no leaks or other issues. IMO it's the large number of bolts (usually 14-18) which provides the holding power - strength in numbers. And I also use an inch torque wrench for these jobs, because most tool makers caution against using the very upper and lower torque settings of their wrench (which 8-10 would be on ft-lb wrenches).

One thing that surprises me is that Mazda doesn't specify multiple passes and a criss-cross sequence pattern for the pan bolts, which I've always considered an important part of these jobs. When the time comes, I'll just go with an inside-out pattern similar to what most of the other automakers use.

Now with all of that said, I'm not someone who tries to push what I do on anyone else, so by all means continue to do whatever you like and has worked well for you.
Do you think we should use the same torque value (71~88 in·lbf) on pan bolts when we use an aftermarket pan gasket instead of applying the RTV?
 
Do you think we should use the same torque value (71~88 in·lbf) on pan bolts when we use an aftermarket pan gasket instead of applying the RTV?
Most of the pans I've done were with solid gaskets, and I've always used the spec torque from the FSM. But I suspect that the actual answer to your question is that it doesn't matter all that much if the torque is somewhat higher, or even perhaps even lower. I've always felt that it's more important to torque in some type of criss-cross pattern using multiple passes, to avoid one area of the gasket getting pinched and skewing the rest of it. JMO on that, and I also believe most pros do these gasket jobs on feel using a ratchet, with probably just an ad-hoc bolt pattern.
 
90-120 in-lbs is the FSM torque spec for all of the motor/trans oil pans that I've done over the years, and those specs are what I've always used, with no leaks or other issues. IMO it's the large number of bolts (usually 14-18) which provides the holding power - strength in numbers. And I also use an inch torque wrench for these jobs, because most tool makers caution against using the very upper and lower torque settings of their wrench (which 8-10 would be on ft-lb wrenches).

One thing that surprises me is that Mazda doesn't specify multiple passes and a criss-cross sequence pattern for the pan bolts, which I've always considered an important part of these jobs. When the time comes, I'll just go with an inside-out pattern similar to what most of the other automakers use.

Now with all of that said, I'm not someone who tries to push what I do on anyone else, so by all means continue to do whatever you like and has worked well for you.
Not exactly apples to apples, but the factory service manual for my Volkswagen Atlas SUV calls for only 7Nm (~62 in/lbs) of torque on the transmission pan. And it uses a rubber gasket that is required to be replaced every 80k miles.
 
Does anyone know if the Torque app can show ATF temps? There is a value called Transmission Temperature but it doesn't seem to display anything.
 
Does anyone know if the Torque app can show ATF temps? There is a value called Transmission Temperature but it doesn't seem to display anything.
When I first researched this a couple of years ago, there were very few Mazda Skyactiv PIDs supported for the Torque Pro Android phone app. Strangely enough however, there was a free plug-in APK available for Android Torque Pro running under Windows on a PC (but not for phone Android at that time). That setup is extremely kludgy and slow, but it does support what I'd describe as a modest number of newer Mazda PIDs, and TFT (Transmission Fluid Temp) is included in that collection.

I used that Android Torque setup on the PC for a year or so, but then discovered that Forscan running under native Windows on a PC is light years ahead of Torque/Windows/Android, not only in the number of PIDs supported, but also in performance and functionality as well. Forscan is the clear winner in every respect, and very surprisingly, was avaliable as a free Windows download, when I installed it last year. However, the doc that I read at that time indicated that the beefy and free version that I downloaded (and am still using) was not available for Android phones. I believe that they also had a version available for Mac OSX, and something for PC Linux as well.

So that was the situation as of late last year, but I haven't checked since I did the download, and of course things might be quite a bit different today. The one caution I'll mention is I've seen a few ODB live data apps which incorrectly display ECT values as Trans Fluid Temp, in addition to ECT. The dead giveaway on this is when ECT and trans fluid temp are identical or very close to each other, during a cold start warm-up. The true TFT values should be quite a bit lower than ECT values for virtually the entire warm-up.
 
Did mine on my 19 CX5 GTR. Went pretty smoothly (knock on wood). The hardest part was applying the RTV and getting it into position. Everything else was pretty standard. It only took less than five minutes to get the transmission above 122 F per the OBD Fusion Mazda package. I don't need to drive the car again until Wednesday so I'm going to keep the skid plate off and monitor for leaks. This was my first time applying RTV. I felt more comfortable with the RTV vs. the gasket. Too many unknowns on the correct torque and the actual quality of gasket. I used the Mazda grey RTV and it dried very fast. I applied it, hand tightened the screws, waiting 10 minutes, tightened to about 45 inch/pounds and then fully tightened at 1 hr to 85 inch/pound to prevent all of it from squeezing out immediately. I let it sit overnight and then added the fluid.

I was afraid that I applied too much RTV as some squeezed out of the sides. I looked at the pictures I took before cleaning away the old stuff and it seems Mazda was pretty generous too. Cleaning off the RTV wasn't awful, I got some non marring plastic blades and it made short work. Less than an hour to clean both surfaces.

Drain and refill (with filter replacement) was exactly 5 quarts.

While I was down there I did the transfer case and differential fluid as well. After filling the first time I drove it and then refilled. Tbh this was a bit unneeded as I only got a few more pumps in. I don't think I'd make that effort again.

I did notice some rust on the frame where water got trapped between the skid plate and the frame. I plan on hitting those spots with rust inhibitor.

Picture below is the Mazda RTV application from the factory. As you can see they were pretty generous.
 

Attachments

  • unnamed (1).jpg
    unnamed (1).jpg
    155.3 KB · Views: 81
Last edited:
Did a drain and fill this weekend as well. I drained about 4.5 qts.
 
Did you just put the same amount back in, or did you use the dip stick?

I put the same amount back in, after I had let the fluid sit for over an hour. Ideally I would have used the dipstick, but I didn't have a capable OBDII reader handy to record the ATF temp. I wasn't having any issues with the transmission prior to the drain and fill, so I figured I would be fine just putting the same amount back in (after I let the fluid cool down). So far, so good.. in fact, the car shifts even better than it used to, specifically the 1-2 shift for me.
 
I put the same amount back in, after I had let the fluid sit for over an hour. ...
I used the exact same method with a dipstick-less Kia a number of years ago. No ill effects whatsoever from that to this day, and IMO your vehicle is A-ok as well.
 
Items needs:
1) 8MM Hex Bit
2) Drain plug gasket ( 9956-41-400)
2) 10MM socket
3) Phillips head screwdriver
4) Loooong skinny funnel
5) Atf Type-Fz - Mazda (0000-FZ-113E-01)
Approx 5-6qt per drain

I warm the vehicle to operating temperature to get the fluid circulated before draining for 2hr. Total capacity should be 8.5qt and I drained 5qt. This is highly YMMV. Please do take into account that fluid will expand with heat.

Before you start, you can consider the following:
The fill plug sits VERY VERY low so you have two options to fill:
A) To avoid removing the airbox, you can go under the car and use a fluid pump
B) Remove the airbox and get a loooooooooooong funnel. To get an idea of how long, you can refer to my picture. With the fully extended spout + the long funnel combo, the top of the funnel was at the level of the framerail.

Steps:
1) Unscrew hose clamp (see attached picture) and decouple the intake hose from air box
2) Remove 2 10MM bolt that hold the snorkel
Be mindful of the MAF sensor harness!!!
3) Pull the entire airbox/snorkel unit upward
You should have enough space to rotate the unit away. Tape the intake hose shut to prevent dust from entering.
4) Locate the fill hole, and remove a 10MM bolt holding down the plastic dipstick
The dry o-ring on the dipstick was stubborn, so I twisted the dipstick back and forth and used a tiny bit of force to pull it out. BE CAREFUL NOT TO KNOCK ANY DUST OR DEBRIS into the transmission fill hole.
5) Use 8MM hex bit to remove drain plug and replace washer
6) Let the fluid cool down to retract and measure
7) Use a loooong funnel to replenish the same amount that was drained out
Hope this question isn't too stupid.
If I have to remove the airbox to get access to the dipstick etc, then how can the car be in idle when checking the level using the dipstick? Is it ok to idle while the airbox is disconnected like that? I didn't think it was...
Also...you fill it up using the tube that the dipstick is in right? there's not a separate fill hole, just the dipstick tube itself?
 
Back