Guide: 2016~2021 CX-9 DIY Transmission Fluid Drain and Fill + Filter Change

:
Mazda CX-9 Signature
Items needs:
1) 8MM Hex Bit
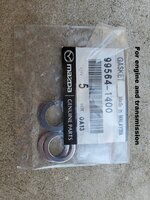
2) Drain plug gasket ( 9956-41-400)
2) 10MM socket
3) Phillips head screwdriver
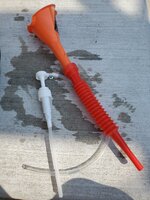
4) Loooong skinny funnel
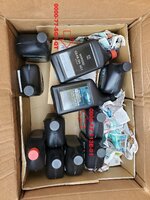
5) Atf Type-Fz - Mazda (0000-FZ-113E-01)
Approx 5-6qt per drain

I warm the vehicle to operating temperature to get the fluid circulated before draining for 2hr. Total capacity should be 8.5qt and I drained 5qt. This is highly YMMV. Please do take into account that fluid will expand with heat.

Before you start, you can consider the following:
The fill plug sits VERY VERY low so you have two options to fill:
A) To avoid removing the airbox, you can go under the car and use a fluid pump
B) Remove the airbox and get a loooooooooooong funnel. To get an idea of how long, you can refer to my picture. With the fully extended spout + the long funnel combo, the top of the funnel was at the level of the framerail.

Steps:
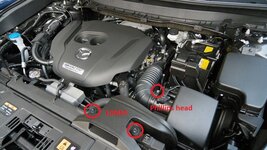
1) Unscrew hose clamp (see attached picture) and decouple the intake hose from air box
2) Remove 2 10MM bolt that hold the snorkel
Be mindful of the MAF sensor harness!!!
3) Pull the entire airbox/snorkel unit upward
You should have enough space to rotate the unit away. Tape the intake hose shut to prevent dust from entering.
4) Locate the fill hole, and remove a 10MM bolt holding down the plastic dipstick
The dry o-ring on the dipstick was stubborn, so I twisted the dipstick back and forth and used a tiny bit of force to pull it out. BE CAREFUL NOT TO KNOCK ANY DUST OR DEBRIS into the transmission fill hole.
5) Use 8MM hex bit to remove drain plug and replace washer
6) Let the fluid cool down to retract and measure
7) Use a loooong funnel to replenish the same amount that was drained out
 

Attachments

  • 20200820_102134.webp
    20200820_102134.webp
    215.6 KB · Views: 2,733
  • 20200821_094157.webp
    20200821_094157.webp
    468.7 KB · Views: 2,184
  • 20200821_095228.webp
    20200821_095228.webp
    402.5 KB · Views: 2,094
  • 20200821_095306.webp
    20200821_095306.webp
    156.1 KB · Views: 2,478
  • Remove Air Box.webp
    Remove Air Box.webp
    62.4 KB · Views: 5,306
Thanks for the write up, I hope you don't mind me adding some screen grabs to this instructional again. The more we have the better for those who will follow along.

I grabbed a screenshot of the dipstick location and drain bolt location:
Transmission dip stick.jpg

trans fluid drain bolt.jpg


Once replaced run the vehicle until the ATF fluid is 122' F (50'C). remove the dipstick with the engine idling on a flat surface and verify the level is within the range on the dipstick as shown below:
dipstick marker.jpg

Once in the marker range reinstall and tighten the bolt to 71-97 in/lbs (8-11Nm)
 
This is part 2 where I did another drain & fill along with filter change. Drain & fill you can refer to the first post. This post is for changing the filter. Please note I drained a total of 6qt after removing the filter.

Items needed:
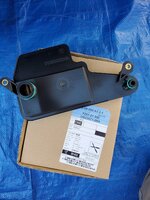
1) Strainer aka filter (FZ01-21-500)
2) 10MM socket
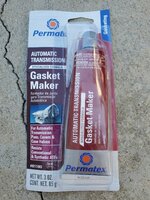
3) Mazda Silicone Gasket (TB1217E) or equivalent RTV Gasket Maker
4) Approx 6qt of ATF
5) New bolts for the pan (I was unable to find replacement and reuse the bolts)

Optional:
Oil Pan (FZ01-21-51XB)

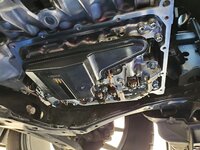
The pan was held on by a number of 10MM bolts. The bonding strength of OEM gasket was very strong and it took me a while to remove it. After the pan was off, I removed the two 10MM bolts holding the strainer in place. Be careful as there will be fluid trapped in the strainer. Thoroughly clean all the gasket off the mating surface. I used a razor blade, a boat load of brake cleaner, and a rag to get the gasket off. Proceed with extreme caution if you use a razor blade because a small nick CAN prevent a perfect seal and cause leak. Follow the instruction for the RTV and put the pan back on. Torque the bolts to approx 7lb/ft.

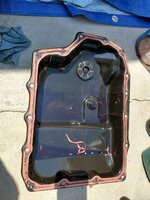
My 2cents... cleaning the gasket off the tranny case was straightforward and easy because it had a flat surface. However it was not the same for the pan. Pan had a tiny "step" to guide you where to lay the bead. You can refer to the picture and see I was able to lightly scrape the gasket off the "step" but not around it.
So if you ain't gonna starve to death over $30, get a new pan!! It was very time consuming and frustrating to clean the gasket off the pan. I emptied an entire bottle of brake cleaner which dissolved my pair of gloves and irritated my fingers. The amount of time + elbow grease made me regret not getting a new pan. Most importantly, if you nick the pan, you basically wasted all your time and effort.
 

Attachments

  • 20200824_175509.webp
    20200824_175509.webp
    376.3 KB · Views: 1,342
  • 20200825_101914.webp
    20200825_101914.webp
    216.2 KB · Views: 1,472
  • 20200825_114056.webp
    20200825_114056.webp
    252.8 KB · Views: 1,587
  • 20200825_114122.webp
    20200825_114122.webp
    179.2 KB · Views: 1,381
This is part 2 where I did another drain & fill along with filter change. Drain & fill you can refer to the first post. This post is for changing the filter. Please note I drained a total of 6qt after removing the filter.

Items needed:
1) Strainer aka filter (FZ01-21-500)
2) 10MM socket
3) Mazda Silicone Gasket (TB1217E) or equivalent RTV Gasket Maker
4) Approx 6qt of ATF
5) New bolts for the pan (I was unable to find replacement and reuse the bolts)

Optional:
Oil Pan (FZ01-21-51XB)

The pan was held on by a number of 10MM bolts. The bonding strength of OEM gasket was very strong and it took me a while to remove it. After the pan was off, I removed the two 10MM bolts holding the strainer in place. Be careful as there will be fluid trapped in the strainer. Thoroughly clean all the gasket off the mating surface. I used a razor blade, a boat load of brake cleaner, and a rag to get the gasket off. Proceed with extreme caution if you use a razor blade because a small nick CAN prevent a perfect seal and cause leak. Follow the instruction for the RTV and put the pan back on. Torque the bolts to approx 7lb/ft.

My 2cents... cleaning the gasket off the tranny case was straightforward and easy because it had a flat surface. However it was not the same for the pan. Pan had a tiny "step" to guide you where to lay the bead. You can refer to the picture and see I was able to lightly scrape the gasket off the "step" but not around it.
So if you ain't gonna starve to death over $30, get a new pan!! It was very time consuming and frustrating to clean the gasket off the pan. I emptied an entire bottle of brake cleaner which dissolved my pair of gloves and irritated my fingers. The amount of time + elbow grease made me regret not getting a new pan. Most importantly, if you nick the pan, you basically wasted all your time and effort.
Nice! I hope to get to this by the end of Sep. Would you recommend plastic scraper blades to no knick the mating surface? Or is a metal blade the real only way?
 
Just a reminder...always loosen the fill plug before you remove the drain plug. If you can't loosen the fill plug, don't let the oil out.

It's getting close to the time when I want to do these jobs. Mr. Wabbit, thanks for posting this. I'll also install a Magnefine or Filtran in-line transmission fluid filter in the line to the cooler while I'm under the car for this. Anyone know the hose I.D.?
 
Nice! I hope to get to this by the end of Sep. Would you recommend plastic scraper blades to no knick the mating surface? Or is a metal blade the real only way?
Honestly, I underestimated the the difficulty and didn't think I would need to resort to a razor blade. I would say a plastic blade would be beneficial for the tranny case but not the pan.

Just a reminder...always loosen the fill plug before you remove the drain plug. If you can't loosen the fill plug, don't let the oil out.

It's getting close to the time when I want to do these jobs. Mr. Wabbit, thanks for posting this. I'll also install a Magnefine or Filtran in-line transmission fluid filter in the line to the cooler while I'm under the car for this. Anyone know the hose I.D.?
Yes, I did loosen the dipstick in the fill hole before I drained the fluid. Sorry I didn't remove the lines so I have no clue.
 
Has anyone found a way to know the transmission temp. Basically to accurately read the trans dipstick?
 
Has anyone found a way to know the transmission temp. Basically to accurately read the trans dipstick?
Wouldn’t it have to be totally warmed up (looking at the coolant temp gauge and with the radiator fans rotated a few times at least) with engine on?
 
Wondering why this thread does not get more comments ? Maybe Silly Wabbit scared everyone off with the trans oil pan gasket lol
 
And the new color is red I assume lol so much for “lifetime” claims lol 😊
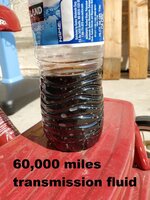
Sorry I never saw your reply, but it’s actually blue. I drained and filled three times within 5000 miles and it was always pretty dark. Idk that color is a good judge on this fluid. It didn’t at all smell burned though.
 
Sorry I never saw your reply, but it’s actually blue. I drained and filled three times within 5000 miles and it was always pretty dark. Idk that color is a good judge on this fluid. It didn’t at all smell burned though.

I see so the trans fluid is suppose to be blue. You said you drained and refill three times each at 5k mi so in other words you did that because you wanted to make sure you get rid most of the old fluid within 15k mi total?
 
I see so the trans fluid is suppose to be blue. You said you drained and refill three times each at 5k mi so in other words you did that because you wanted to make sure you get rid most of the old fluid within 15k mi total?
All three was within 5k miles, but yes. I was making the assumption it had never been done so just wanted to get out as much as possible. I did the rear diff and transfer case at the same time(just once of course) but it looked great.
 
7) Use a loooong funnel to replenish the same amount that was drained out
This would possibly cause inaccurate ATF level as many have found the factory has under-filled the ATF. Always use Mazda recommended procedure in post #3 to check the ATF level after the drain-and-fill or filter cartridge replacement.
 
⋯ I'll also install a Magnefine or Filtran in-line transmission fluid filter in the line to the cooler while I'm under the car for this. Anyone know the hose I.D.?
Can’t do that. Mazda SkyActiv-Drive automatic transmission has designed without sending ATF out to an external ATF cooler. Instead, it sends engine coolant to a piggy-backed ATF cooler to cool down the ATF. Two lines you see to the transmission have coolant inside, not the ATF.
 
This would possibly cause inaccurate ATF level as many have found the factory has under-filled the ATF. Always use Mazda recommended procedure in post #3 to check the ATF level after the drain-and-fill or filter cartridge replacement.
Edit
Just read that an OBDII might be needed to read the ATF temp at 122 deg F.
Edit
Or is driving it to warm up the coolant temp gauge on the instrument cluster like 30 mins drive is enough?
 
Last edited:
Edit
Just read that an OBDII might be needed to read the ATF temp at 122 deg F.
Edit
Or is driving it to warm up the coolant temp gauge on the instrument cluster like 30 mins drive is enough?
To get an accurate reading on ATF level, an OBDII reader is needed.

On Gen-1 CX-5 with blue cold coolant indicator light without coolant temperature gauge, some check the ATF level right after the blue indicator is off. As that indicates the coolant temperature has risen close to 122°F. And they assume the ATF temperature is also close to 122°F at least in the ATF cooler.

Driving 30 minutes definitely will make the ATF temperature too high for level measurement.
 
Last edited:
To get an accurate reading on ATF level, an OBDII reader is needed.

On Gen-1 CX-5 with blue cold coolant indicator light without coolant temperature gauge, some check the ATF level right after the blue indicator is off. As that indicates the coolant temperature has risen close to 122°F. And they assume the ATF temperature is also close to 122°F at least in the ATF cooler.

Driving 30 minutes definitely will make the ATF temperature too high for level measurement.
The light turns off at 131°F coolant temp. No idea what that relates to in the ATF or oil temps though.
 
Back