Signs of a Blown Head Gasket

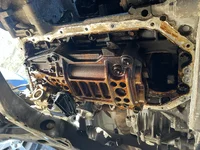
Worked like heck today to get the timing cover on before the weather gets bitter cold later this week. Do yourselves a favor folks and follow the instructions in order. I got a little ahead of myself and had to re-do the timing chain three times! Here's the order:

1. line up the sprockets
2. put the chain on, it's going to hang off the crank sprocket, I used a zip-tie just above the sprocket to keep everything in place.
3. Install the guide on the right side, the straight-ish one.
4. Install the left, curved guide
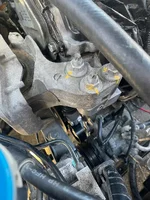
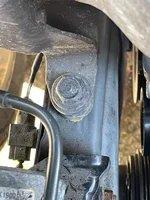
5. Install the plunger, tensioner
6. Pull the pin on the tensioner

Hope this helps someone in the future.
 
I paid about $750 to have 2 Ford heads (2 valve per cylinder) cleaned, valve job and surfaced, so $530 is right in line with that since you have same total number of valves and arguably a bit more complicated head design.
 
Thank you so much for the pictures and status updates. Reading this whole thread is making me feel completely lazy putting off a transmission fluid and filter change on the truck.
 
Well you can be SUPER lazy like me and never change the transmission fluid! lol. 316K miles on this CX-5 and never had a fluid change. Yes, I'm knocking on all of the wood in my house!
Ha! So there all you "change trans fluid every 30k miles" folks. Look! 316k on factory fill 😮 and hasn't blown up haha.
 
Ha! So there all you "change trans fluid every 30k miles" folks. Look! 316k on factory fill 😮 and hasn't blown up haha.
Well to be 100% honest, we bought the car used at 22K miles but yeah, I'm pretty sure it's still the factory fill. I know I've never changed it. And my wife is a tough driver. She does not baby anything! As far as I can tell it is still working perfectly! Getting around 30 mpg , and is still snappy.
 
It's been too darn cold to work outside this week! Got a little done last night. Installed a new belt tensioner, water pump pully and the the crank pulley. There was no way I was going to be able to get a torque wrench on that water pump pulley, so I just used the old elbow torque setting. Last thing was re-installing the engine mount so I can work on the oil pan today.

I will just make a note for anyone else working on the engine mount, I did review the instructions before removal, but I don't think the diagrams were that clear. They are VERY adamant that the mount is precisely positioned and it MUST go back exactly to the previous spot or else the engine is going to vibrate and cause havoc! So I used a paint marker and marked where the mounting nuts were positioned on the mount. This ended up being helpful for re-torqueing the nuts, but not what they wanted. You are supposed to mark around the base of the mounting legs on the frame so the legs go back into their original spot. Luckily for me with 300K miles of dirt on the frame I was able to see and then mark the outline of the mount legs with it removed. But word to the wise, do this before removal!
 

Attachments

  • IMG_4182.webp
    IMG_4182.webp
    242 KB · Views: 19
  • IMG_4183.webp
    IMG_4183.webp
    182.8 KB · Views: 21
Well done. I thought we had to pull the engine to get the timing cover off! I've been thinking how to get the car high enough to get the engine and transaxle out.

I always wet down all the cylinders with WD40 to prevent cylinders rusting after removing a head.

I may have tried one of the head gasket, cracked head sealant first. We treated a Subaru cracked block with this way and it held.

I'd take the head to a head rebuilder and see if they have an exchange program for a rebuilt and tested head. Folks do this with domestic V8s.

For +300k miles.it looks very good!

I'm equally impressed your trans has lasted this long as well without being serviced!!

If you are successful fixing the engine, maybe service the trans too.

Good luck!!
 
Ha! So there all you "change trans fluid every 30k miles" folks. Look! 316k on factory fill 😮 and hasn't blown up haha.
Just a comment here, and I see it all the time. High mileage transmissions with no maintenance, but you have to ask what kind of miles were they? Highway or city? There's an obvious difference with more shifting and internal movement in city driving, more chance for wear and I see the OP said driving was 90% highway give or take. Not trying to be disingenuous, just making a comment. Nice write up by the way. Appreciate the pics
 
It's a question I always ask when I see any brand out there with those miles with no trans maintenance. Highway or city?
 
I'll do the 30k ATF and gear box fluid change. Coolant and brake fluid will be changed on another schedule. Spark plugs, oil and filts too.

Diesel guys seem to be in two camps, run until it quits or keep up with it. The lowest cost of ownership is to keep up with scheduled maintenance.

One can roll the dice and see. My stuff seems to break when funds are low, I need the vehicle or I'm out town. Id rather pay as I go rather then wake up and my FILL IN THE BLANK has quit. Then have a big repair, down time or scrapping the car, take a big lose and get back onto debt. I like not having truck and car payments...
 
Thanks for the replies. Today's tasks while the sun was out was dropping, cleaning and reinstalling the oil pan. Happy to report no chunks or glitter in the oil pan. Also nothing in the the pick-up screen. Everything got a good cleaning and a re-install. This evening I got the oil shower pipes, OCV and valve cover installed. Small incremental progress! I'm off until after the new year, so I'm hopping to get it buttoned up and started up here in the coming week. Fingers crossed that I don't have fluids leaking everywhere!

Oh, and yes the transmission miles were 90% highway, and knowing my lead footed wife, probably all over 75 mph. So no, not a lot of shifting I would guess. I don't plan to service the transmission anytime soon. Maybe when the weather gets warmer, if the engine repairs I made are holding up.

For today's enjoyment, a look at the bottom end without the pan on.
 

Attachments

  • IMG_4184.webp
    IMG_4184.webp
    263.3 KB · Views: 29
Thanks for the replies. Today's tasks while the sun was out was dropping, cleaning and reinstalling the oil pan. Happy to report no chunks or glitter in the oil pan. Also nothing in the the pick-up screen. Everything got a good cleaning and a re-install. This evening I got the oil shower pipes, OCV and valve cover installed. Small incremental progress! I'm off until after the new year, so I'm hopping to get it buttoned up and started up here in the coming week. Fingers crossed that I don't have fluids leaking everywhere!

Oh, and yes the transmission miles were 90% highway, and knowing my lead footed wife, probably all over 75 mph. So no, not a lot of shifting I would guess. I don't plan to service the transmission anytime soon. Maybe when the weather gets warmer, if the engine repairs I made are holding up.

For today's enjoyment, a look at the bottom end without the pan on.
Excellent work! You are making great progress! I'm inspired to take on replacing a head or head gasket down the road!

X2 on trans service. I hope you post up pics of what's in the pan and how it shifts with fresh atf and filter.
 
Man this is such a good read. I do love how detail you are and photos. I'll probably order all the parts and take a week off to do this. Great project to do one day. Thanks man
 
Sorry, no pictures today, but I got a lot of progress done. Re-installed the Exhaust manifold, the bracket above the water pump, and alternator. I was dreading doing the exhaust manifold having to hang over the engine, crawl under and all around wasn't fun, but it wasn't all that bad. Down at the union where the manifold connects to the rest of the exhaust I ended up using standard exhaust bolts rather than the studs that are stock. but I did double-nut them on the back to add a little extra peace of mind. The only real issue I had today was installing the new belt tensioner. Try as I might, I could NOT get it to compress. The manual says to compress the tensioner three times to bleed any air out of it, but it was so rock hard my wrenches were just chewing up the hex adapter. I ended up taking it back off, disassembling the tensioner, and compressing the little shock in my bench vise a few times. Even that wasn't easy. Not sure why this thing is so stiff. Might try getting another one. Not sure I can compress this one enough to get the belt installed!

Things left to do:
1. Install high pressure fuel pump
2. re-install hoses and belt
3. install injectors and fuel rail
4. reconnect all of the wire harness and connectors
5. Install Intake
6. Install throttle body
7. Install battery box
8. Install air duct and air box.
9. Install battery and coils
10. Add oil and coolant
11. Start her up and see what happens!
12. Fix all of the leaks
13. Reinstall the cowl and under engine panels

Crap, I thought that list would be smaller... ugh.
 
⋯ This evening I got the oil shower pipes, OCV and valve cover installed.
OCV is prone to leak. Hope you’d installed a new one before you installed the valve cover.


⋯ The only real issue I had today was installing the new belt tensioner. Try as I might, I could NOT get it to compress.
The belt tensioner is also prone to leak. Looks like you do have a new one. Although INA makes the belt tensioner for Mazda, but based on the discussion between @Digbicks1234 and @PatrickGSR94, we can see there’re some differences between the aftermarket INA tensioner and Mazda OEM tensioner:

2013~2016 Belt Tensioner - Shouldn't this be a warranty item?

And if you read further down on that thread, you’ll see @Digbicks1234‘s second aftermarket INA tensioner may have cut into the serpentine belt:

Mileage: 76,785

Decided to randomly check on the serpentine belt and tensioner. Not looking good, there's actually a nice slice right in the middle.

You may try an OEM belt tensioner but it’s quite expensive. And the OEM water pump stretch belt if you need one will be much easier to install as it has correct size than any other aftermarket scratch belt.


Nice write-up! I couldn’t resist to read it from the post one till the last!

Unfortunately not too many car owners will tackle the task you are doing by themselves nowadays.
 
Thanks for the comments. Yes! I did install a new seal in the valve cover for the OCV valve. The old one was leaking before the teardown so I made sure to get a replacement before I re-assembled every thing. One note on that topic, I initially ordered a replacement OCV gasket by Mahle through RockAuto. But the base of it was too big to fit in my valve cover. If I remember right, my original was about 40 mm and the replacement was like 45mm? I ended up finding one on amazon that actually had the base dimension listed. Not sure if this is a 2.5L thing or not, but something for folks to watch out for.

Also, for the belt tensioner, you're right the replacements from Mazda are pretty darn expensive. I'm going to try the aftermarket one I got again. I think it is a "SKP" brand. But if I don't feel good about it, the original is going back on. It still feels fine. The idler pulley is still smooth with no play in it.

Today I got quite a bit done. I installed the "rear housing", then the vacuum pump, high pressure fuel pump, injectors, fuel rail, intake, plugs and coils. Oh, and all of the hoses. Feeling like I'm getting close now. My to-do list is down to:
1. Install belt tensioner and belts
2. Airbox
3. Battery
4. Add fluids
5. Start and check for leaks
6. Burp the coolant
7. Put the shields back on if everything looks ok.

Fingers crossed I'll get her started tomorrow!
 
Thanks for the comments. Yes! I did install a new seal in the valve cover for the OCV valve. The old one was leaking before the teardown so I made sure to get a replacement before I re-assembled every thing.
Actually the leak around the OCV is a known issue and it’s actually coming from the VVT solenoid / oil control valve (OCV), part no. PE01-14-420A, itself, not caused by rubber seal / grommet for the OCV. This has been discussed many times in this forum.

Oil patches on Engine cover - 2022 CX-5

2014 CX5 Tune-Up items to replace?

Honestly changing the rubber seal / grommet for OCV, or changing the valve cover gasket won’t fix the problem.

Also noticed this OEM VVT solenoid / OCV PE01-14-420A used to be $110 ~ $160, now it costs at least $230 with the $395.71 MSRP!!!
 

New Threads and Articles

Back