
You are using an out of date browser. It may not display this or other websites correctly.
You should upgrade or use an alternative browser.
You should upgrade or use an alternative browser.
What have you done to your P5 today?
- Thread starter Tg5
- Start date
- :
- -- 23 CX-5 --
Mine had one of the plastic corners break and the 2 spring loaded ends of cable housing near motor that clip into a bracket were ripped out. I have the nasty plastic laying sticky side up in my cargo area and the door panel leaning up in rear seat. Propped the window shut with a plastic container, a rolled up glove stuffed between it and a piece of a 2x4 wedged between glove and bottom of glass inside the door.If you can't get a hold of a regulator soon, Looking at the pics on rock auto it is similar to one I had fail on a car when I was younger and wayy more broke lol. I took the track the window rides on the regulator and bent it with the window all the way up so that the holder couldn't come down. Mine didn't fall down like that though, the cable got bound up in the drum near the motor and it broke the drum, letting the window come down about an inch. that held for a few months for a replacement but I would say it could be a permanent fix.
You are doing better than my co worker though, last week he had his left window shatter in the semi when he lowered it. 98f without the heat index with four hours to ride home.

There are some that have wheels where wire makes corners into the regulator track and then some that have the stationary wire guides like oem. Both types of corners are plastic. Initially thought maybe the wheels at the corners might be a better thing but most likely will just go oem and wind the cable ends to my existing motor. Most of the cheapy ones come with a motor but only 1 yr warranty.....oem setup made it 20 yrs so that is probably best bet. Not like the car sees much action anyway so we'll see.
Last edited:
The bolt does line up pretty good with the weight of the car pushing down on the control arm, but it twists out of alignment when it is dangling in the air.
That's why @Diamond_Dave and I had to lift up at the hub assembly with a floor jack.
Good callout. When you unpackage the new control arms, you'll see the angle of that bushing.
FWIW, some non-intuitive, but extremely helpful tips on the lower control arm job:
As with many front suspension maintenance jobs, having the wheels at matching height/droop can help - so I used a Gorilla ramp on the opposing side to help even the suspension out.
Removal is pretty simple - just loosen and remove all of the bolts. For the Hub/Ball Joint, it's helpful to have a drift or pry bar or cold chisel to pry the hub off.
The inner bracket that secures the bushing side uses (3) different length bolts to attach it so pay attention as you remove them.
For Installation, the order of attachment is: (1) Ball joint (2) outer bushing (3) Install inner bushing bracket (4) start lifting hub / compressing strut (5) - (10) fiddle fart with trying to blindly thread the bushing bolt into the hidden captive body nut. This just takes patience and helps using a medium prybar to massage and move the control arm until you can thread the bolt.
Using https://www.amazon.com (commissions earned) on your floor jack, in general, is a great upgrade, but for lifting the suspension, using one of these types of pucks can help stabilize the pressure of the hub/brake disc so that it doesn't walk out on you under pressure.
If I were to do this job again (on my P5), I'd probably replace the sway bar endlinks and get the rotors re-surfaced and replace brake pads at this time as well.
I came across the very good video below that, along with the advice I've received on this forum, will help me get this knocked out soon. I just need a day below 100 degrees here in TX.
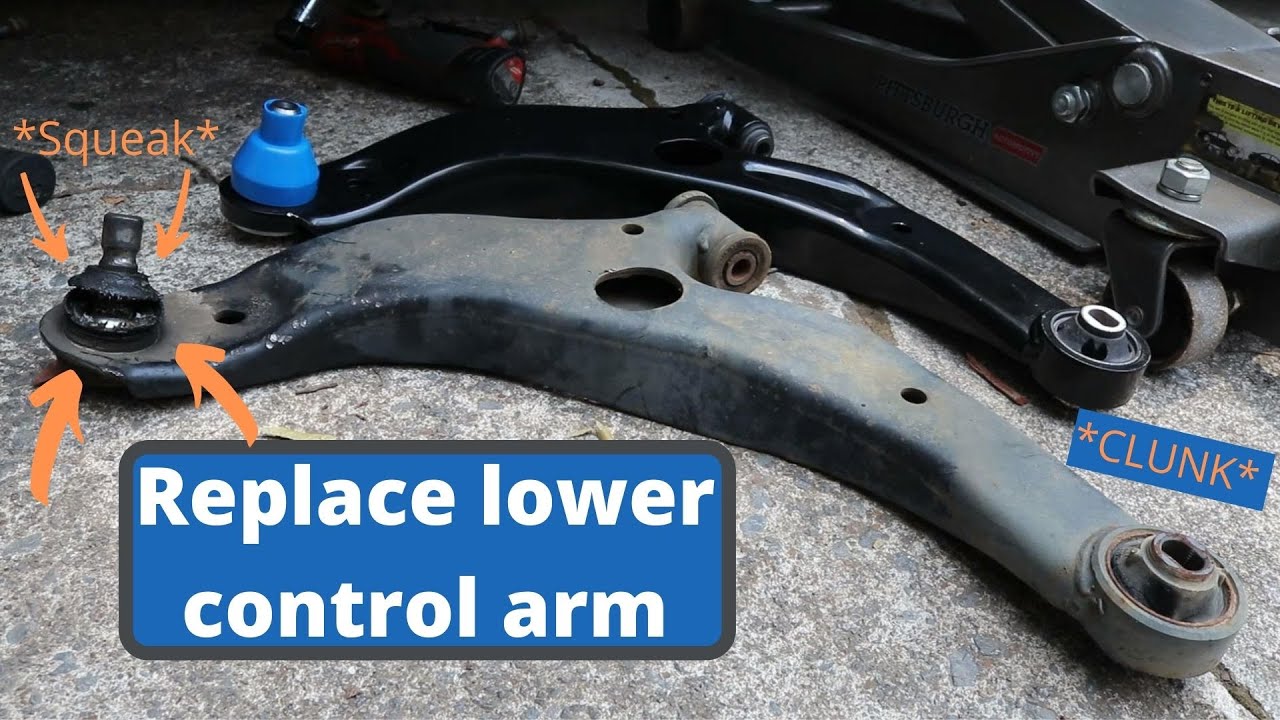
How to replace a lower control arm
In this video i show you how to replace a lower control arm also known as a lower A frame on a 2003 Mazda Protege. This job can pretty much be applied to any...www.youtube.com
Watching that video, I have two comments - 1) I can't see a valid reason to remove the caliper from the hub. I didn't do it on mine and it doesn't allow you any more room to work. 2) His inner bushing bolt was WAAYAYAYYAYAYY too easy to install. If yours is that easy, then congrats. Otherwise, I'm not sure what was different about his procedure.
,.. For the Hub/Ball Joint, it's helpful to have a drift or pry bar or cold chisel to pry the hub off.
Keep in mind that the pinch bolt needs to be completely removed.
The bolt fits into a notch in the ball joint stem.
I hammered a chisel in the crack to open it up a bit to release the ball joint stem. (after the bolt was out.)
,..For Installation, the order of attachment is: (1) Ball joint (2) outer bushing (3) Install inner bushing bracket (4) start lifting hub / compressing strut (5) - (10) fiddle fart with trying to blindly thread the bushing bolt into the hidden captive body nut.
@Diamond_Dave That's what I did too.
That's what the service manual says. (they don't mention steps (5) - (10) though. Lol)
I remember backing off the 3 bracket bolts to give me a little more wobble room on the bracket, but I noticed that the guy in the video installed the bushing bolt before installing the bracket.
Maybe that's the trick that you and I didn't think of ??
(I still think you would have to lift the knuckle though because now the bracket holes will be out of alignment.? But at least you can see them.)
Last edited:
katapaltes
'03 P5, '17 Miata, stock AF
- :
- Dallas, TX
- :
- 2003 Protege5
I replaced the driver's side LCA in 108-degree (that's 42 C for folks with more sane units of measurement). Heat index was 114 and I had limited shade. That was a huge mistake, but I took breaks and drank six bottles of water. My shirt became so heavy with sweat that it was like some kind of weighted workout jacket. Oh, and to top it off, we had a brief downpour in that 108 degrees while still in full sun. It was surreal. By the time I went back out it was a literal wet sauna. Man, everything hurts today and I had all kinds of crazy dreams waking me up last night so I didn't get a good night's sleep. Don't do this. Don't be me.Watching that video, I have two comments - 1) I can't see a valid reason to remove the caliper from the hub. I didn't do it on mine and it doesn't allow you any more room to work. 2) His inner bushing bolt was WAAYAYAYYAYAYY too easy to install. If yours is that easy, then congrats. Otherwise, I'm not sure what was different about his procedure.
The key to successful installation *for me* was jacking up that knuckle to get the LCA completely horizontal. That allowed me to start the front bushing and the rear bracket+bolts with ease. DD, I've checked my other, new LCA and the original, removed LCA and the bolt hole on that rear bushing (or whatever it is) is boringly perpendicular to the rest of the part. So I'm not surprised that it was easy to install in my case. Now, I don't have OEM replacement parts, but some (NOS?) Beck Arnley ones, and they may be different from other brands.
My biggest problem with elevating that knuckle (which was a *requirement* for me) was that the floor jack was occupying the space where the ball joint needed to be when I'd swing the LCA up to get it horizontal. I tried turning the wheel all the way to the left or right to try and make some space, but in one of those directions, the end link contacted another piece of the suspension when I elevated the knuckle so that was a no-go.
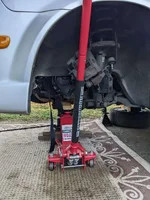
 I ended up returning the steering wheel to center and went another route: Moving the knuckle fore and aft. In the end, I moved the knuckle forward a little farther than I wanted to as shown below. Hopefully I didn't hurt anything. After hours in the sun and an immobilized vehicle in my apartment parking lot, I honestly didn't care as long as I could get it moving to take it to a shop if needed. The other challenge was my not wanting to remove the cap from the ball joint boot until the very last minute. There are a lot of sharp parts down there including the knife-like disc brake shield, and I didn't want to destroy the ball joint boot.
DD, this is where I would say that removing the brake assembly, hub, and shield might help. If it allows more jacking options or keeps that ball joint boot safe it is well worth the additional minutes and bungee cord required. I will definitely do that for the other side. Also, if you're filming it like the guy in the video, it's a lot better for the viewer.
") Speaking of the video, I think the guy got the torque for the pinch bolt wrong (too high), and I can see from the service manual how he could have done that. I'll confirm that and if so, drop him a note in his Comment section.
Speaking of the video, I think the guy got the torque for the pinch bolt wrong (too high), and I can see from the service manual how he could have done that. I'll confirm that and if so, drop him a note in his Comment section.Pics:
Found out what was making the noise after I removed my wheel
 (yes, it was there, but it wasn't making the noises):
Knuckle shoved to the front of the car while jacked, hopefully not too far:
Knuckle elevated with plastic ball joint cover installed till the bitter end:
Captured the order of the three different bolts for that rear bracket (actual LCA bolt would go in the empty space among them):
I finally watched the entire video and realized that @katapaltes and the guy in the video connected the ball joint last.
Both @Diamond_Dave and I hooked up the ball joint first and that's why we had to jack up the knuckle.
@Diamond_Dave mentioned that he sees no need to remove the caliper.
I figure the guy in the video removed the caliper to allow for clearance of the LCA to push up until it's horizontal, without hitting anything.
I'd suggest that you remove the caliper on the other side and do it like the guy in the video.
Last edited:
- :
- -- 23 CX-5 --
Got the new oem window regulator and added my original oem motor to it. Ready to go back in the door but 115 in the garage has lowered the priority of reinstalling it at the moment.

Last edited:
BenjiHoggi
OEM+
- :
- Oregon, USA
- :
- 22v Protege5
Finally got some time to do a bunch of maintenance. Just finished pulling the transmission today to replace the clutch and flywheel. By far the most work I've done on a vehicle. Not going to get into fine details of the process but so far it has been a lot of removing parts to get to things, and the only real hard part was getting the actual transmission out. Kind of shocked it went so smoothly. Oh...except for the starter bolt that came out completely destroyed. Gonna have to figure that one out.
The parts list is long and exciting. I've been collecting things for a while. I will list everything when it is actually done.
And just a few quick questions in case anybody knows off the top of their heads...
1. Is there a special type of grease for the bearings/shift fork stuff in the transmission?
2. Does the oil need to be drained to do the rear main seal?
I searched a bit and couldn't find much, but I'll keep looking as well.
Stopped right after getting the trans off...very interested to see what the clutch and (horribly warped) flywheel look like tomorrow.
Attachments
BenjiHoggi
OEM+
- :
- Oregon, USA
- :
- 22v Protege5
Oh also went to the junkyard today and snagged some extremely rare roof rack delete caps (YAYYYYYY) that weren't totally destroyed. The two front ones came right off but one in the rear snapped in half and the other was gone. Nonetheless, I will glue the broken one back together and swap it for my terrible condition current ones. Still hoping to 3D model and print some prototypes at some point.
Also got a parking brake cable to fix my seized one and an HVAC fan switch to play with. Because it turns out I didn't really fix my AC after all
Also got a parking brake cable to fix my seized one and an HVAC fan switch to play with. Because it turns out I didn't really fix my AC after all
,.. and an HVAC fan switch to play with. Because it turns out I didn't really fix my AC after all
You could install 4 relays and hook them up to your fan switch.
That's what I did and haven't had a problem for almost 10 years now.
I found this diagram I made showing how to wire up the relays.


I used really thick wire soldered directly to the terminals of the relays to help keep the resistance down and not upset the sense circuit.
You can also buy relays with the connector to make things a bit easier to fabricate, but I wanted to keep my resistance as low as possible.
I used heavy duty 30 amp relays.

I remember splicing into a pink wire to feed +12V to the relays.

I used really thick wire soldered directly to the terminals of the relays to help keep the resistance down and not upset the sense circuit.
You can also buy relays with the connector to make things a bit easier to fabricate, but I wanted to keep my resistance as low as possible.
I used heavy duty 30 amp relays.
I remember splicing into a pink wire to feed +12V to the relays.
did you really wire that up with that rats nest of wires? I hope you have wrapped them all up in loom, otherwise you have a fire waiting to happenYou could install 4 relays and hook them up to your fan switch.
That's what I did and haven't had a problem for almost 10 years now.
View attachment 311523
did you really wire that up with that rats nest of wires? I hope you have wrapped them all up in loom, otherwise you have a fire waiting to happen.
Yeah, I did just stuff that whole rats nest in there. Lol
(I did wrap the relays with electrical tape though.)
It's not too dangerous because if any wires short to ground the fan just starts blowing with the fan switch turned off.
It's not a dead short.
If a fan speed wire shorts to another fan speed wire, then you don't get all four fan speeds.
The pink B+ wire powering the relays is fused in case that wire shorts to ground.
So if my fan ever starts blowing with the switch turned off, then I know that I have to look into it.
It's been fine for almost 10 years.
The fat black wire on the fan switch connector is ground.
B+ comes from the battery, through the heater fuse, then the blower relay, then the blower motor, then the resistor pack, then to the fan switch where it waits to get grounded to the black wire.
Last edited:
BenjiHoggi
OEM+
- :
- Oregon, USA
- :
- 22v Protege5

And just a few quick questions in case anybody knows off the top of their heads...
1. Is there a special type of grease for the bearings/shift fork stuff in the transmission?
I found this,..
- :
- -- 23 CX-5 --
Put my window regulator into the door and put door all back together.
Finally got some time to do a bunch of maintenance. Just finished pulling the transmission today to replace the clutch and flywheel.
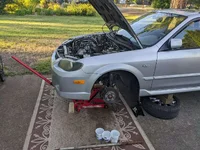
Dude, your tie rod end boot looks like it's shot.
If the boot is shot, it's likely that your tie rod end is too.
You should think about replacing both ends while your at it.
You will likely need an alignment after or you could do your alignment yourself.
(Or at least get it close enough to drive it to the shop for an alignment.)
BenjiHoggi
OEM+
- :
- Oregon, USA
- :
- 22v Protege5
Good eyeDude, your tie rod end boot looks like it's shot.
If the boot is shot, it's likely that your tie rod end is too.
You should think about replacing both ends while your at it.

Bet you can't guess what's in a box in the back of the car...couldn't possibly be some new tie rod ends. Not at all.
Haha yes, one step ahead of you there, already planning to get that done. I'm replacing LCAs, swaybar bushings, tie rod ends, and I was going to replace end links but I think they are still okay. So I will definitely be getting an alignment.You will likely need an alignment after
All jokes aside, you seem to have a good eye for that. I was wondering how much butchery people would notice in my pics. Also the harbor freight advertising...I'm too cheap.
At the moment my primary struggle is getting a new rear main seal locally (I forgot to order one) and trying to fix the mess with the stripped bolt in my starter. About to install an insert with the kit I just bought. Expensive but better than the cost of the new starter.
The car is in so many pieces right now. Hopefully will start putting things back together tonight so I can drive her again.
I discovered yesterday that the clutch had been replaced and it had loads of life left, but the flywheel was OEM and original (thus explains the warping). The throwout bearing and thrust bearing (I think it's called?) are also shot and very gritty sounding. The old clutch is labeled DK and looks very different than the Exedy clutch I am putting in along with a new flywheel.
Side by side comparison:
New Posts and Comments


- Replies
- 8
- Views
- 259
- Replies
- 0
- Views
- 32