
You are using an out of date browser. It may not display this or other websites correctly.
You should upgrade or use an alternative browser.
You should upgrade or use an alternative browser.
Lighter = Faster (RX-7 Build #2)
- Thread starter magnumP5
- Start date
I was planning on adding that back in (I had removed it from the red car). Would blasting ambient air (no heat or A/C, remember) keep the windows clear? I need to look at the back of the dash again to see how much can be removed in that case.Jon
Keep the defrost part of the ducting and the fan to keep you windshield clear ordrive around with a towel on a stick to keep it clear your choice.
In all likelihood this car won't ever get driven in freezing weather. The worst will be interior fogging due to cooler outside temperatures in the morning or at night. Even then I'm not sure blasting ambient air will help.I would second the defrost part, no fun not being able to see out front...been there, had to drive with my head out the window in below freezing weather
What's the goal for this car, anyway? I checked the first post for this thread and the previous red version and didn't really see it.
Is it a track car? Will is still be street legal with plates?
It's not built to any specific SCCA or NASA classes but that won't prevent me from taking it to track or autocross events. I'll drive it to shows, meets, and get-togethers so it's not a "track car" or a "show car." It won't be street legal by the definition of the law but I won't have a problem registering it here. However, it won't be a daily driver nor likely ever (intentionally) see rain or snow so it isn't a "daily driver." I guess that makes it a "fun car that serves no purpose." Whatever you want to call it I do know one thing for sure; my wife calls it a waste of time and money.
I'm gonna keep the vents and stuff for now. I looked into windshield defrosters but I don't wanna deal with that.
This is too much text. I need to get back to work and take some pictures.
I was about to say, I'd keep the blowers and vents. Even without air conditioning, its nice to have air circulating. I even used the defroster this morning with how cool it was out, the dew was giving me problems for the first 5 minutes of my commute.
I was about to say, I'd keep the blowers and vents. Even without air conditioning, its nice to have air circulating. I even used the defroster this morning with how cool it was out, the dew was giving me problems for the first 5 minutes of my commute.
That was the original thought. Then the thought of having easier access/space to work under the dash made the idea of removing everything appealing.
Any concerns I had regarding the weight of the rear hatch were abated last night. I installed the shocks so I didn't have to use a prop anymore. Not paying attention while unlocking the hatch could result in a nasty blow to the chin if I'm not paying attention...
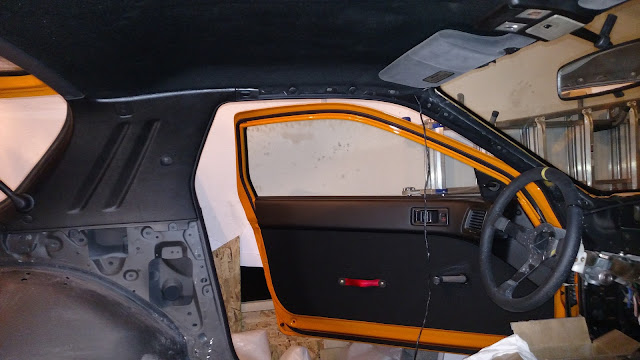
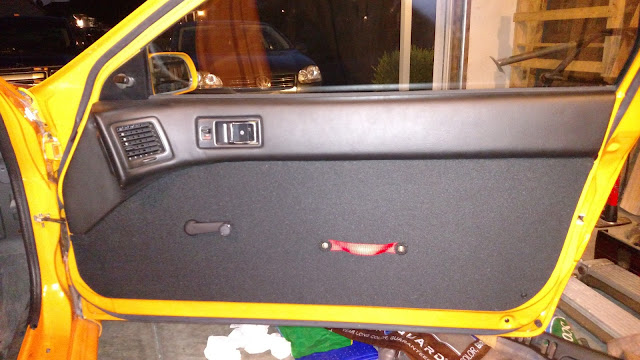
Did some stuff. The doors are back together and the headliner is in. I really like how the doors turned out. I might need to dye the faded sun visors.
Sold my last set of stock wheels so the car will be in "hovercraft" mode until it's time to set it down for the last time. I threw one of the wheels on to check fitment. It looks like it'll clear just fine but front camber is like -3.x degrees at this point. I spent a lot of time on Saturday hacking up the stock fender liners to work with the ~1 in. wider fenders.
That's is how the car looked when I stopped last night.
Last edited:
The car is looking better all the time! What did you make the door cards out of?
The panel is 1/16" ABS from McMaster and I covered it with some knock-off "racing seat fabric" purchased from eBay.
Despite the lack of updates I have been working on this. There's just nothing to photograph. All the exterior lights have been polished up and reinstalled. There may be a small clearance issue between the hood and passenger's side headlight. I pulled the front subframe and suspension to clean and then reinstalled everything at the proper torques. I spent Labor Day weekend working on the front, rear, and dash wiring harnesses and got them about 90% done. Still need to add the digital display wiring to the dash harness and make up a sub-harness for the reverse switch and oxygen sensors, which requires everything being in the car.
Heat insulation - thoughts? Underside is bedliner'd so I don't think anything will "stick" not that the exhaust manifold leaves much room anyway. The exhaust manifold is ceramic coated but I'm thinking something is still needed near it and around the transmission. Looking at interior insulation. I looked at Koolmat but it's expensive at $14/sq. ft. Some people have used "aluminum-covered bubblewrap" insulation from Lowe's/Home Depot. Others use stuff like Dynamat, etc. but I don't care about sound insulation.
Here's a quick update with no pictures since I've been doing all my work at night. The exterior is basically completely back together. I just need to finish the front splash guards and fender liners. The suspension and brakes are all back on and fasteners torqued to their proper values. The immediate next step is to reinstall the brake booster and master cylinder, add new fluid, and bleed the system. After that all car work will be put on hold because we're in the preliminary stages of moving from Ohio to Richmond, VA.
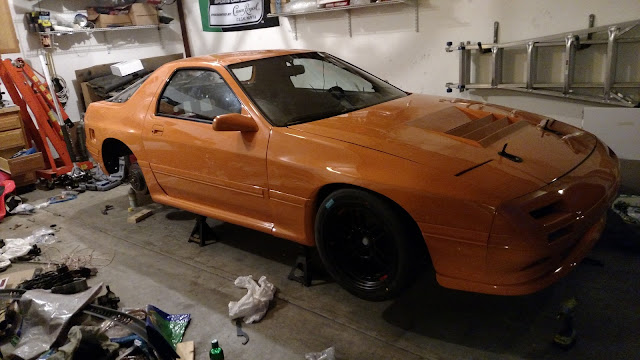
I'll try to take a picture of the car this weekend because it looks pretty bad-ass with the orange body, black wheels, and red brake calipers.
I'll try to take a picture of the car this weekend because it looks pretty bad-ass with the orange body, black wheels, and red brake calipers.
Hey, two months since the last update.
Brakes are done on back on the car. I'm a bit disappointed because the parking brake on the right rear caliper doesn't work. Not a major issue but something I'll have to address in the future.
I picked up a Wedge Engineering bracket to mount the driver's seat. Despite being a sunroof-less car it still looks like I'm going to have some helmet-to-headliner clearance issues. I'm going to play with the bracket to see how low I can get everything. Maybe I just need a smaller helmet...
The big news is I'm still in Ohio for now. I've made the decision to build the engine in order to reduce the number of loose parts that need to be moved. Building the engine seems surprisingly easy. So far the most time-consuming aspect is setting the proper side seal clearance. I've completed one rotor and should finish the other tonight. One of the first seals I did may have a little excess clearance but hopefully that won't be too much of an issue. I'll do a quick compression test once the engine is together to confirm. Phone was dead so no pictures of the finished rotor. Who wants to see pictures of a greasy/oily rotor anyway...
Who wants to see pictures of a greasy/oily rotor anyway...
This guy.
Good to read some progress.
Just for you, Nate:
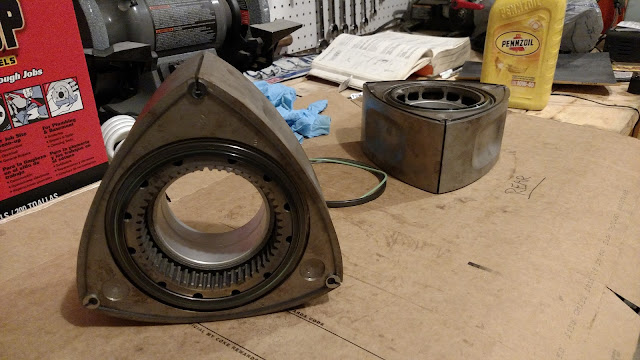
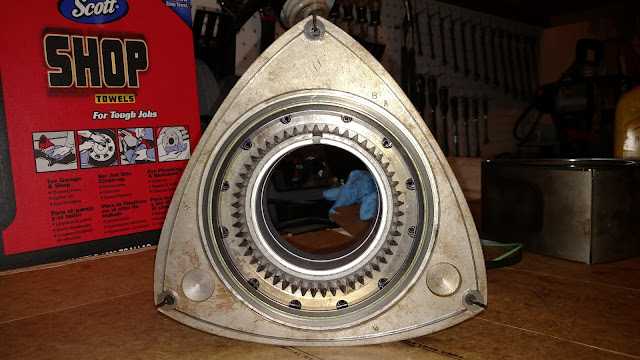
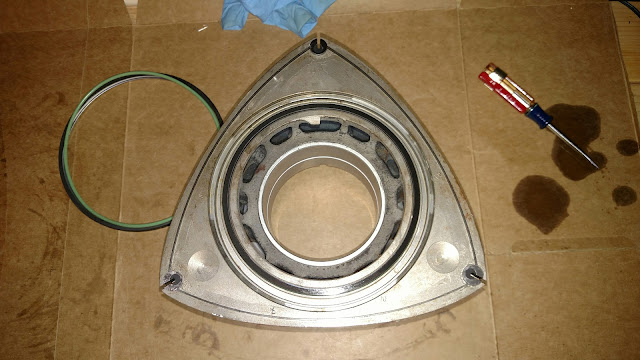
Why is the second rotor not complete, you ask? Well, this is why:
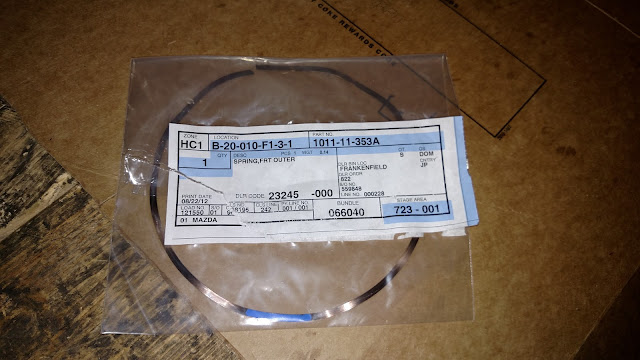
Don't get it? There are four oil control seals per rotor: two on the front side and two on the back side. Beneath each of these is a spring and the springs are specific to the front and back. Mazda puts a color-coded paint mark on the springs to indicate the side: white for the front and blue for the rear. In the picture above the bag clearly reads "SPRING,FRT OUTER" yet the spring itself has a blue mark. Unless Mazda changed something I got the wrong and failed to notice when I received everything two years ago. Oh well, another is on order and will be here Sunday. Fortunately I assembled the front rotor first so I can build half the engine until then.
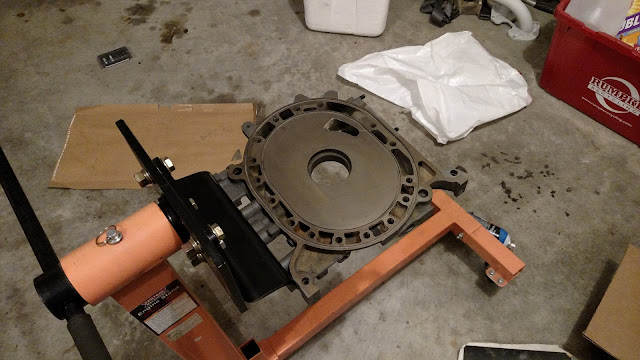
Since I was stuck there I got the engine stand re-assembled and mounted the front iron.
About all I can do at this point is install the front stationary gear because I'm waiting for my Hylomar to be delivered tomorrow since no one locally carries it.
Why is the second rotor not complete, you ask? Well, this is why:
Don't get it? There are four oil control seals per rotor: two on the front side and two on the back side. Beneath each of these is a spring and the springs are specific to the front and back. Mazda puts a color-coded paint mark on the springs to indicate the side: white for the front and blue for the rear. In the picture above the bag clearly reads "SPRING,FRT OUTER" yet the spring itself has a blue mark. Unless Mazda changed something I got the wrong and failed to notice when I received everything two years ago. Oh well, another is on order and will be here Sunday. Fortunately I assembled the front rotor first so I can build half the engine until then.
Since I was stuck there I got the engine stand re-assembled and mounted the front iron.
About all I can do at this point is install the front stationary gear because I'm waiting for my Hylomar to be delivered tomorrow since no one locally carries it.
I'm going to say about about 40% into the engine build at this point:
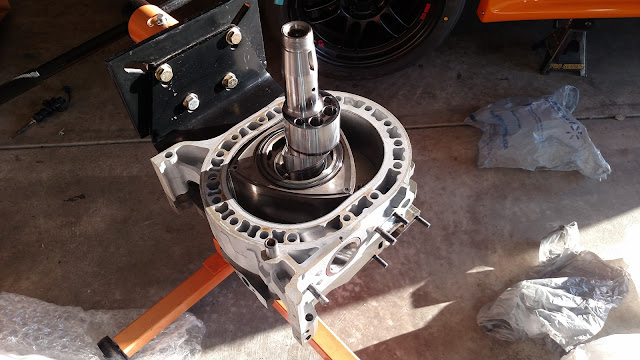
Unfortunately the front outer oil control spring for the rear rotor won't be delivered until today so I only could assemble the engine to the center iron. The plan is to get the rear rotor housing, rotor, and iron installed and the tension bolts torqued down tonight. I'll get the short block finished up tomorrow night so perhaps I'll have the engine and transmission back in the car Wednesday or Thursday night.
Since I couldn't do anything with the engine on Sunday I got the front fender-liners and brake cooling ducts installed and I mounted the front left wheel and tire. I'll install the front right wheel and tire once the engine and transmission are in.
New Posts and Comments
- Replies
- 25
- Views
- 5K
- Replies
- 4
- Views
- 136
- Replies
- 130
- Views
- 12K
- Replies
- 0
- Views
- 54
New Threads and Articles
-
-
Master Warning Light after jump start - mazda 3 2.2 diesel
- By bataccia
- Replies: 0
-
