So a have been beating on this thing for the past hour and can not get it to budge.
2004 Masda3s hatch 2.3L milage=95,000
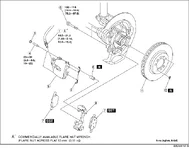
Rim=off
Caliper is off and supported by an old coat hanger
5-1 has been applied liberally in between the rotor and hub assembly.
I currently have a gear puller clamped to the outside of the rotor and putting moderate pressure on a 1x2 I have over the hub assembly, there is about 1/4 of an inch space between the rotor and the 1x2 so it has a little room to pop.
This is my first time doing this so just curious if there is something I am missing or do I just have to wait for the 5-1 to do it's stuff and break the corrosion bond between the rotor and hub assembly.
My ultimate goal is replacing the wheel bearing and the brake pads while I am at it. Trying not to destroy the rotor, would like to keep them and not replace them.
Any tips insight or advice on this stubborn rotor is appreciated. : )
2004 Masda3s hatch 2.3L milage=95,000
Rim=off
Caliper is off and supported by an old coat hanger
5-1 has been applied liberally in between the rotor and hub assembly.
I currently have a gear puller clamped to the outside of the rotor and putting moderate pressure on a 1x2 I have over the hub assembly, there is about 1/4 of an inch space between the rotor and the 1x2 so it has a little room to pop.
This is my first time doing this so just curious if there is something I am missing or do I just have to wait for the 5-1 to do it's stuff and break the corrosion bond between the rotor and hub assembly.
My ultimate goal is replacing the wheel bearing and the brake pads while I am at it. Trying not to destroy the rotor, would like to keep them and not replace them.
Any tips insight or advice on this stubborn rotor is appreciated. : )
Last edited: