What have you done to your CX-9 today?

At least they came to their senses and dropped their horrible CVT or was that just their hybrid?

I'm not sure if it was just on the hybrid. The transmission on this one is an 8-speed, clearly tuned for optimal fuel economy. You really have to lean into the throttle to get it going from a stop.

Forgot to mention the ASS. Aptly named. I freakin hate it! Lol. It feels very primitive, a bit slow to restart the engine, which sometimes results in a jerky takeoff if the engine isn't done starting up by the time I move from the brake to the accelerator. Definitely takes some getting used to. This particular vehicle has about 62k kms (38.5k mi) on it.
 
1000012326.webp

Doin something running alot faster then expected
 

Attachments

  • 17235255376768952629920107009202.webp
    17235255376768952629920107009202.webp
    69.2 KB · Views: 29
Finally got around to cleaning the engine bay after a couple of interior BC winters.

Thanks to @sm1ke and his post here: Thread 'CX-9 Cleaning and dressing the engine bay'
https://mazdas247.com/forum/t/cx-9-cleaning-and-dressing-the-engine-bay.123875594/

Didn’t do the post clean 303 treatment, and was maybe a bit less invasive with the brush. But overall, what a difference! Before & after pics

View attachment 330731View attachment 330732
Well done. That looks awesome!
 
Finally got around to cleaning the engine bay after a couple of interior BC winters.

Thanks to @sm1ke and his post here: Thread 'CX-9 Cleaning and dressing the engine bay'
https://mazdas247.com/forum/t/cx-9-cleaning-and-dressing-the-engine-bay.123875594/

Didn’t do the post clean 303 treatment, and was maybe a bit less invasive with the brush. But overall, what a difference! Before & after pics

View attachment 330731View attachment 330732

Nice job!

Yeah the 303/dressing treatment really isn't necessary, and there are better products for engine bay dressing anyway.
 
Replaced front brake pads yesterday. No more annoying scraping sound! Inner pads seemed to be wearing faster, and the inner pad on the front right only had about 2mm remaining. These pads have about 100k kms or 62k mi on them. Replaced with some cheap Max Advanced Brakes ceramic pads, they were only $55 CDN after taxes, available locally, and they feel just like the OEM pads from Advics, at least so far.

I had a hard time getting the caliper slide pins out by hand due to the rust. They came right out with some PB Blaster and my mid torque impact wrench though. This was my first time doing any brake work. Pretty easy with the right tools and enough research.

20240828_195414.webp
 
Got a lot done this weekend.

On Sunday, I mounted my front plate properly. I previously had it bent and ziptied to the lower front grille area, seen here:

20240512_172246.webp


The rear plate started to peel and flake, so I got some new vanity plates. The front plate mount is actually for a motorcycle. I did have to drill a couple of holes for the mount, but they aren't visible unless you're down on your knees looking for them inside the bumper.

20240902_194353.webp

20240901_194448.webp


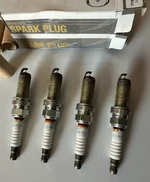
Then yesterday, I changed the spark plugs. The old ones looked good. Replaced the old set (NGK 90288 - DILKAR7M8) with the same plugs.

20240902_191803.webp


I also gave the car a good wash, then applied some Ceramic Trim Coat from Cerakote. It did a pretty good job masking the plastic fender liner deterioration on the wheel arches. Not perfect, but quite a bit better. I did all the black plastic trim on the lower half of the car. Here are some before and after pics.

20240902_163843.webp

20240902_194454.webp

20240902_163739.webp

20240902_194441.webp

20240902_163820.webp


I have no idea what caused the discolouration in the first place. It isn't wax residue, that's for sure. I did try the heat gun trick, but it barely did anything. Decided to order these wipes based on a Project Farm video.
 
I started using that stuff on my Mini. Right after application, it looks great. I'm anxious to see how long it lasts. I'm hoping with another application, it will last through the winter.

I took a look at the trim just now, and the finish looks a bit uneven. I think this is just because I over applied it in some areas. I'm going to clean the trim and apply an additional coat to try and even out the finish. Maybe this will also hide the discolouration even more.
 
sm1ke,

You did nothing wrong. Cerakote Trim is a sketchy product , as others have said online. I've made the mistake of using it on my other vehicle a while back and although it seemed okay - though not perfectly even despite meticulously applying it - the worst part came afterwards.

Having applied the stuff to the textured exterior trim pieces of a 2013 Hyundai Santa Fe, the coating began to exhibit light colored spots. Closer inspection revealed them to be tiny bubbles in small valleys found between raised areas in the trim.

Re-application made it worse.

Removal is either through time after the claimed 200+ washes, nail polish remover, wet sanding, pure acetone or Magic Eraser. Nearly all of which will ruin the trim even more.

Occasional application of whatever protectant (303, Meguiar's, etc.) hides the imperfections but they're still there.

I hope this isn't disheartening news but I thought I'd put it out here to warn others.

VA
 
Last edited:
sm1ke,

You did nothing wrong. Cerakote Trim is a sketchy product , as others have said online. I've made the mistake of using it on my other vehicle a while back and although it seemed okay - though not perfectly even despite meticulously applying it - the worst part came afterwards.

Having applied the stuff to the textured exterior trim pieces of a 2013 Hyundai Santa Fe, the coating began to exhibit light colored spots. Closer inspection revealed them to be tiny bubbles in small valleys found between raised areas in the trim.

Re-application made it worse.

Removal is either through time after the claimed 200+ washes, nail polish remover, wet sanding, pure acetone or Magic Eraser. Nearly all of which will ruin the trim even more.

Occasional application of whatever protectant (303, Meguiar's, etc.) hides the imperfections but they're still there.

I hope this isn't disheartening news but I thought I'd put it out here to warn others.

VA

Thanks for the insight. I did notice those tiny bubbles during my application as well, but I think that was just due to my technique as I was rubbing the wipe fairly quickly and in short strokes at first. When I noticed the bubbles, I switched to longer, smoother strokes and slowed down a bit, and it helped a lot. No visible bubbles on my trim.

I did try a second application with one wipe, but it's not much better. I think the problem I created is that I didn't "level" the coating. The fresh wipe is saturated with product, and goes on the trim fairly thick initially, no matter how much you wipe on the same area, so it's easy to miss the high spots and level them down. I remember doing the wheel arches on my CX-9 first, then the rear bumper, and the lower door trim last. I used one wipe for all of those areas, and the lower door trim looks the best, while the wheel arches have more noticeable high spots. I might remove the coating from the arches and try again before the end of summer.
 
If/when you decide to remove it and do so successfully, kindly post your method. I would like to strip the stuff clean off my car's trim. Thanks! 👍
 
Back