What have you done to your P5 today?

This week, got a 2003 P5 with 220k on the clock. ordered a few parts and hope to get to enjoy my first mazda a little better. neat little car so far. only issues I need to address are a couple water leaks in the back, something about the seam sealer getting weak, one is coming from the RH quarter glass. two small holes drilled to keep excess rain from pooling up untill I can get the source 100% fixed. a couple CEL codes and an oil leak from the pan gasket as well. this weekend I need to get the front wheel studs replaced, one on each side has been broken off.
 
only issues I need to address are a couple water leaks in the back, something about the seam sealer getting weak, one is coming from the RH quarter glass.

Here's some info about your water leaks.

Thread 'Water Leak In Rear Cargo Area' Water Leak In Rear Cargo Area

and an oil leak from the pan gasket as well.


There are oil pan gaskets available but a few people had problems with them leaking.

The ended up removing them and using silicone.

20210726_051806.jpg
 
tj4fa2003P5 sent me a question, and I thought I would post it here.

You should throw a new solenoid valve on it first.

FWIW, these are like $18 from Amazon and install in a few minutes. If this doesn't clear the CEL, then you might also need to get a Charcoal Purge Valve (it's under the rear bumper).
 
Just finished doing the front motor mount and passenger motor mounts (the easy to reach ones) on my P5. Doing the same job now the my MSP. Make sure you order a mount kit where the passenger motor mount already has the mounting ear to the engine installed. Otherwise, it's definitely a project staller.

Shout out to AWR for this front mount. Ally at AWR said the Front Mount made the most difference, so I knew, having a P5 and MSP that it only made sense to replace them on both cars. Got a killer deal to boot at $80/ea!

The quality of the AWR is readily obvious and the difference going from the two completely worn mounts to a fresh poly front and side mount is drastic. They recommended the 70 durometer for street cars. Yes, I'm sure the rear mount and transmission mounts are worn as well, so those will get replaced in time. Not sure yet if I'll do those as AWR or not. Based on everyone's stories, I'm really not looking forward to the rear mount.


broken, from the replacement kit, AWR
51339389523_740ae0b6f0.jpg


The AWR mount is SOOOO much beefier!

51339170661_ee02d6355a.jpg


Originally, in my P5, when accelerating from a stop and turning right, there was a weird NVH/grinding that has completely disappeared. No real surprise since both mounts I replaced were broken. There's a little increase in NVH, but A) no kidding B) I haven't put many miles on the car yet. Initial feel has been great. Such a balanced chassis right out of the box. No wonder Mazda changed this category so much with this car. Can't wait for the MSP to get the passenger mount replaced - that thing is a ton of fun to drive already.


Notes:
The passenger side mounts claimed the life of my Craftsman 14mm deep socket. I purchased a DeWalt 20V impact and a full set of regular and deep Impact sockets and was able to quickly triumph.

I used a single ramp on the passenger side + a floor jack under the oil pan to manipulate the engine position when replacing the mounts.

Passenger side mount is extremely easy. The Front AWR mount is finicky to force in place. I ended up using a 3" long wooden stick and my dead blow hammer to finesse it. To install the bolt securing the mount to the engine bracket, I used a screwdriver to lever the mount as I changed position with the floor jack.


Remaining projects:
Factory Shifter bushing kit for P5
Audio install for P5
Finish replacing passenger motor mount - MSP
Exile Shifter bushing kit - MSP
Short shifter kit - MSP
Install 7" rally lights (can't decide which car yet)
Purchase and install Evo 8 Recaro's in MSP


Still tracing front and rear leaks in the MSP - I suspect both front and rear glass would need to come out and get glued back in. Just not feeling spending ~$500+ to gamble (that's money for crypto). Probably just go back to keeping it covered all winter and avoiding driving in rain (in Oregon?! Ha!).
 
Last edited:
replaced air cleaner boot, the old one seemed to be turning into plastic. noticed the previous owner has replaced both O2 sensors and forgot to secure the connectors back into place. Noticing coolant temperatures are climbing as high as 226 when I make the return trip home and go up a steep grade. radiator has a few debris on the lower 1/4 of it. going to clean that out tomorrow when I replace the swollen upper rad hose.

curious, what temperatures do y'all see from OBD data when loading the engine down pretty good? Normally I don't notice much fluctuation on mine when pulling that same hill but I do reckon the debris has something to do with it this time 😂
 
About our pistons and oil rings...

20210627_185134.jpg

Smoke on cold start​

gozz

Bumping the thread back, with some good/bad news...

Well, the good news is: I found the problem of cold start smoke.

Bad news: Well, it's the rings...

Worse news: The rings are fine, not worn out, not scored, not broken...So, what is it then?

Ok, here's the details:

Mazda's pistons are crap! So f#"$%&ng bad, because they have one design flaw. The flaw that mazda jerks did not put any improvement in the pistons dept in 20 years!

The oil ring channel on the piston, has just 4 (four) tiny oil holes. Theese holes are used for the oil that was scraped off the cylinder walls while the piston was moving down to escape to the sump.

Naturally, more holes, bigger holes, the easier it is for the oil to sink down...

Ok, so, during time, oil and gasoline carbon deposits gradually plug these tiny holes up, preventing the oil from flowing down, and cooling the pistons, and bla bla...

The pistons overheat slightly, causing the oil that gets caught in the oil rings retainer to get sticky and guey and carbonised, turning it self into that hard -impossible to clean- resin / gunk / lacquer that sticks to your kitchen fry pans...

So, at the end you are left with the oil rings that are so badly stuck, glued, burned into the oil channel of the piston, that the oil rings do not even touch the cylinder walls.

The compression rings are a whole different story, and they are doing their job pretty good.

To make things worse, oil rings have sooooo weak initial tension, compared to the compression rings, that it is almost natural to have such a result.

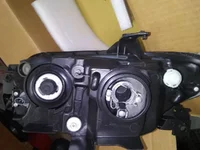
Take a look in this picture. Look at the gap between ends of the compression rings, and compare to the gap between oil rings... You will get the idea..


Ok, so why does it only smoke on cold starts...

Well, here's why:

Once you start up the cold engine, there is increased idle rpm, creating a huge vaccum in the intake manifold, as well as in the cylinders, as the pistons are trying to suck the gases in, but the throttle fully closed prevent thet from happening...

So, as the oil ring doesn't seal the oil, the vacuum sucks the oil past the compression rings ** and into the combustion chambers, and.... tadaaa! Bluse smoke. Now, the oil is fresh and cold, hence, there is no pale blue smoke, but thick white smoke, clearly smelling like oil.

As the engine runs, 10, 20, 30 seconds later, the piston warms up, the compression rings warm up, expand a little, close the gap, so does the crappy oil ring, that finally starts to touch the cylinder walls, and the oil stops sipping up onto the piston.

There is stil some run by, but not so noticable, so the oil consumption is pretty high.

The solution:

Rering the sucker, but drill some extra drain holes in the piston oil channel, and make the existing ones a bit bigger.

** Compression rings are designed to hold the pressure, but not to scrape the oil of the flat surface. it is like your rain wipers on the windshield. They have to be thin, almost blade-like, to be able to scrape.

That is the reason why the compression rings do a perfect job of sealing the compression but leak oil past them like swiss cheese. And why oil rings are thin, blade-like!
 
- Finished replacing front bumper after installing new aftermarket headlight assemblies and replacing burned out low beam bulbs and di-electric grease (old fixtures were crap with broken mounting parts and missing bulb mounting clips).

- Flushed and ran new brake fluid through Brake Master Cylinder and all the brake lines.

- Silicone sealed around tail lights where water was getting into back hatch/spare tire well areas (after reading water leak posts).

- Removed/cleaned/replaced O2 sensors in advance of installing rear 02 sensor spacer adapter (to clear recent P0421 Catalytic Converter CEL if it pops up again).
 
Did some spot cleaning on the seats today, found an old audiovox cell phone from about 2004 down below the parking brake. saturday I got the new solenoids in. only chasing one more CEL code, same as the guy above me here P0421. new coolant reservoir and upper rad hose. noted both of the hose attachments on the engine side need replaced, they are corroded badly near the lip and the lower one leaks a little on warm up. fixed the radio wires where prev owner decided to delete the factory connector and just twist the wires and electric tape them. they managed to get the left and right channels crossed, at least they were wired in phase.
 
- Installed the Downstream an O2 sensor "Defouler" adapter to get rid of the
P0421 CEL (Pre-cat) code that recently popped up a couple times after clearing other codes (photo attached).

-- I used PB Blaster to wet the 02 sensor base down overnight and right before removing the sensor and used a 3 piece 02 sensor "free rental kit" (pay for it and get reimbursed when you bring it back) from Advanced Parts Store that worked REALLY well removing it.

- Installed a piece of 2" I.D. Sch40 PVC Pipe X 3" long into air inlet pipe where upper cover enters lower pipe (no gluing-just drop it in).

-- That area doesn't have a good seal (at least not on this P5) so it bridges the air gap so air can flow straight through to the air cleaner and beyond.

-- The pipe sits above the 90* turn opening to the air cleaner so does not interfere with the air flow.

- After finishing installation of front bumper and new aftermarket headlights (that have 2 beam adjusters vs 1), I tried to adjust high and low beams and found out that one of the adjusters on each fixture is buried behind some of the radiator support/fender metal work that can't be accessed from the back (photo below).

-- The company brand (DEPO) made a slotted adjusted wheel provision to turn them with a tiny screwdriver along with a "capped" headed Phillips/Bolt head, and is a PITA to rotate in those tucked away areas.

-- If someone chooses to buy these fixtures, I would recommend cutting a little bit of metal away in the corner where they will mount to where you can have access to get at the adjuster from the rear through the fender-well area.

https://www.ebay.com (commissions earned)

-- The do have bigger screws and wire clip holder arm shown in the photo below so that's an improvement over the (IMO) crappy original equipment lightbulb installation design.
I personally like the plug it in and rotate-it-to-lock design.
 

Attachments

  • CEL P0421 Pre-Cat Defouler on Downstream O2 Sensor .jpg
    CEL P0421 Pre-Cat Defouler on Downstream O2 Sensor .jpg
    106.3 KB · Views: 130
  • 2in Dia. PVC Sch40 Pipe x 3in Length.jpg
    2in Dia. PVC Sch40 Pipe x 3in Length.jpg
    119.9 KB · Views: 118
  • New Aftermkt P5 Headlights.jpg
    New Aftermkt P5 Headlights.jpg
    134.8 KB · Views: 117
  • Lens Beam Adjuster Buried in Corner.jpg
    Lens Beam Adjuster Buried in Corner.jpg
    96.2 KB · Views: 103
  • DEPO Brand P5 Aftermarket Headlight Fixtures.jpg
    DEPO Brand P5 Aftermarket Headlight Fixtures.jpg
    78.2 KB · Views: 112
Finally got the retrofits down out of the attic I have had for years and tightened up the projectors to the reflectors. Think I'm gonna luck out and not have to bake them open to stabilize the shaky projectors. Tightened them a good bit and put red loctite on the threads. Also made sure the cutoffs are level.Found new h1 hid bulbs in box with lights. Ordered the spring clips needed to hold them in projector. Have a pr of morimoto 35w ballasts and battery harness from another hid setup on hand. Getting bulbs secure in projectors is only holdup on them going in the car. Have some yellow halogen brights and silverstar parking bulbs out of the current halogen fixtures....can't wait to go back with hid lows in proper housings with correct cutoffs and effective halogen brights as well. Matters since no fogs in msp lip......

CC859B14-452B-4255-B684-0F4740D7873E.jpeg
49863A75-0250-43F8-8E81-2002C4911772.jpeg
41A31783-6A69-4F55-A36F-45139E664791.jpeg
 
Last edited:
-Installed the Downstream an O2 sensor "Defouler" adapter to get rid of the
P0421 CEL (Pre-cat) code that recently popped up a couple times after clearing other codes (photo attached).

--I used PB Blaster to wet the 02 sensor base down overnight and right before removing the sensor and used a 3 piece 02 sensor "free rental kit" (pay for it and get reimbursed when you bring it back) from Advanced Parts Store that worked REALLY well removing it.

-Installed a piece of 2" I.D. Sch40 PVC Pipe X 3" long into air inlet pipe where upper cover enters lower pipe (no gluing-just drop it in).
--That area doesn't have a good seal (at least not on this P5) so it bridges the air gap so air can flow straight through to the air cleaner and beyond.
--The pipe sits above the 90* turn opening to the air cleaner so does not interfere with the air flow.

-After finishing installation of front bumper and new aftermarket headlights (that have 2 beam adjusters vs 1), I tried to adjust high and low beams and found out that one of the adjusters on each fixture is buried behind some of the radiator support/fender metal work that can't be accessed from the back (photo below).
--The company brand (DEPO) made a slotted adjusted wheel provision to turn them with a tiny screwdriver along with a "capped" headed Phillips/Bolt head, and is a PITA to rotate in those tucked away areas.
--If someone chooses to buy these fixtures, I would recommend cutting a little bit of metal away in the corner where they will mount to where you can have access to get at the adjuster from the rear through the fender-well area.

https://www.ebay.com (commissions earned)

--The do have bigger screws and wire clip holder arm shown in the photo below so that's an improvement over the (IMO) crappy original equipment lightbulb installation design.
I personally like the plug it in and rotate-it-to-lock design.
Shoot, I've got a stock pair of P5 headlights that just need a polish. I should have put them up for sale on here earlier heh.

Not sure if you tried this, but I believe that adjuster is meant to be rotated using a Philips screw driver. I figured that out when I installed my retrofitted headlights a month back or so.
 
^^^ What he said.

You can reach down from the top with a Phillips screwdriver to adjust them.

The plastic "wheel" has notches in it to fit a Phillips screwdriver.


20210803_085829.jpg
 
Last edited:
These are the options...


20210803_160003.jpg


20210803_160339.jpg


20210803_160314.jpg


The pictures are from my parts car and I have half the engine removed.
I don't know how much crap would be in the way on my DD.

A regular Philips screwdriver is probably the easiest.
 
Not sure if you tried this, but I believe that adjuster is meant to be rotated using a Philips screw driver. I figured that out when I installed my retrofitted headlights a month back or so.

Huh, that's why I couldn't figure out how to adjust the ones on the spectra I sold before I got the p5, they didn't have the 10mm head, just the Phillips head in the center and the little teeth. I dealt with that car being cross eyed for a WHILE.
 
Got a leaf in the blower fan for the ac, getting the fan out was wayy easy. after looking in there a little bit I decided to start tearing into it more and found the evap core was 1/4 way covered on top and bottom with leaves. spent some time cleaning all that out. kudos to mazda for making a easily serviceable system. next on the list is the blower speed switch, it gets warm to the touch and I have to wiggle it a lot to get the ac to stay enabled. I checked the connector and it's not burned and the terminals look healthy. thanks to prev owner for not securing the radio in so I can easily get back there to look at it.
 
Back