NB MX-5 Hey, it's Minnie!

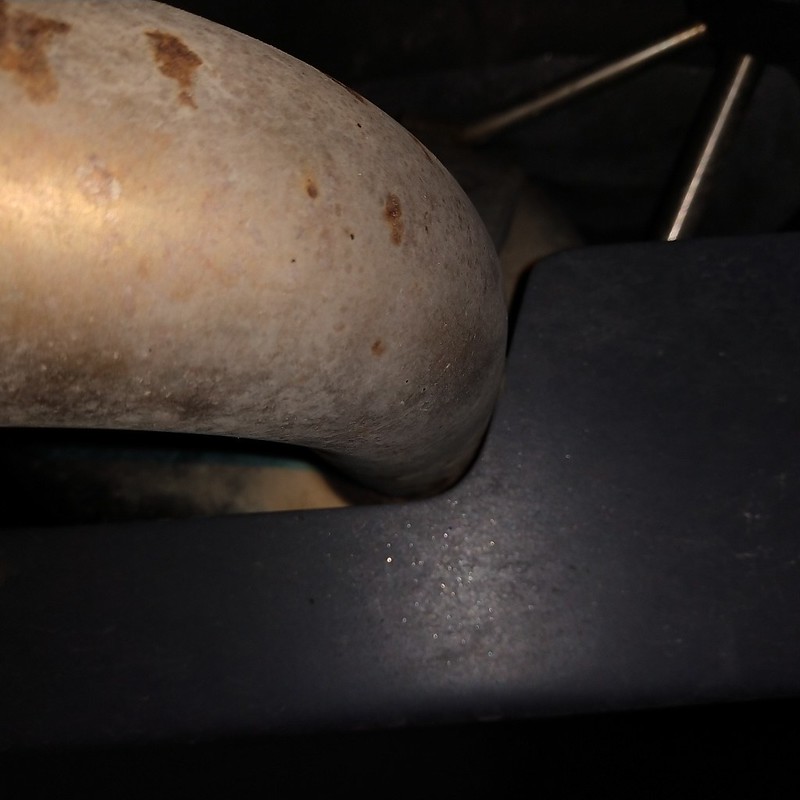
Everything was nicely dry this morning so proceeded with the installation. Yesterday evening I put the edging back on, along with a piece of silicone hose I split to cover the cut-out area for my tow hook. That looked like this:

51684556988_f1374f0703_c.jpg


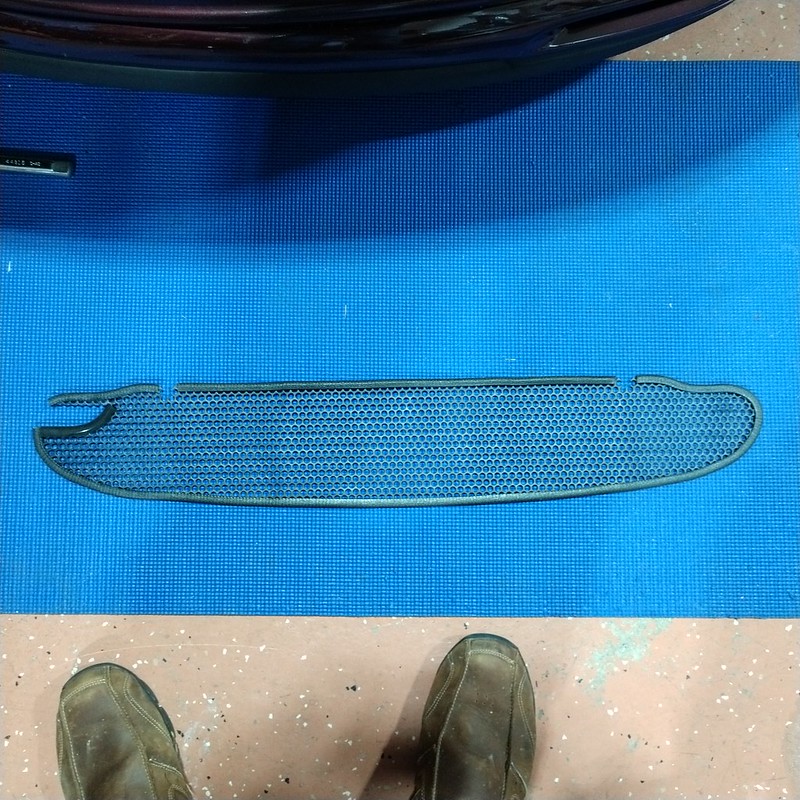
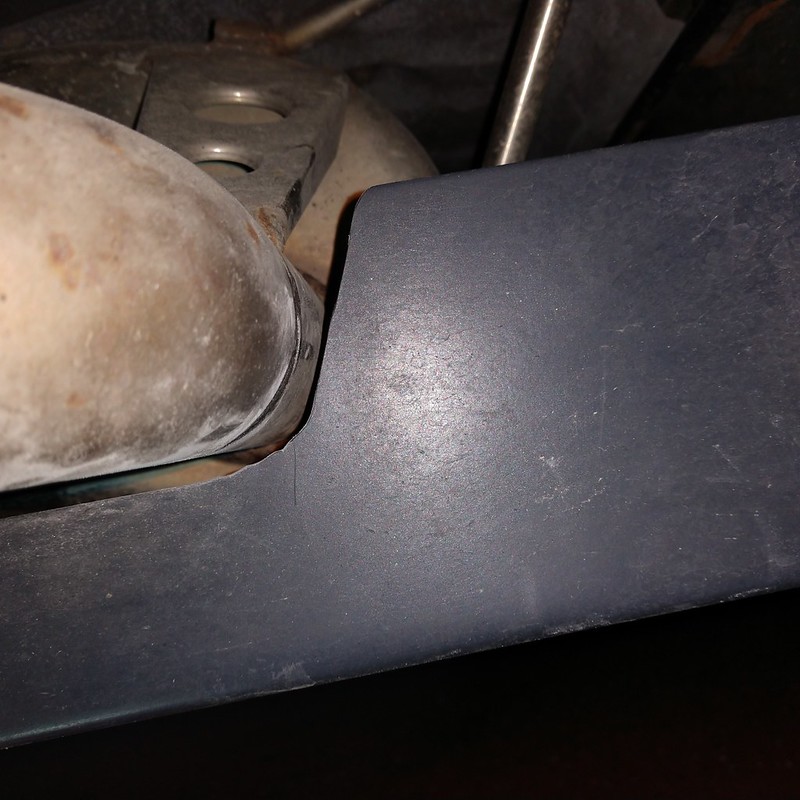
I ended up taking off the hose piece as there wasn’t enough room for it without cutting the grille back further. I mainly wanted it to prevent any rubbing on the tow hook but clearance looks sufficient for that to not be an issue. First time I put it on the sections for the bolts wouldn’t line up so I removed it and cut those back a little more. Second time was a charm!

51683497517_7b87180abb_c.jpg


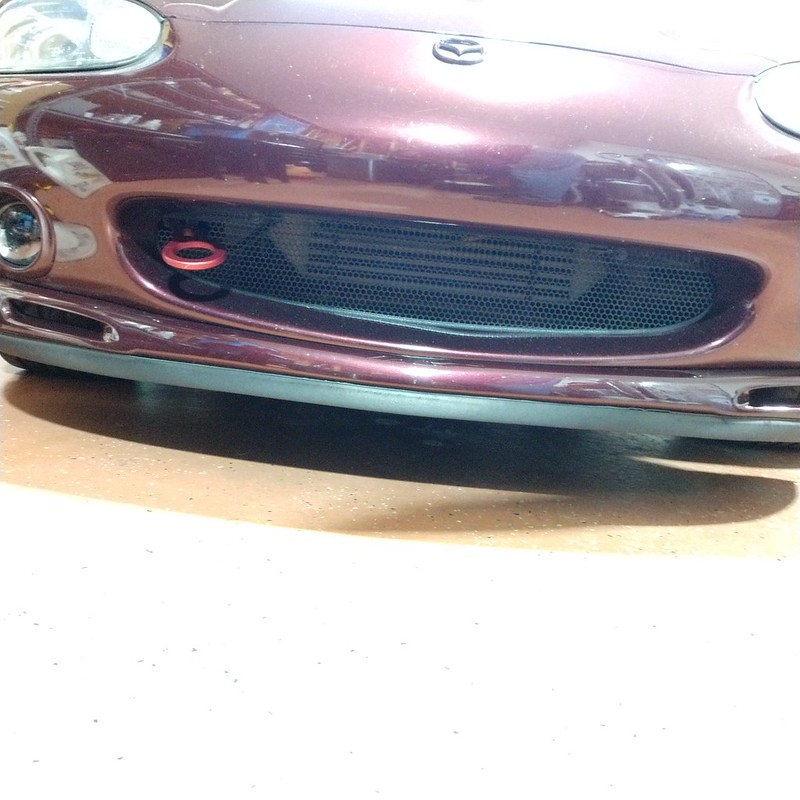
As can be seen, it appears almost transparent to the camera so I don’t think it will block too much airflow.
 
Got under her this morning to calibrate the O2 sensor. I have been seeing unusual AFR readings (higher than normal under steady state cruise), at first I thought maybe it was due to the colder temperatures we’ve been having but my gas consumption was up as well. Thinking about it yesterday I realized when I had my battery problem a few weeks ago it might have caused the sensor to reset. After I did the calibration and took a drive she was behaving much better. I have now put this as a point of reference for any future occurrence. Sometimes I’m a little slow on the uptake.
 
Nice day here so took her out to run to the store. On the way home, I got a big E8 error code on the wideband. She would run ok steady-state but bucked under acceleration. I nursed her home (couple of miles), before I shut her down I checked the battery voltage since that has been an intermittent problem. Voltage was steady at 14.6 so that wasn’t an issue. Checked my wideband instructions and it says the E8 code is for a sensor timing error (overheating or overcooling, appears at full throttle OR damaged sensor). Looks like I’ll be hoisting her up into the air for a look.
 
O2 sensor arrived today so out to the garage I went. Put her up on the QuickJack, removed the old sensor, reset the wideband, connected/calibrated the new sensor (important step) and then installed it. Old sensor didn’t look bad so must have suffered an internal failure (I’m guessing due to my sometimes rich condition). It was on the car for 9,351 miles.

FYI, DIY Autotune sells two different Bosch O2 sensors. The LSU4.2 (which is what I have) and the LSU4.9. If you check their site the only external difference is the connector on the 4.9 is not as wide as the one on the 4.2. I would have to change out the cable going from the sensor to the Megasquirt if I wanted to change to the 4.9 sensor.

Time to do the job (including putting her up and down on the lift) was the length of the first Saint Asonia album.
 
Well, I thought I was going to be able to attend MATG this year. However, the best laid plans etc. The person who was supposed to relieve me decided two weeks beforehand that he was going to go elsewhere. Lots of nonsense ensued with the end result that I am still on ship. What to do to alleviate the disappointment? RETAIL THERAPY!! Ok, not really retail but I found someone selling an AEM Uego wideband that is able to connect to my MS via CAN-BUS. This means the money I spent on the CAN-BUS module several years ago will finally be used. Right now I don’t know just when I’ll be home but the AEM is already waiting on me. Now that I’ve bumped my thread closer to the top I won’t have to hunt for it as much. Stay tuned…
 
Sorry to hear you could not make MATG but that is a nice silver lining.
 
FINALLY made it home a little over a week ago. Spent some time driving her, had to help with the preps for my oldest step-daughter’s wedding, moved a safe out of my vehicle which didn’t do my lower back any favors. All of that was over with so today I started swapping out the wideband. Did the change-out of the O2 sensor and associated wiring first since it’s still a little bit of a pain moving around. Got that done, I was glad to find that the connecting wiring from the O2 sensor to the gauge is plenty long enough on the AEM. With that all done and the removal of the Megasquirt harness and other wires, I discovered that I did not know which wires to use to connect directly to the CANBUS in the MS. I even disassembled the MS unit to see if I could figure it out with no success. I think I know which wires are the correct ones, but I don’t want to risk being wrong. Sent an e-mail to the builder asking for guidance on this one. Had to push her around the garage to get her lined up back on her side so the wife’s car could fit back in too.
 
I’m running a bit behind on updating this. Heard back from the MS builder, turns out that the AEM came out about the same time as the CAN module was made. Something he told me was that each piece has a discrete address which must be in the CAN module for it to function. Unfortunately this means that I can’t use the CAN functionality of the AEM wideband. He did say the serial connection was good for the AEM. OK, so I’ll do that. As I like things tidy I decided to source a serial connector to hook the AEM wires up to the serial connector coming out of my MS. Two days after ordering it showed up, and here is what I did:

52442201886_07a0a7bacd_c.jpg


52442719903_4320ba3713_c.jpg


52441689992_365699abbf_c.jpg


Once that was all together I connected everything and tried firing her up. I say tried because I was unable to figure out just how to get the MS to recognize the wideband with the connections I made. After some frustration I just went ahead and connected it using the analog wires, and voila! I am going to seek some help with this to see if I can find out how to get the MS to see the wideband using the serial connections.

I did use a new piece to connect several power wires. I was unable to find exactly what I was hoping to (something that will enable me to disconnect the power wires easily) but this little gem is working for now:

52442470224_92fd2353e2_c.jpg
 
While I was underneath changing out my O2 sensors I noticed there were signs of leakage at the slip-joint on the exhaust pipe. I threw some Kroil on there to make sure I could loosen the joint easily. Today I got back underneath and tightened that clamp up after putting some assemble lube on the threads to make any future adjustment easier.

The other thing I noticed was the right-side muffler outlet was contacting the lower diffuser. Not sure how it shifted as the opening is plenty large enough, but here it was:

52442470504_ef6886c52e_c.jpg


A little time with some tape, pencil and my Dremel took care of that problem:

52442202176_e95485409f_c.jpg


I’ll smooth the edge and round it better the next time I remove the diffuser. I suspect I was getting some extra noise transmitted into the cabin due to that contact, but time will tell for sure.
 
On my way to some babysitting duties last night, she suddenly got louder. I suspected the muffler clamp I had tightened had broken, but when I had a look once things cooled down I discovered that both bolts for the flange connecting the exhaust pipe to the muffler had come loose. One was completely gone, the other just hanging in there. I yanked it out along with the gasket so I could get new ones. This morning I dug around and found the other bolt had dropped into the diffuser along with one nut and lock washer. I took some measurements and went to Ace. The bolt holes were 13.5mm while the bolts were around 10.5mm. I decided to go with a more appropriately-sized bolt and picked up M14s along with some lock washers and metal lock nuts (don’t recall right now what the proper term for those is). When I got back home I was able to wiggle things and get one bolt in but not the other so I used one of the old ones for now. I’m going to have to drop the lower diffuser and the muffler, then hog out the bolt holes a little. This should provide for a more positive joint. I was able to get the old gasket in well enough to seal but will be buying another to do it right. I have no idea what caused the original bolts to lose their nuts, as they had looked good when I was underneath last week.

While I was able to squeeze my hand into the space between the diffuser and muffler to get things back together it was not done without some repercussion, as seen below:

52446893064_73557bfcae_c.jpg
 
Sometimes I feel like I am almost smart. After some research yesterday for the muffler gasket, I thought I might have posted the last one I used. Sure enough I had a picture so I checked my local O’Reilly’s and they showed it as being in stock. Picked that up yesterday afternoon so I was ready to go this morning. Hoisted her in the air with the QuickJack and set to work. Removed the lower diffuser followed by the muffler. I checked the fitment of the M14 bolts in the flange holes, and found the lower ones were fine while the upper ones showed some dragging. I hogged all four holes out a little with a ½” drill bit until I was satisfied with the freedom of movement. Here you can see the bolts that I was using compared to the new bolts, the larger size will give a proper fitment:

52451506965_25c14df3d1_c.jpg


While everything was apart I took a close look at the flanges. The one on the exhaust pipe is flat while the one on the muffler has a recess. However this recess is not consistent in depth due to how Racing Beat welded the flange to the muffler. I decided to try using a flat gasket I had made for a previous use in addition to the round gasket. You can (sort of) see how that turned out here:

52450538572_8c460c2cc8_c.jpg


A quick leak-check was good. If that comes apart then I may just weld the damn thing up. Oh yeah, and there is now plenty of room on the passenger side of the lower diffuser where the exhaust pipe exits. Had I looked more in depth to that contact problem last week I would have found the muffler bolts were loose. Ah well, then I wouldn't have installed these mondo bolts.

While I was in the garage pulling around I discovered that mice had gnawed on the special yellow car cover I have. We never used to have problems with rodents in the garage, guess I need to figure out some means of controlling them.
 
Thanks Mark, I'll give that a shot. The wife found other signs of the little bastards in the garage today so I guess I'll be digging into other stuff to see how far they've gotten.
 
Mike, book a house for MATG 2023…..I have until July to cancel. we should know by then who can attend and who can’t.
it’s me, you, bruce, jeff and Levi.
 

Attachments

  • 330A92A1-EA84-481D-9EB0-35B6B042700B.jpeg
    330A92A1-EA84-481D-9EB0-35B6B042700B.jpeg
    86.7 KB · Views: 70
Mike, book a house for MATG 2023…..I have until July to cancel. we should know by then who can attend and who can’t.
it’s me, you, bruce, jeff and Levi.
Cool! Count me in, I'll let you know soonest if I can't be there (hopefully next year won't be a repeat of this year). Looking at that house, do I need to bring a banjo? :ROFLMAO:
 
Cool! Count me in, I'll let you know soonest if I can't be there (hopefully next year won't be a repeat of this year). Looking at that house, do I need to bring a banjo? :ROFLMAO:
PM me your phone number so I can start a group chat on the trip.
 
I showed my wife the pic of the house and banjo and shotgun were not the first things that came to her mind. She said "oh hell no, I have seen too many horror movies to stay at a place like that, have fun!" :ROFLMAO:
 
I showed my wife the pic of the house and banjo and shotgun were not the first things that came to her mind. She said "oh hell no, I have seen too many horror movies to stay at a place like that, have fun!" :ROFLMAO:
So your out ?😳
 
Back