A Rebuild Story - A Forged MP3 Motor

TurfBurn

Member
:
'01 Yellow MP3 #1026
So as some of you know I have Terry "Spoolin Mp3" former owner of Spool Innovative Turbo 's old car. The motor met it's demise during a high speed out in michigan. See: http://www.msprotege.com/forum/showthread.php?p=1256270 for more on that...

So this is my rebuild story. I'm spending my evenings researching, my weeks and months saving like there is no tomorrow, and doing basically everything I can to this new motor. I'm well on my way to getting this project moving. So this thread is going to be a lot of descriptions and pictures and the like as the project moves along. Largely for info and help and sort of a how to for all the curious ones out there! So enjoy!

Here is a bump pass the reservations to the rest of the thread for comments and the like:
http://www.msprotege.com/forum/showthread.php?t=83298&page=2&pp=15

Thanks!

Steve
 
Last edited:
A plan?

So first of all what is the plan?

Terry already equipped the car with a Microtech Standalone EMS which works wonderfully as well as a spool mani, Evo III 16G, FMIC, a secondary fuel rail and 8 550cc injectors, plus the necessary support for that. I've since added a JandS safeguard, PLX Wideband, changed to a Walbro 255 in tank pump, and put in a welded MSP LSD. (there is more detail in my sig). The car was wonderfully fun to drive, but seemed to be on its way out in the month before it blew up. It didn't matter how I tuned it, or if I bumped up the boost another 4 psi... the car just wouldn't get any faster. Then during my race it started running far richer than it was programmed to and a couple minutes later the number 4 rod gave out and blew a massive hole in my block and upper oil pan. Metal and oil everywhere!!!!

So that gets us to here... and here is the list of "to come" items.
Cold Air Intake
Rebalanced Injectors
AEM adjustable FPR
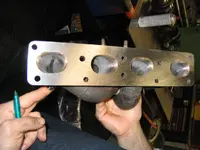
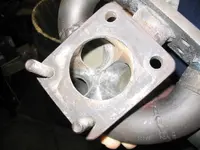
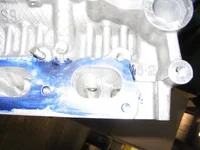
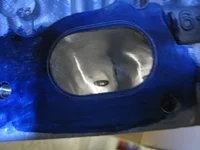
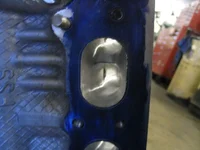
Ported and Polished Intake Manifold
Removed VTCS, VICS and EGR
Ported and Polished Head
Ported and Polished exhaust manifold
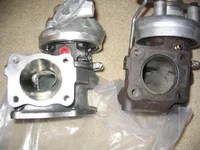
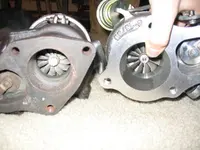
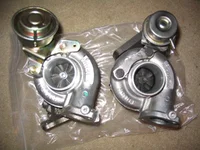
Ported and polished hot and cold side Evo III 16G turbo
3 angle valve job with back-cutting (standard valve size)
Ferrea Exhaust Valves
Chamfered Oil Galley Ports
CP 8.9:1 pistons
CP Nitrided Rings
Oliver Forged Rods
Spec Stage 3+ full face clutch
Mitsubishi Eclipse Evo III O2 housing matched and polished
Balanced Crank
Toga Rod and Main Bearings (FlatLanderRacing MBMA17-HP and RBMA17-HP for a total of 138.49 for the rods and mains)
EDIT: Edited to actual final list.

I also got a lightly used (4,000 miles) Mazdaspeed motor that I have already torn completely down and will be building up with all this as my replacement motor. It is currently in for an align honing on the mains, a glaze break on the cylinder walls, and a check of the deck as well as a good hot tanking. Then it will be coated in WD40 basically cleaned and packaged to be stored for the next month or so until I can start adding more parts as I have the money.

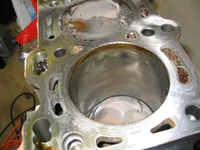
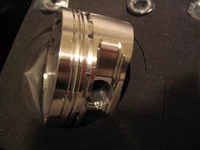
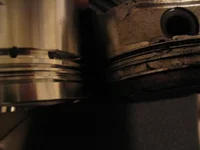
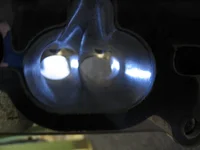
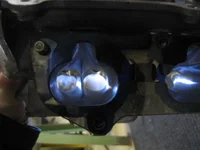
One of the things I learned right away is that there are a lot of "little" machining things that you can "skip" but aren't good ideas to skip over. One example is my cylinder walls. They are in PERFECT shape... (see pictures) and are so new that the hatching is still visible. However, for the new rings to seat in properly they need to have the right surface roughness to wear the rings as is needed. This roughness level varies based on the rings you use and so does the angle of the cross hatch! Spending the whopping 4-8 dollars per cylinder for the honing is such a simple and cheap thing there is NO reason not to do it!

Also, to ensure that your crank is loaded as evenly as possible it is best to have your block's mains align honed. By doing so you ensure that they are nearly perfectly aligned to one another and that the crank and all forces will be distributed as evenly as possible. Along these lines, having your crank balanced will help it be even smoother in it's rotation than it is in stock form (smooth in a vibrational sense). Our pistons, rods, and crank are balanced from the factory, but not to very tight tolerances, and you can gain some improvement by having them re-balanced by a machine shop. Balancing is also relatively cheap. A crank balance is 50-75 dollars, and piston balancing is roughly 40 dollars.

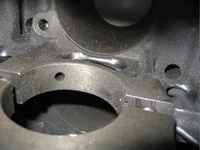
Additionally, if you have the block in... get it cleaned up! Getting it hot tanked is generally a must anyway for machining to make sure that all the oils are off of it and that there isn't any extra dust and rust hanging around.

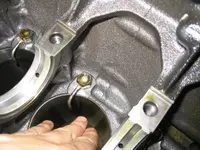
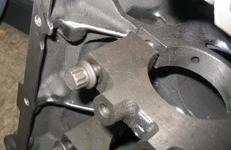
It is of note as I found out today that our oil squirters are press fit into the block. They can be removed, but then new ones should be pressed back into the block when machining and so forth is complete!

Some pictures and links will be added to this post soon hopefully! :)

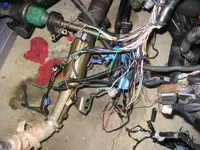
Next Up: Cleaning and rewiring my engine bay as well as painting the block!

Pics: new_motor_4: The crosshatch of the new motor still visible even with 4k on it!
oil_squirter: a pic from the bottom of the engine of an oil squirter
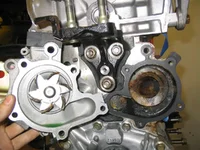
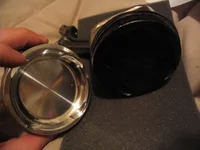
water_pump_and_seat: The water pump removed... simple device!
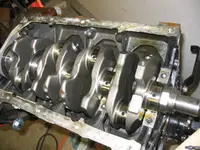
uncapped_crank: all caps and bearings removed from the crank.

Zip of about 50 of my new motor teardown pics: about 3.1mb
http://www.nsnmotorsports.com/MP3Build/NewMotor1.zip
Includes water pump, oil pump, main caps, cylinders, head, etc...
 

Attachments

  • new_motor_4_low.jpg
    new_motor_4_low.jpg
    75.1 KB · Views: 1,044
  • oil_squirter_low.jpg
    oil_squirter_low.jpg
    118.4 KB · Views: 1,052
  • water_pump_and_seat_low.jpg
    water_pump_and_seat_low.jpg
    107 KB · Views: 1,068
  • uncapped_crank_low.jpg
    uncapped_crank_low.jpg
    106.3 KB · Views: 1,124
Last edited:
The Block and rotating assembly

Well it's been a while since I did an update.. (today is 12/3/04). So here is the story as to why.

Details people... details! I can't stress this enough for building your motor. There are 10,000 and 1 details you need to worry about to make your build successful.

So far I have been concentrating on the reciprocating assembly and block thus far to date. As was stated above I went with CP pistons (8.9:1, 10 thou overbore) and oliver rods. Also I am using Toga bearings.

I was originally going with Total Seal TS1 rings for the motor. These rings are a gapless second ring I believe with a moly first ring and a cast iron second ring. However, after talking with Tota Seal directly about my application and so forth they recommended the MaxSeal (MS1) rings. These are a gapless top ring and are both cast iron rings. The rings are stronger and can handle more heat, but unfortunately will tear up the bore of the motor relatively quickly. this means I will need a new hone and so forth pretty often (likely less than every 20K). But these rings will give superior sealing, and will be able to handle some very extreme heat and conditions. The TS1's would likely be fine, but this is just and extra measure toward keeping things solid and strong. EDIT: I later stayed with the gas-nitride rings CP supplies with their pistons as they are actually very good rings in their own right and very very strong.

So based off those conversations my block work has all been decided:

Hone: I'm having a precision bore and re-hone done on my block to ensure that the pistons get exactly the right clearance. I oversized the pistons by 10 thousandths not because I wanted the overbore, but rather because my machinist wanted the extra working room to make sure he can dial each bore in exactly to give me the perfect fit for my pistons and the recommended piston to wall clearance (about 3 thousandths standard for many appliations, but ended up being 3.5 thousandths in my case due to the high boost).

Main Bearings: I had an align hone done to make sure that every saddle is exactly true with one another and with the cylinder bores. This ensures less wear of motor components and better support for the crank. Additionally, I am having each bearing carefully hand fitted and given a main bearing clearance of 1.9 thousandths. I had originally planned to handle this portion myself. But the important thing I learned is that the tools it takes to do this yourself are more costly then having it done by the builder. In fact a full assembly by the builder is about 150 dollars, and just one of the 3 tools I needed would have been in excess of 300 for a quality tool. So it is obviously more cost effective to have the builder do this and ensure that it is done right. I also upgraded my bearings to be using the Toga bearings. They are slightly better than stock, but slightly harsher on the crank itself. But they should handle the severe duty a little better.

Block Cleanup: I had the machinist go through and knock off all the casting flash everywhere in the block. this is an easy one to do yourself, but since he had it, I figured paying him the 60 bucks to deal with the mess and the work was worth it. He is carefully going over every main and removing the flash while making sure he doesn't actually cut into the ribs themselves at all. Any cutting into that "root" will weaken the block and is vastly undesireable. Additionally he is chamfering off oil returns and cleaning up the entire area by the oil filter. Essentially every rough unfinished edge is getting a bit of a grind and sand to make sure that the block doesn't have any stress risers on it and will be as strong as it can be.

Reciprocating assembly: The assembly is being balanced. Both the crank and the piston/rod combo is being very carefully balanced and checked to make sure they are all very true and very inline. This ensures minimal vibration and as equal of loading as can be done The balancing costs are not expensiev. Balancing the pistons and rods is only about 40 dollars. The balancing of the crank is about 60 dollars. 100 bucks well spent to make sure the engine stays intact. Additionally, this combined with the stronger and longer rods I'm using allows for a higher redline. In theory a 7,000 ish redline will be safe. I will be capping it at about 6800 as that should be plenty sufficient for my needs and the motor does not breathe well enough above that to warrant the higher redline and higher risks associated.
 
Last edited:
The Head

The head is one of the most expensive components of this build. More expensive than the forged internals in fact! The reason is that the head is the source of all your air, and also exposed to the viscious conditions of burning exhaust gasses.

As I'm not going for higher revs, and not NA I'm not making any direct upgrades to the valve springs, tappets, and retainers at this point. However the valves are getting a serious overhaul. Due to the crazy temperatures I expect to see in this motor I'm going to be replacing all the exhaust valves with Ferrea Super Alloy valves (I will be a dealer for these in short order). They are built for even more severe duty and conditions than even an Iconel valve. They are rated to withstand temperatures up to 2400F which is an insane engine temperature. To give you an idea, a "normal" stainless valve is rated for around 1200-1400F. These valves will be swirl polished and backcut for better performance. Additionally, the valve seats will be given a matching 3-5 angle job as well.

Additionally I am having both the intake and exhaust sides of the head ported out to the gasket size and matched to my turbo header piping sizes. Everything will be knife edged or radiused as is necessary to maximize flow.

Unfortunately the valve set will run up to nearly 700 dollars, the valve angle work will run about 400 dollars and the porting and polishing may push up to 800 or 900. This means the machining and parts value of the head will be in excess of 2000 dollars.

Additionally, I am having all of the oil galley returns (the galley is where the cams are sitting... and the returns are approximately 5/8" holes cast in the head that allows oil to flow into the oil return channels in the block and back down to your oil pan. ) chamfered and flash removed from the head as well to ensure rapid oil draining and cylcling.

This head will be mated to the block using ARP studs and will be sealed with a stock head gasket. The stock head gasket has not been popped on properly tuned high boost motors, and has been proving to be more than adequate thus far for the turbo'ed cars. I shied away from a copper head gasket as for as excellent as they can be, they are often insanely difficult to deal with in getting a good seal. Even with your block o-ringed and your head with a receiving groove, you are guaranteed to get a good seal and are often open to even more problems when you have them. They are a great solution if you are willing to put in the effort to make it work!
 
Last edited:
Well a couple of updates finally... lots more updates will start happening as parts are coming in, money is available, and damn it I want to get it done!

The block has had all the flash removed and stress areas have been polished. All oil passages were also cleaned up and smoothed out. So she's a beauty now. I hope to have pictures of that on Tuesday or Wednesday this week.

My pistons should arrive tomorrow, so I'll have those. I no longer am going with Total Seal TS1 or MS1 rings. Long story behind that but I ended up with the CP rings intended for boost. They are gas nitrided and very strong. I asked CP if they could handle what I was going to do and the response was "They'll handle anything you can put at them.. just open the gap up by a couple thousandths". So that is what is being done there.

I've started working on some aesthetic stuff for the motor... polishing and sanding the manifolds and various engine parts. It's turning out to be way too much work for my schedule so I'm likely going to scale much of it back just so I can remain sane.

The point of this post is to show some of my wiring changes! I'm going through removing and rewiring portions of the motor. Since I run a Microtech and this car will never be sold to anyone else (except maybe another racer or enthusiast) I'm not worried about being able to revert back to stock. Thus, I'm tearing out a lot of wiring that is "unnecessary" and cleaning up wiring done by shops that worked on the car before I got it. It's amazing how much stuff can be pulled... here is a short list:

Both oxygen sensors and wiring (8 wires)
Stock Injector wires (8 wires)
Stock A/C wiring (2 wires)
stock oil pressure (2 wires)
stock CAS wires (3 wires)
Stock TPS wires (3 wires)
And there are a few more that I'm pulling as well I believe.

I left the stock Cam position sensor wiring in even though I don't believe I need it. I'd rather keep it and not have to worry about other problems down the road if it is keeping some part of the stock ECU acting. I may pull it at a later date though. I'm also going to likely pull the stock EGR wiring as that is about 6 wires that aren't needed. I"m capping off the EGR passages so that shouldn't be an issue either.

One I'm debating on right now and haven't decided on is the stock IAC solenoid. I don't control it with the Microtech, and the stock ECU has so little info I doubt it is controlling it, so I'd like to pull it off and cap the passages, but I can't get the dang thing off as the screws are REALLY in there. But assuming I remove that, it'll be a few more wires.

So all in all, the amazing thing is the wiring is pretty simple, and it is easy to pull out a lot! I'm pulling wires all the way back through the firewall, cutting them so about a foot is left, and then coiling them and storing them under the passenger foot plate. That way I can rerun wire from the stock ECU should a need ever arise (although I doubt it).

The wiring is pretty interesting in the car. There is a large portion that comes through the firewall from the ECU, that goes along until a join point where some of it goes up to the fusebox, and the rest goes out to the motor sensors and injectors and spark modules. But the thing that surprised me was how many wires go from those sensors and then later dead end off at the fuse box. Also, there is a set of wires that are for the ignition and starter etc, and those all run in their own harness. It's actually MUCH simpler than it looks. As is everything on the car. It's easy as hell once you actually tackle it. So get in there and try stuff for yourself!

So that being said... here is a picture of the wiring seperated.

EDIT: Extra picture of the piston that wouldn't attach for below...
 

Attachments

  • wiring groupings.jpg
    wiring groupings.jpg
    145.7 KB · Views: 890
  • new piston.jpg
    new piston.jpg
    81.7 KB · Views: 770
Last edited:
New Parts and Block Work

So I got my CP pistons in, and took them to the shop to get that moving. Also, I took the camera with and got some pictures of the block that I had the flash removed, and had the ribs polished to ensure stress relief and so forth.

Also, I'm having the machinist do some more final touch up on my pistons. The CP's are AMAZING looking as you'll see.. but looks aren't everything. There is a slight sharp edge on the valve reliefs on the top of the pistons. I'm having this removed/radiused. Why you ask/wonder? Well becuase having a sharp edge means a place that will get hotter than elsewhere. That can lead to detonation and other bad things. Additionally sharp edges are bad for even mixing and the like. So by having those radiused off you'll get better mixing, and be able to run more timing (because of less chance of detonation) and thus you'll make more power overall from that simple little fix. How much more.. maybe only 1 hp, maybe 10... we don't know yet as no one has had so much expendable income that they can build the motor without such a change... dyno it out tuned all the way, and then rebuild it with the change and see...

The block will get it's 10 thousandths overbore, and a hone done as well. The hone is not being done with torque plates because there apparently is not enough of a need to do so on our motors from what I heard from other more experienced members and builders. Additionally the block we have is rather strong and thick overall, and this helps reduce distortions and thus reduced the need or reason for a torque plate hone job. The main reason behind a torque plate hone job is to simulate the torque that having the head tightened down on the block does to the block. This distorts the cylinder walls and can causes poorer sealing of the piston rings. If you hone without a torque plate on a block that should be honed with one, you may have a nice beautiful cylinder when you are done with perfect bearing clearances and the like, but once you load the block with the cylinder head you may soon have egg shaped cylinder walls that have clearances all over the place that are incorrect. But that being said, word is our block doesn't need it, so you can save yourself the 200 dollars for the torque plate plus the extra cost associated with such a hone.

So here are pictures of the new pistons, and the polished ribs inside the block that had flash removed and are polished to help prevent stress cracking.

More updates soon!

Thanks,

Steve
 

Attachments

  • blockribspolishedlow.jpg
    blockribspolishedlow.jpg
    119 KB · Views: 644
  • upper polish.jpg
    upper polish.jpg
    123.8 KB · Views: 641
  • side by side pistons.jpg
    side by side pistons.jpg
    69.3 KB · Views: 582
  • skirts.jpg
    skirts.jpg
    78.3 KB · Views: 642
  • piston tops.jpg
    piston tops.jpg
    92.2 KB · Views: 631
Last edited:
Alrighty... it's january 18th.... time for more updates! All the parts necessary will be at the machine shop tomorrow. I was a little hung up getting a thrust bearing and my main studs. But I have them and should have time to take them to the machine shop tomorrow. So that is good news for me! Also excited right now as NSN has the Microtech essentially ready for public release at this point (one more minor thing to work out). So that's very cool! Same system as I run on my car is what we are basically using for the NSN solution... but anyway.. back to the info portion of things..

So the parts are getting dropped off and that will be getting done soon. I cringe to think of the bill for this!

I've been working with SPEC clutch on getting a clutch for my application. They are going to be putting together a custom solution for me... and get this!!!! They will be actually using my ACT pressure plate. They will resurface it and set it up properly to match this disc that they have for me. VERY cool. Their customer service has been absolutely fabulous to say the least. Additionally, they are going to set me up to be a dealer of these components so I will be able to provide these solutions to you guys as well.

I am getting a full faced carbon metallic sprung disc. It will give me somewhat soft engagement while being able to handle well over 400 ft-lb's of torque. So if you want to talk holding power that is the baby! The best part is I can stay with my 35% over stock pressure plate. No need to bump up to a 50% over stock or even 75% over stock (other options that spec provides if needed) plate that can risk really stressing the block and the thrust mains. So it's an excellent overall option that will more than meet my needs and really be a great fit. It's not cheap... the disc alone is the cost of a cheaper clutch kit. But hell!!! It'll do the deed for sure. They have another option that would make the 400 ft-lb mark without trouble on the 35% pressure plate, and it was VERY affordable. So always got options.

The car is nearly rewired. I'm hoping to really dig into that this weekend and get that taken care of. I'll send pictures of my crazy rewire (redoing all the loom and taping).

So that's basically it.. clutch is squared away.. I have a new Evo III turbo all ported out that is showing up shortly, the engine is getting the full treatment as far as the machining and we'll be well on the way to getting some major progress done. Looks like I should be able to assemble up and get moving in about 4-5 weeks. So not too far away!

Stay tuned.

Steve

Clutch plate picture attached. Spec ST3+ clutch plate.
 

Attachments

  • clutch.jpg
    clutch.jpg
    142.1 KB · Views: 508
Last edited:
Checked in with the shop today. They are beginning all the work now and have all the parts needed. They had the head disassembled and should have valve specs for me soon as well. So I'll be able to post those eventually for everyone's benefit.

Also got one other of the keys to the build. My new turbo. I'm glad that I started looking at getting a new turbo because it turned out I did not have what I originally thought/was told I had. Turned out I had been running on a plain 16G until now. My new turbo is the Evo III 16G and comparitively it is a monster as you can see from the pics. The turbo is capable of flowing between 40 and 44 lbs, or about 550 cfm. It's enough to run a pretty solid clean 22-25 psi on our cars. And it will stay quite efficient through that band and also spool up very nicely. So with that being said here are the pictures...

I had the turbo ported as you can see in the picture. That opening is nearly 1/4" bigger than my old turbo. Also you can see on the hot side flange in the other picture that the exhaust outlet of the turbo is nearly a full 1/2" bigger. Pretty impressive. On top of that, the turbo actually weighs a good 3-4 lbs less than the other turbo and it is VERY noticeable when you pick them up. Also, the inducer of the turbo is bored nearly 1/4" larger as well... all in all she'll move some air! :)

Enjoy!

Steve
 

Attachments

  • mouth.jpg
    mouth.jpg
    144.2 KB · Views: 686
  • exit.jpg
    exit.jpg
    129.9 KB · Views: 721
  • side by side.jpg
    side by side.jpg
    141.5 KB · Views: 703
Last edited:
PandP work

Well here you guys go... I finally have some progress... I'm only about 2 weeks away from having the whole motor back which will be great! :) The head has been ported and polished on both the exhaust side and intake side. The exhaust manifold was also ported. I had them flatten the flange as it was ridiculously warped it turned out, and then they also went in and welded and restructured the ports to make the blend between the pipe and the flange much better than it used to be. They then matched this properly to the exhaust side of the head. All in all everything is now smoother, sharper, and flowed properly to keep the systems moving much much better than they used to be! So enjoy a little eye candy and sorry the pics aren't a bit better.

(Intake manifold and block work are coming soon!)

Later!

Steve
 

Attachments

  • IMG_2029.jpg
    IMG_2029.jpg
    74.8 KB · Views: 605
  • IMG_2030.jpg
    IMG_2030.jpg
    110 KB · Views: 666
  • IMG_2031.jpg
    IMG_2031.jpg
    144.9 KB · Views: 590
Last edited:
Some PandP work.

Same deal as above.. just needed another post for pictures.
 

Attachments

  • IMG_2023.jpg
    IMG_2023.jpg
    114.7 KB · Views: 562
  • IMG_2024.jpg
    IMG_2024.jpg
    100.7 KB · Views: 525
  • IMG_2025.jpg
    IMG_2025.jpg
    100.1 KB · Views: 515
  • IMG_2027.jpg
    IMG_2027.jpg
    84.6 KB · Views: 511
Last edited:
This post will get moved down the thread as I add updates... but I wanted to keep you guys in a list of the seals I've replaced part numbers and the like and why. So I have TONS of these numbers to post... but the ones I have on hand I'll start with.

Injector Insulators: JE06-13-257 6.76 each x 4 pieces (8 for me with two injector rails)
-I replaced these because some of mine were falling apart... these are the black surrounds on the tips of the injectors that protect them from all the high frequency motor vibration

Oil Jets: FS01-10-580A 12.81 each x 4 pieces
-These have to be replaced each time you remove them from the block because they are a press fit part. They are often called oil squirters on these forums. The are critical for small end lubrication and cooling of the underside of the piston.

Fuel Pump O-Ring: ZL01-13-ZE5 14.63 each
- I replaced this because I have a tiny little crack in mind and I noticed my fuel pressures were lower than they should be. I recommend replacing this part any time you install a walbro in-tank pump. This fits over the output nipple of the fuel pump and is critical in maintaining fuel pressure.

Head Bolts: FS01-10-135: 8.XX each
- I didn't replace these, but figured it was useful to post the part number for anyone that needs it/wants it!


lots more to come!

Steve
 
Last edited:
More stuff for you.. and I'll add more soon.

Here is the cad files for the Toyota thrust bearing you can use for a full face bearing... I don't give any gurantees to the accuracy of the file.. but it is what I'm using for it.

Thrust bearing part number from import performance Topline kit: TWTO17


Thank you!

Steve

EDIT: I ended up not using this modification. Logistically it became a nightmare all as insurance against a problem that has not been PROVEN to exist. Crankwalk is possible, and there are good trains of thought behind the possibility of it happening with heavier clutches. however, no actual signs or instances of it have occured yet. Also, addition of the thrust bearing can potentially cause a number of major problems if not done perfectly.
 

Attachments

  • thrust bearing.zip
    28.1 KB · Views: 379
Last edited:
Hah! A real update.. first in ages. Which is said because the motor has been done for over a month. Today is 6/7/05.. I fired the car up for the first time right around the end of april or mid-may I believe (I posted about it somewhere).

So the finals on the motor.

I did indeed do a full port and polish on the head, and also on the inake manifold and exhaust manifold. The exhaust valves were replaced with ferrea's, but the intake valves were left alone. All valves received a 3-angle valve job on them with partial radius work done on the exhaust valves.

The entire valve train was carefully worked to bring all valve lash settings to nearly exactly 10 thousandths clearance as is recommended. After the break in the valves settled in with 1 valve at 9 thousandths and 3 at 11 thousandths. The rest ran at 10 thousandths. This is very good overall lash, and I'm happy with it.

The crank was installed and machined with bearing clearances of 1.8-1.9 thousandths on the main bearings. This is a little tighter than average, but will lead to improved performance in some respects.

I ran into several problems with the turbo system. The new turbo had to be modified in a couple of spots to get it to go onto the flanges because of the use of studs on the flange instead of bolts as the turbo was originally designed for. Also, the location of the exhaust manifold ended up resulting in the turbo wastegate actuator bumping against the water jacket lines. All those things were carefully corrected for now and everything has been fine there. I get some boost creep currently because the wastegate actuator hits one of the water jacket lines as it extends and thus the wastegate can't be opened as far as it should be and some boost creep results from the inadequate venting.


Attached are some pictures of the motor as it was assembled and just before going into the car.
 

Attachments

  • IMG_0737.jpg
    IMG_0737.jpg
    463.2 KB · Views: 767
  • IMG_0741.jpg
    IMG_0741.jpg
    575.8 KB · Views: 800
Last edited:
Pulling a motor and dropping it in are FAR more simple than you think. Essentially with the radiator and fans removed, you pull the wiring harness off to the side to give the motor clearance... you lower it in and attach the two side mounts and rear mount to support the motor. Then you can release the chains. After that, you make the inlet and outlet fuel connection, the two radiator hose connections and the two heater core hose connections. You replace the wiring harness to the appropriate locations. Re-connect the clutch and replace the radiator and fans. That gets the motor in the hole all the way. Then you can put the axles back into the transmission, and fil that up with fluid. Then connect the lower radiator hose to the radiator. Then take the upper radiator hose and fill the motor with coolant by pouring into that hose slowly. This does a GREAT job of making sure you don't get many bubbles in the system. Once that hoese gets full all the way, fill the coolant resevoir and top off the radiator as necessary. This combination worked great for me on filling it and I had very little for air bubbles, and I had no traps at all at any point in time.

With that all taken care of, you connect up your intake charge system (intercooler etc on the turbo'ed car... air intake on NA cars). I also about this time put the power steering pump back in place and also put the AC compressor back on. That covers the majority of your connections. Just once over everythign and make sure you don't see any signs of oil, coolant, or fuel leaks at all.

With all the wiring checked out, turn the key to on and verify that everything works right (don't start the motor!). Make sure you have fuel pressure, appropriate fans, lights etc.. If that's all good, check the motor over and make sure nothing looks wrong or out of place or that there are any leaks at all.

Then go through and check your coolant and oil again. If that's all good... take a deep breath and go start the car!
 
Last edited:
I ran into a number of problems when I first got my car started.

My wiring was good, my connections were good, my fluids were good etc.. BUT I did find a couple mistakes.

During the wiring changes that I made, I corrected a "mistake" where one color went to a wrong color in the engien bay.. turns out they had been cut and reversed previously because of one reason or another. This led to my coil packs being wired wrong. I corrected that and I was making progress. One of the first times I got the car started by drag starting it (I fried a starter from cranking it too much as I worked through all these problems) I soon melted down a catalytic converter and the car ran like crap. There were a few reasons for this... but each in turn. The first major issue was that I had not been as meticulous as I had thought when I timed the cams and the cam timing was off by a tooth on each cam. This lead to some issues with raw fuel dumping through the exhaust and overheating the catalytic converter. This got corrected and the car was getting better but still didn't start properly, or run right.

The next thing I discovered was that fine wire plugs whether they are platinum or iridium or the like have no place on turbo charged car. They foul far too easily with large amounts of fuel and in general can be a source of hotspots and other problems. As soon as I switched plugs out to NGK BKR-6E plugs, the car started prefectly.

With those changes in place the car was starting and running beautifully. I did have my alternator flake out on me... probably got wet with oil and coolant when the motor blew up the first time. I replaced that and rewired it so that the car accepted a 1991-1996 Mazda 626 alternator without a problem. All you need is one ignition switched wire with a 300 ohm resistor going to the L terminal, and a 12V directly wired battery wire for the S terminal. Then the alternator will kick on the first time, after that it does fine anytime above 1000 rpm's.

After that... no more problems and the car ran great and went through..

break in:
 
Last edited:
Break In:

The most important time of your engine's life. I researched for a while, and chose to break my car in like this:

Run car for 10 minutes at 2500 rpm's.
Shut car off and change oil.

120 miles of hard acceleration and deceleration in 3rd and 4th with NO BOOST and no higher than 5,000 rpm's. Change Oil.

800 miles of normal driving at varied speeds from in town to highway driving with no consistent speeds. Intersperesed with runs of acceleration and deceleration and no higher than 5,000 rpm's. Boost up to 3-4 psi Change Oil

Begin normal driving with full rpm's and full boost. After 2000 miles on the motor increase of boost past 10 psi.

The reason for the hard acceleration is it is ABSOLUTELY NECESSARY to get your cylinder pressures up to force the rings out against the walls to get them to seat quickly before the hone is worn down to where it is ineffective at grinding down the rings and creating a good seal. If you "baby" the car and don't accelerate it hard you will get a poorer ring seat.

After that is all done you can have fun with the car... i've been carefully monitoring all of the oil temps and the like and everything has been smooth/great!
 
Last edited:
Well, one year of driving down. She goes in to storage and tear down and improvements in a couple days here (storage on Nov. 6th). I'm going to redo the exhaust system and eliminate some issue I have there with a very restrictive set of bends, and some small leaks and isssue. I'm also going to relocate and switch out the coolant thermostat and I will be inspecting the head, bearings, and cylinders for any problems. Overall thought he car has been great, makes fabulous power and the only "issue" I have is a phantom oil consumption issue that I can not find anywhere and doesn't seem to be in the exhaust either... I will hopefully find it and get it taken care of and then all will be well :).

So watch for some more updates, and hopefully a "how to tear down your motor" thread as I go through the steps myself.

Later!

Steve
NSN Motorsports, LLC
 
Last edited:
Update 3/7/06

Figured this was due for an update :)

I finally got around to working on the car this week after putting it in storage on November 6th....

Upgrades for this year are some improvements to the exhaust and then JIC coilovers and AWR rear trailing arms and updated sway bar bushings to get rid of some of the clunk hopefully...

I've been fabbing the new exhaust and it is a MONSTER compared to the old... should genuinely yield a rather large leap in performance... I'm using a 3" 90 degree mandrel bend pipe to a 3" flex joint right into my 3" straight through exhaust... the Evo 3 O2 housing I'm using is a massive 2.5" straight through right from the turbine and I'm porting it to about 2.75" to flute nicely into the 3" exhaust and yield a good transition that should yield more power... I can't imagine how much better this should make things!

I'm also in the process of relocating my thermostat (new DP is too big with my turbo location to keep the thermostat where it was) and remote mounting it and putting in a 160 degrees thermostat (versus our stock 190 degree)... Also trying to salvage my AC system if at all possible as the girlfriend has made it rather clear that she won't be riding in the car much if I want to drive around in it without AC for another year... we'll see I guess... If shifting it down and out a little and going to a longer belt doesn't do it for me I'm going to have to pull the system.. which isn't bad from a racing standpoint :).

I'm also having one of the flanges on my turbo manifold flattened as it was leaking pretty bad this last year... so that will help as well getting that taken care of so I have no exhaust leaks for once...

Lastly, I'm still trying to trace my oil consumption issues... I found oil residue in the intake manifold... and I found oil residue on the intake port of the turbo itself which means that I likely am pulling oil through my air intake which is drawing off the valve cover to ensure that the crankcase stays ventilated... so I found traces of oil in all sorts of places, but none of any quantity... and considering I "lost" about 8-10 quarts of oil in the 6,000 miles I put on last year you would definitely think it would show up definitively... but it hasn't...

My debate now is if I pull the head and check for cylinder wall glazing... it's easy enough to do and I want to re-torque the head studs... but I fear what I might find and what that will cost me in time and money...

My compression numbers were decent.. and leakdown was all under 20% (I didn't measure it accurately enough to tell you exactly what each was.. just did a quick check to make sure everything was under 20% which means the rings and piston crowns are intact even if the seal may not be that great overall)... so that's the word from here!

Hoping to have it on the road by the first week of April... so here's hoping!
 
Last edited:
Figured one other update was needed....

another year later the car has been great and no issues. The oil consumption is consistent but lower than I thought originally (not the over quart per thousand I thought before). Turns out most of the oil consumption is spread between "normal" for a 16G turbo and some blowby I get at the oil pan where the drain tube for the turbo comes down. Again, no big deal and it's better for the engine to burn some oil than to not use any (bad rings if you aren't using any!! Usually not good in the long run). The exhaust changes seemed to help the turbo for the oil consumption as less back pressure on it so that is good too!

Everything is consistent and well behaved. Gets good gas mileage overall (like 28 on the highway and 20 in the city). The new dynos went up recently... car got to 306 whp at 16-17 psi... on a 88 degree day... soo :) Not too shabby!
 
Last edited:
Back