What have you done to your Mazda5 today?

So those wheels transform the Van into a Car like feel! Anything you could elaborate?
A Mazda5 is nothing more than a stretched Mazda3 with sliding doors. If yours doesn't already feel like a car when driving, something is wrong!
 
My 2010 Sport has 17's and I replaced them with Miata (NC) wheels a few years ago. Kept the same tire size as well. No issues.
This is the answer. With the lighter wheels, you can actually feel some torque steer. I was like: woah, you go little, sad, 2.5L but with the 16lb Miata rims!
 
Installed auto dimming mirror with compass.

And also did a-pillar upholstery with black cloth, looks much better and premium like, than original light plastic.
 

Attachments

  • PSX_20210926_132742.jpg
    PSX_20210926_132742.jpg
    40.2 KB · Views: 246
Serpentine belt today at 104k miles. Original was severely cracked. Looked at a bunch of instructions and videos, all of which suggested using a little plastic wedge tool to get the belt to stretch into place because the ‘12 model doesn’t have a tensioner pulley like the 1st gen models. Then I found one video by a mechanic who apparently had to do a bunch of these and decided to find a better way.

Cut the old belt loose, and route the new belt around every pulley except the top forward one. Then loosen the top two bolts holding the top pulley bracket in place. The whole pulley/bracket will rotate towards the right of the car when you loosen the bottom bolt. Pull the belt over the pulley, and then using a pry bar between the frame and the pulley mounting bolt lever it up into position. Stick the top bolts back in and torque them down. Less than 10 minutes including jacking up the front end so my son could help guide the belt around the pulleys from below. No special tools needed. (13mm socket, ratchet, 3” extension, and a 2’ piece of pipe because I can’t find my long pry bar)

I will soon be doing front and rear end links, RSB bushings, tire rotation, transmission mount, rear engine mount, and an oil change. Just not today.

Remove these two bolts
2C22724C-C6DE-4224-9872-B448D4A10FCE.jpeg
87803553-C54A-49CC-A3DC-A87EDAC6C6A3.jpeg


Pry here (I used a 2’ pipe because this pry bar wasn’t long enough)
25CC4564-198B-458B-8CA6-0A4FE847D423.jpeg
 
Last edited:
My 2010 Sport has 17's and I replaced them with Miata (NC) wheels a few years ago. Kept the same tire size as well. No issues.
Junkyards don't have Miata's especially with original wheels!

Anyone using wider tires - any advantage of using wider tires?
 
Okay, I lied. Went ahead and did the RSB bushings, and end links. You could sneeze and rotate the original end links. Feels amazingly better now, and the front end is still riding on worn out end links, and a broken strut mount.

Does anyone have any tips on reinstalling the sway bar brackets over the bushings? I ended up having to remove the sway bar then pound the bracket most of the way back onto the bushing with a 5 lbs sledgehammer. Then when I tightened the bolts it pulled into position. I couldn’t find a way to get the bracket back on by hand with the bar still on the car.
 
Last edited:
Serpentine belt today at 104k miles. Original was severely cracked. Looked at a bunch of instructions and videos, all of which suggested using a little plastic wedge tool to get the belt to stretch into place because the ‘12 model doesn’t have a tensioner pulley like the 1st gen models. Then I found one video by a mechanic who apparently had to do a bunch of these and decided to find a better way.
I know the 2.5 changed to a single belt vs 2 belts on the 2.3 (serpt. belt goes through idler/tensioner but AC belt is also stretch fit). Can you confirm if the 2.5's crank pulley (harmonic balancer) has holes or slots? Did you come across anyone using the zip tie method on the 2.5L belt change? It is by far the easiest and cheapest way to mount any stretch fit belt.

Okay, I lied. Went ahead and did the rear SWB, and end links. You could sneeze and rotate the original end links. Feels amazingly better now, and the front end is still riding on worn out end links, and a broken strut mount.

Does anyone have any tips on reinstalling the SWB brackets? I ended up having to remove the sway bar then pound the bracket most of the way back on with a 5 lbs sledgehammer. Then when I tightened the bolts it pulled into position. I couldn’t find a way to get the bracket back on by hand with the bar still on the car.
Does rear SWB = rear sway/stabilizer bar, as in RSB? Unless I miss understand what is SWB, I can't imagine the need to pound anything to install that.

Front/Rear sway/stabilizer bars should be tightened with the suspension under load. Mount the bar via brackets to the chassis first. Then mount the end links to the bar. The end link ball joints can rotate to fit into the rear cross member; b/c this joint allow for movement, I can't imagine why you need to pound anything... unless you are installing stiff aftermarket end links that have little to no articulation and/or with the rear end suspension under full droop. In this case, I hope your suspension is also very stiff and doesn't move/flex much or you'll end up with broken end links sooner than later.
 
I know the 2.5 changed to a single belt vs 2 belts on the 2.3 (serpt. belt goes through idler/tensioner but AC belt is also stretch fit). Can you confirm if the 2.5's crank pulley (harmonic balancer) has holes or slots? Did you come across anyone using the zip tie method on the 2.5L belt change? It is by far the easiest and cheapest way to mount any stretch fit belt.


Correct the 2.5 dropped the two belts with the stretch fit AC belt, and tensioner pulley. I’d read about people using zip ties, but since I wasn’t planning on doing that I didn’t read too much into it. I didn’t look at holes/slots for the crank pulley since I was just using the bottom anchor point of the top/forward pulley as a pivot to pull the belt tight. Honestly that was so easy I don’t see why anyone would use any other method.

Does rear SWB = rear sway/stabilizer bar, as in RSB? Unless I miss understand what is SWB, I can't imagine the need to pound anything to install that.

Front/Rear sway/stabilizer bars should be tightened with the suspension under load. Mount the bar via brackets to the chassis first. Then mount the end links to the bar. The end link ball joints can rotate to fit into the rear cross member; b/c this joint allow for movement, I can't imagine why you need to pound anything... unless you are installing stiff aftermarket end links that have little to no articulation and/or with the rear end suspension under full droop. In this case, I hope your suspension is also very stiff and doesn't move/flex much or you'll end up with broken end links sooner than later.

Let’s just chalk that up to my brain and my fingers not communicating clearly. I was replacing the rear sway bar bushings, and the end links. I edited my above posts to clarify.

The mounting brackets I referred to were the ones which go over the bushings and hold the bar to the frame. I wasn’t able to push them into place while laying under the car, and had to remove the bar and knock them about 80% of the way on (piece of wood between the hammer and the bracket). Once they were that far I was able to get the bolts to engage and pulled the bracket the rest of the way onto that bushing that way.

Suspension was under load when tightened.

End link installation required no pounding with a hammer. A little creative Allen wrench placement since my nice large handled Allen wouldn’t fit above the right end link because the fuel filler line was in the way, and I had to use a smaller one. Removing the original was nearly perilous because part of the allen socket was slightly rounded out, so it took awhile to get the partially seized nut off of the threads. End links I put in were moog, and definitely stiffer…. Wouldn’t call them performance stiff, but by comparison to the worn out wet-spaghetti-esc ones they’re all but immobile 😂. Rear springs were previously swapped out for progressive CX-7 lowering springs, so it is stiffer.
 
Wasn't just what did today, was actually whole weekend project

Installed amplifier under front passenger seat, changed the front speakers for 2-way setup.

It's was really PITA to get the wires in the door, but I made it.

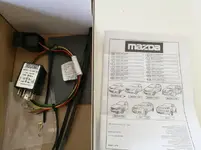
Also when the glovebox was out, installed Mazdas original "smart turn system" to bcm wires.
Smart turn system is extra relay what makes triple blink when changing lane.
 

Attachments

  • PSX_20211010_184649.jpg
    PSX_20211010_184649.jpg
    63.3 KB · Views: 187
  • PSX_20211010_184558.jpg
    PSX_20211010_184558.jpg
    33.7 KB · Views: 197
Wasn't just what did today, was actually whole weekend project

Installed amplifier under front passenger seat, changed the front speakers for 2-way setup.

It's was really PITA to get the wires in the door, but I made it.

Also when the glovebox was out, installed Mazdas original "smart turn system" to bcm wires.
Smart turn system is extra relay what makes triple blink when changing lane.
I love the smart turn signal system retro fit you did. Do you know what years of Mazda 5 that works for?
Not sure if your Mazda 5 was like mine or not but if you take out the front seats and pull up the carpet there is a huge space underneath them you can mount amps and not even see them. If you check out my thread on my build you'll see what I did I've got a full stereo system in there
 
Wasn't just what did today, was actually whole weekend project

Installed amplifier under front passenger seat, changed the front speakers for 2-way setup.

It's was really PITA to get the wires in the door, but I made it.

Also when the glovebox was out, installed Mazdas original "smart turn system" to bcm wires.
Smart turn system is extra relay what makes triple blink when changing lane.
What's the part number for the smart turn signals?
 
Part nr. C830-V7-160B
According to instructions it fits both gen 5's

@TheMZ5wagon, looking your pics, floor looks pretty same, so I might use your idea next summer, when I'll try add sounddeadening to front floor.

At this moment I have added deadening to rear (floor and trunk sides), not as much as @theblooms, but still made huge difference.
 
Wasn't just what did today, was actually whole weekend project

Installed amplifier under front passenger seat, changed the front speakers for 2-way setup.

It's was really PITA to get the wires in the door, but I made it.

Also when the glovebox was out, installed Mazdas original "smart turn system" to bcm wires.
Smart turn system is extra relay what makes triple blink when changing lane.

Also interested in the smart turn mod. Any comments on where you got it, how much it cost, and what the install involved?
 
I just checked the smart turn signal system and unfortunately you can't get it in Canada the part number doesn't even come up in their system at Mazda ☹️
 
Back