What have you done to your Miata today?

Not bad, that should be pretty easy. When I've had the need to change the angle on a flange I've cut most of the way through the tube, but left the end attached with a bit of pipe wall, about 1/2 or so of diametral distance. This method maintains the flange orientation nicely and you can bend it to the right angle in-situ. Make sense?

It does, but I'm changing from a flat flange to a donut flange, so the whole thing needs to come off.


And while I wait for the flange and gasket to be shipped, I got rid of those stupid studs under the bumper that make installing and removing the bumper a pain in the balls.

C2F1U4EM10ZGH7jG_jswnUdgXT7IHjN2M8BZk4bWT9W2=w1396-h785-no


I7ciW4AI3Eh4WIa58vEhgI2gk4gvFjBQONBAo8d_jy0R=w1396-h785-no


VEW_ikCFnBfCBhAV0uVsl3E0pP_aqFybDEVB3Lv1Ehqk=w1396-h785-no


gcQeyy0XS2ICfW3sMLgaQPvtznm-RzLtATm0GwkRhDmA=w1396-h785-no
 
Accidentally stumbled into a pretty cool picture of the detritus left over from yesterday's thrash.

NfEMyVt0ZYCQSjxk86Y8VbZ3Wbovudz8aNyAHgV1R4eh=w1280-h720-no
 
It was a busy week in the garage!

This week I:
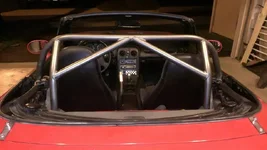
painted my roll bar
took the soft top and frame off of the car
removed the cracked rain rail
installed an uncracked rainrail
installed the rollbar
reinstalled the soft top and frame
tested that for leaks
found two
realized I'd riveted the top to the rain rail in such a way that the back side of the rivets were probably causing the leaks
unbolted the top all around the rain rail
removed some of the rivets
reversed some of the rivets
reattached the top all around the rain rail
tested that for leaks
found one
unbolted the top all around the rain rail
added nylon washers to the studs, between the outside of the rain rail and the top
reattached the top all around the rain rail
tested that for leaks
found none
did a happy dance
pulled the driver side carpet over to the door sill again, stuck it down with gaffer's tape (under the trim) in hopes that it won't come loose again
re-installed my seats, center console, etc.
padded the roll bar
drove it to work today!
Smiled a lot!
 

Attachments

  • barincar.webp
    barincar.webp
    31.6 KB · Views: 158
Picked up a radiator that's in MUCH better shape, and made a small change to the re-route to unkink the hose. It was about an inch too long at the back of the head, and was kinking there at the water neck. I also reoriented the worm clamp on the back of the head so it'll be much more accessible in the future. I guess when I put it on the first time, I'd done it with the motor out of the car. Oops?

SPKdWuQFXCRHuMpV8ljkwWHAVsOIpB-kZlZzZUSME-hZ=w1396-h785-no


Protip: if you ever feel the need to pick up welding, don't mess around with flux core for very long. I knew intellectually that MIG was a cleaner process than Flux (they don't call it Hobbyist level stuff for nothing), but until you actually see it in person while working on it, you don't realize how ugly flux core is.

A few practice beads of Flux core:

YlTVyUh2lgtBL5HD9Norppt9d6QaTk8Ppgp-9pjZNkuX=w1396-h785-no


And a few practice beads of MIG. Yeah, it's more expensive to start, but holy crap is it worth it.

wysmUB13oH_9a7r8bK_PU8tsCgbnPNrHKGho-QY_3qWR=w1396-h785-no
 
Today I learned that not only is the header flange angle different between the NAs and the NBs, but the length is significantly different. As such, I had to make a midpipe from scratch. And somehow, I did. I've made a thing! It's not much, it's not perfect (in fact, it'll need filler pieces on a couple of gaps that are bigger than I'm happy with), but I'm chuffed to bits, to borrow a phrase from the brits. It's incredibly satisfying to take raw materials and create something that did not exist minutes (...ok, hours) ago.

Also: I really need to get a proper chop saw. Doing this with a couple 4.5" angle grinders? Sub optimal. That didn't help.

20150601_230918.jpg
 
Woo! Looks pretty good from the picture. I wouldn't even worry about filler pieces unless there's something dramatically worse than what we see here.

When I do that sort of work I actually use a hacksaw. I got a really nice Lennox hacksaw frame and blades and I much prefer using that to an angle grinder or an abrasive cutoff saw. Angle grinders can catch when cutting thin-walled tube and get into a lot of trouble, and abrasive chop saws (generally) have no good way of holding and cutting tubing bends. The only serious power tool I'd want to cut a tube with would be a band-saw. A band-saw will have a much smaller kerf than a chop-saw, is easy to cut just where you want it, and is generally a much more useful shop tool. I know angle grinders and abrasive chop saws can be faster, but they can also cause trouble and make scrap a lot faster too!

Also: I really like that you have a full face shield for doing that sort of cutting. A friend of mine needed 40 stitches in his face when a cutoff wheel came apart in front of him (like I said, cut-off wheels can get caught in thin material!) Safety glasses kept his eyes intact at least.
 
Woo! Looks pretty good from the picture. I wouldn't even worry about filler pieces unless there's something dramatically worse than what we see here.

What, you think I'm going to post a picture of the UGLY side!? :-P
No, the gap with 3 tack welds has a pretty big (1/4") gap on the back side because of the angle grinder('s user) not making a straight cut on that bend. So I had to tack it on 1 side, fit it up to the exhaust again and bend it to where it needs to be, then reinforce that tack and make a filler piece for the gap. There's also a maybe 1/8" gap on 1 of the joints that I could probably fill in by globbing a fat weld on, but I'd rather something there to support it.

When I do that sort of work I actually use a hacksaw.

That's a pretty good idea. I'd love to have a bandsaw, SO much, but alas. I'll likely use a hacksaw next time.


Also: I really like that you have a full face shield for doing that sort of cutting. A friend of mine needed 40 stitches in his face when a cutoff wheel came apart in front of him (like I said, cut-off wheels can get caught in thin material!) Safety glasses kept his eyes intact at least.

This isn't the first story I've heard about that, and I've seen some pictures in a couple of mechanic / fabricator groups I'm a member of on facbook, so I decided to spend a few bucks on a good full-face shield w/ anti-fog. Makes a HUGE difference in comfort. Not just in "now it won't kill me if it blows up!" but also in terms of being able to look exactly where you want to look when working on a piece. With just safety glasses, if you're taking shrapnel to the neck or face, it's going to suck and you end up working semi-blind. With the full face, it doesn't really matter where the sparks are going.

Protip: keep safety glasses on as well, because you will inevitably forget to flip the mask down at some point, and also occasionally you'll get a ricochet that hops up under the mask.
 
Last edited:
"My grinds look fantastic!" ...said no self respecting welder, ever. Fortunately, I'm not a welder, self respecting or otherwise, so I'm fairly happy with how it came out. Butt welds are hard. But alas, here's the finished product, and it should work.

Fixture to keep the flange from warping:

20150602_172924.jpg


I debated on welding the corners near the bolts, but there was enough gap there that I was not going to be happy with leaving it open. So as a compromise, I welded in there, then ground it back so the flange nuts / bolts would have ample clearance:

20150602_202222.jpg


In retrospect, I should have gone back over it with a flap disk to smooth it out some, but I forgot I even had those before I slapped a coat of paint on. But yeah, it ain't pretty, but it'll work.

20150602_203239.jpg


Beat it to fit, paint it to match.

20150602_204235.jpg
 
Well, you see, that's what I thought... until I looked at it from somewhere that wasn't directly underneath. That's when I realized I had apparently pushed the cat-back out of the way at some point, and instead of swinging back into position, it stuck in place... so while the pipe fit, it fit like this:

20150603_130626.jpg


After a good bit of work, and a F**K ton of cursing, it looks like this (ie: basically stock catback fitment):

20150604_221750.jpg


More to the story here if you're interested, but that's the Cliff's Notes.:
https://preparedmiata.wordpress.com/2015/06/05/mid-pipe-part-the-second/
 
To get everything sealed up, without getting in the way of mounting bolts, you could have welded around the inside of the flange and then ground the flange smooth again. That's a more viable option if you have a belt sander/grinder though.

Still though, if it's together and it works, close enough!
 
To get everything sealed up, without getting in the way of mounting bolts, you could have welded around the inside of the flange and then ground the flange smooth again. That's a more viable option if you have a belt sander/grinder though.

Still though, if it's together and it works, close enough!

A 4" belt sander and a proper band saw (and a bigger fan) are my biggest workshop wants at the moment.


Speaking of using lessons learned on the 1st go round used in the second, I took your advice and did away completely with using grinders (even with cutting disks) to cut the tubing. Instead I used a 3" 90 degree grinder w/ a cutoff wheel to make a notch, and used a sawzall to make the pie cuts, then the angle grinder to fine tune those notches to facilitate making the bend I needed. I did exactly 1 cut with a hack saw and knew that doing more of that was not for me, so I compromised lol. If you can get it started (ie: cutting a notch w/ a hacksaw or cutoff wheel), the sawzall with a quality blade made super clean cuts.

But man was I jonesin' for a bandsaw!
 
To prod aMaff into getting a bandsaw even harder...

I used a bandsaw to cut a sheet of aluminum into a PCM mount for the LS1 Miata I'm putting together for a buddy:

FAadvPB.jpg


2GW57eW.jpg


EangjTm.jpg
 
Picked up my car yesterday from the body shop. had my Heater Core die last night bringing the car back from the body shop, so i scrubbed and shampoo'd the carpet to clean all the antifreeze/coolant out of the drivers footwell.
Removed/rerouted the coolant line to bypass the heater core for the time being this morning. Found and fixed a vacuum leak this morning, it runs and idles alot better now. Also ordered my Hankook Ventus RS3's for the Joengbloed wheels yesterday and got confirmation they have already shipped so the new wheels/tires should be on the car next tuesday or wednesday

18152242214_ef6a6e98a1_z.jpg
you happy with the fit and finish? Looks good from here in MA!
 
yeah overall im pretty happy with the fit and finish. i haven't gotten a chance to go over all the fit and finish with a fine tooth comb yet but i don't expect ill have any issues. i know i need to get a good wash, wax, polish on it but the body shop told me not to wax it for 30 days
 
Installed my new (to me) Mitsubishi Eclipse vents. work substantially better than the eyeball vents did, and IMO look a lot better as well

18805209886_9b1caf1f70_c.jpg


18834136111_4ccdc13be0_c.jpg
 
Back