
You are using an out of date browser. It may not display this or other websites correctly.
You should upgrade or use an alternative browser.
You should upgrade or use an alternative browser.
Protege5 Leak (tranny fluid). Which seal?
- Thread starter newUser08
- Start date
The service manual just calls it an "oil seal" for both the manual and automatic transmission.
Rockauto lists "input shaft seal", "output shaft seal", " transmission seal"...
I wouldn't know which one to order.
They don't show where it goes.
An online Mazda parts store might be a better choice, even if just to get a part number.
Rockauto lists "input shaft seal", "output shaft seal", " transmission seal"...
I wouldn't know which one to order.
They don't show where it goes.
An online Mazda parts store might be a better choice, even if just to get a part number.
- :
- protege5
Don't try and guess what it might be. When you're driving, wind blows fluids and stuff all over the place so who knows where it's REALLY coming from if it's everywhere. You need to pinpoint exactly what is leaking before going and spending a bunch of time replacing seals one at a time until you eventually find it.
Put the car up on jack stands and clean everything really really well with a couple cans of brake cleaner and blow it out with compressed air so everything is clean and dry. Then take the car for a 10-15 minute drive. Put the car back in the air and see where the leak is coming from. Then decide what part you need to order.
guessing is a very expensive and frustrating way to fix a car.
I had the same oil seal leak on my car.
When I first got my car I noticed a squeal from under my hood and took it to my local shop (who shall remain nameless except that they're Canadian and they sell tires).
They said the alternator was bad and needed to be replaced.
It wasn't the actual alternator, it was the bearing that went bad.
I got a new rebuilt alternator installed for around $400.
(this is before I found this forum and started doing my own work.)
A few months later, the squealing started again and yet another alternator bearing was shot.
The alternator was warrantied but not the labor to put it in, so another $180.
Then yet again, another failure... $180.
Then again but this time, the alternator burned up and it was covered, but not the labor. Another $180.
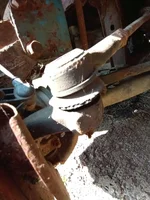
Then I got a transmission oil leak on the CV shaft.
I took it to a different shop and spent around $200 to have the seal replaced.
Every time the alternator was replaced, they pulled the axle and ended up wrecking the seal.
And, every time they replaced the alternator, they tightened the living s*** out of the belt which lead to a failed alternator bearing.
The Canadian shop that sells Tires (and employs children) didn't properly "torque" the belt which ended up costing me over $1000
I do ALL my own work now and if I F'-up I know it's my own damn fault.
That sits way better in my gut and I sleep better at night.
When I first got my car I noticed a squeal from under my hood and took it to my local shop (who shall remain nameless except that they're Canadian and they sell tires).
They said the alternator was bad and needed to be replaced.
It wasn't the actual alternator, it was the bearing that went bad.
I got a new rebuilt alternator installed for around $400.
(this is before I found this forum and started doing my own work.)
A few months later, the squealing started again and yet another alternator bearing was shot.
The alternator was warrantied but not the labor to put it in, so another $180.
Then yet again, another failure... $180.
Then again but this time, the alternator burned up and it was covered, but not the labor. Another $180.
Then I got a transmission oil leak on the CV shaft.
I took it to a different shop and spent around $200 to have the seal replaced.
Every time the alternator was replaced, they pulled the axle and ended up wrecking the seal.
And, every time they replaced the alternator, they tightened the living s*** out of the belt which lead to a failed alternator bearing.
The Canadian shop that sells Tires (and employs children) didn't properly "torque" the belt which ended up costing me over $1000
I do ALL my own work now and if I F'-up I know it's my own damn fault.
That sits way better in my gut and I sleep better at night.
I had the same oil seal leak on my car.
When I first got my car I noticed a squeal from under my hood and took it to my local shop (who shall remain nameless except that they're Canadian and they sell tires).
They said the alternator was bad and needed to be replaced.
It wasn't the actual alternator, it was the bearing that went bad.
I got a new rebuilt alternator installed for around $400.
(this is before I found this forum and started doing my own work.)
A few months later, the squealing started again and yet another alternator bearing was shot.
The alternator was warrantied but not the labor to put it in, so another $180.
Then yet again, another failure... $180.
Then again but this time, the alternator burned up and it was covered, but not the labor. Another $180.
Then I got a transmission oil leak on the CV shaft.
I took it to a different shop and spent around $200 to have the seal replaced.
Every time the alternator was replaced, they pulled the axle and ended up wrecking the seal.
And, every time they replaced the alternator, they tightened the living s*** out of the belt which lead to a failed alternator bearing.
The Canadian shop that sells Tires (and employs children) didn't properly "torque" the belt which ended up costing me over $1000
I do ALL my own work now and if I F'-up I know it's my own damn fault.
That sits way better in my gut and I sleep better at night.
do you recalll the name of the seal?
No.do you recalll the name of the seal?
The mechanic ordered and installed the part.
Here's a link to the service manual and parts catalog.
It's probably in the parts catalog with a part number.
katapaltes
'03 P5, '17 Miata, stock AF
- :
- Dallas, TX
- :
- 2003 Protege5
I had trouble finding that part number so I'm going to write it here for posterity: F003-27-238 / F00327238 (same part used on both sides of the differential).
I kept trying to find it in the parts PDF in the axle section and not in the differential section. D'oh!!
I kept trying to find it in the parts PDF in the axle section and not in the differential section. D'oh!!
katapaltes
'03 P5, '17 Miata, stock AF
- :
- Dallas, TX
- :
- 2003 Protege5
Even though your comment more than two years old, it's as appropriate a segue as I'm ever going to see."I do ALL my own work now and if I F'-up I know it's my own damn fault."
I replaced the differential/axle/shaft seal yesterday and it took me hours. Over the course of that time, I ripped the ball joint boot on the new lower control arm which had also taken me hours to replace. So if you guys are working *anywhere* near the ball joint, make sure you wrap it with a rag 100% of the time. I do this maintenance mainly for the experience, so I wasn't too torn up (or at least not nearly as torn up as the boot).
My most important takeaway from reinstalling the axle was the position it needed to be in for me to re-seat it, what with that dang C-clip on the differential side hampering re-installation. For the life of me, I could not get the axle back in with a two-pound brass hammer. The problem seemed to be that the axle wasn't in a perfectly straight line as I was whacking on it. The knuckle and everything else was in the way of the hammer and I had to hold that out of the way and support the axle simultaneously with one hand while hammering the outboard axle end using the other hand.
In the end, I inserted the knuckle side of the axle back through the knuckle even though the axle side was not yet fully seated. I then jacked up the lower control arm so that everything was in a perfectly straight line and with plenty of the knuckle side of the spline poking through the center hole of the disc rotor. It then took only one or two hits with the hammer to seat the axle, and since the hammer was brass I didn't have any worries about marring anything.
So now I'm driving with a 20-year-old LCA with a torn ball joint boot on one side and a brand new LCA with a torn ball joint boot on the other. My car still sounds like a box of hammers when I go over bumps, and at this point it's not worth the aggravation trying to fix all the noises. At this point, I may simply install the remaining LCA and the front stabilizer bar bushing since they're sitting on the shelf and call it good.
I used almost 3 quarts of Valvoline synthetic at $10USD per quart. It seems to shift pretty nicely now, although I really had no complaints about the existing oil. I didn't measure the new oil level against the fill hole because the car was at an angle up on ramps; I simply put in the 2.9 quarts specified in the manual. Weird note: Back at 30k miles, I had the transmission oil replaced *at the Mazda dealership* and when I left there, shifting was very sluggish. I turned the car around and they did a drain and refill, and it still didn't shift right. I thought maybe it needed to "break in," and ended up driving with it for 30k miles with difficulty shifting, mainly from 1st to 2nd. At 60k miles, I went to a random Goodyear and they put in garden variety GL-5 75w-80 and everything was Gucci after that. I left that fluid in for 80k miles as I was afraid to have it changed again. I only changed it now due to the oil leak.
Anyway, the leak seems to be fixed, so I'm happy.
")
EDIT: I had the car on jack stands, so there was not much room to pry from below. I used a pry bar from the top of the engine bay to remove the axle. It was worth my time to remove the strut tower brace, battery, and battery tray to get a better angle on that axle. I needed a screwdriver to remove the old, leaking seal, but the new one went in by hand.
For a novice mechanic, the Harbor Freight four-piece pry bar set is a bargain at $13. Made with Indian steel, they're pretty tough.
Last edited:
.., I ripped the ball joint boot on the new lower control arm which had also taken me hours to replace.
So now I'm driving with a 20-year-old LCA with a torn ball joint boot on one side and a brand new LCA with a torn ball joint boot on the other.
At this point, I may simply install the remaining LCA and the front stabilizer bar bushing since they're sitting on the shelf and call it good.
Your second LCA should be WAY easier to replace now that we figured out that YouTube video and you remove the brake caliper for clearance.
As far as the new ripped boot goes, get a grease needle and pack the torn boot with grease. It clips onto a grease gun and you just pump the grease in.
That should really help with keeping dirt and water from getting into the ball joint.
Feed the needle through the rip to the opposite side of the rip so that the grease pumps in and pushes the air out.
Just wipe the excess grease off the boot then take it for a spin and check if more grease gushed out of the tear.
The boot is about ¼ inch from the brake rotor and you don't want grease on the rotor.
That should buy you all kinds of time and should probably last as long as you have the car.

katapaltes
'03 P5, '17 Miata, stock AF
- :
- Dallas, TX
- :
- 2003 Protege5
I think a pickle fork can still touch the boot. I didn't damage the boot when separating the ball joint from the knuckle/spindle. I was still being careful at that pointThey also have a pickle fork tool to help getting the ball joint off.
I've never used one and I wonder if it still touches the boot?
 and was using a big pry bar only on the "arm part" of the LCA. I probably damaged the boot by letting it come in contact with the knuckle or something when reinstalling that axle. (Either that, or the Beck/Arnley boot was crap/old from the seller and it split spontaneously, which I doubt.) When I replace that other LCA, I'll be sure not to damage it. I'll then inspect it after a few months and see if it has somehow split on its own.
Unfortunately, I have tears on the inner and outer sides of the ball joint boot (no idea how I accomplished that) so I'd have to feed it grease often. Might be a good short-term workaround until I grab another LCA, though. The cracked boots on my tie rod ends might appreciate that treatment.
I think a pickle fork can still touch the boot.
I think you're right.
The tongs of the fork would have to be close together to grab both the knuckle and control arm at the same time, so it the would push on the boot.
I didn't damage the boot when separating the ball joint from the knuckle/spindle. I was still being careful at that point
It probably came in contact with the brake caliper and pinched/cut the boot.
The control arms are under HUGE pressure.
(Either that, or the Beck/Arnley boot was crap/old from the seller and it split spontaneously, which I doubt.) When I replace that other LCA, I'll be sure not to damage it. I'll then inspect it after a few months and see if it has somehow split on its own.
If you remove the caliper from the knuckle, like in the video you should be fine.
You'll have clearance for the LCA.
Unfortunately, I have tears on the inner and outer sides of the ball joint boot (no idea how I accomplished that) so I'd have to feed it grease often.
If you feed the grease needle towards the base of the ball and squeeze the air out, your ball joint should be packed and protected.
Might be a good short-term workaround until I grab another LCA, though.
If you pack the ball joint and boot with grease, you should WAY better off than a short term fix.
The ball of the ball joint normally only rotates in its socket. It stays vertical.
It's when your strut goes up and down (you drive over a bump) that the ball joint stem and boot pivot.
It's that pivoting motion that sqashes the grease out of the boot.
If you are careful and wipe the grease off the boot before it gets on your brake rotor, you should be fine.
It can be an almost permanent fix.
Back in the late 80's they had split boots for the CV shaft and it had a bunch of plastic scews/nut to hold it together.
You just remove the old cracked boot and installed the new split boot over top of the joint and screwed it together.
I did that once for my 83' GLC, but it didn't work.
The grease flung out of the seam and made a mess.
Then they came out with split boots that you glue together.
I never tried it and ended up removing my axle, taking it apart and installing a one piece boot.
If it were me and I was you, I'd fill the LCA ball joint boot with grease and glue the cuts together.
Replacing the entire LCA because of a cut ball joint boot sounds like too much work.
Clean up the slice area with acetone and glue it together to seal it.
I'm pretty sure it's just crazy glue, but it might be special stuff that is more flexible.
3M should have the right stuff that you need?
The cracked boots on my tie rod ends might appreciate that treatment.
Just buy new tie rod ends.
They're relatively cheap even with OEM.
Luckily the ball of the joint in the tie rod ends are upside down, so crap drains out.
You're going to be all up in there anyway so replacing the tie rod ends at the same time is a good idea.
You live in the flood zone and your car gets submerged occasionally, so pack all your boots with grease.
Including the new LCA that you are planning to install.
Fill the ball joint boot of the LCA with grease before you install it.
Push the grease needle down from the top of the boot at the pin where you don't have to puncture the boot and fill it.
If you end up replacing your LCA'S, I would personally go with Mevotech.
The Mevotech are grease-able and the grease pushes up from the bottom and pushes the old dirty/wet/rusty s*** out and packs the boot.
I'm almost positive that these weren't available when it bought my LCA'S, or I would have bought them
I like maintainable/greaseable pivot points. Waterproof
Attachments
Last edited:
katapaltes
'03 P5, '17 Miata, stock AF
- :
- Dallas, TX
- :
- 2003 Protege5
I'm seeing some advice on YouTube to use silicone stretch-and-seal tape. That might work a little better than an adhesive simply due to the nature of the mating surfaces (or lack thereof). I'm going to run to the hardware store and get some. I'll try it out and report back.
I've located a grease needle in stock at an O'Reilly nearby.
I've located a grease needle in stock at an O'Reilly nearby.
I'm seeing some advice on YouTube to use silicone stretch-and-seal tape. That might work a little better,..
I agree.
I've got some emergency repair tape on hand.
This stuff is supposed to be able to seal a torn radiator hose.
You peel off the orange tape to expose the glue.
Seal your boot and pack it with grease.
Clean your boot first so the tape sticks better.
This is a link showing some spots that you might want to lubricate.
 mazdas247.com
You might want to check and grease/oil your P-brake cables. They were probably submerged.
Your gas cap release lever is on the floor too.

There are rubber boots on both ends of each cable and you can disconnect them from the cable to expose the wire inside, then you can pack the boots with grease/oil.

Be sure to use silicone lube/grease in those boots.
Regular grease dissolves the rubber.
I'm almost positive that the boots on the LCA ball joints are a different kind of rubber that is grease proof.
I think it's some kind of special rubbery plastic?
The boot is kinda shiny and stiffer.
A tube of silicone grease for your grease gun is kinda expensive but you can use it everywhere on your car.
What have you done to your P5 today?
Part of the problem is paying in Canadian dollars, and free shipping usually doesn't apply to Canada. My stalk shipped from Quebec. I think that I paid about $40 Canadian? My wiper stalk ended up being from a Ford Escape. (I don't recall how I knew it would fit?) For anyone that doesn't...
You might want to check and grease/oil your P-brake cables. They were probably submerged.
Your gas cap release lever is on the floor too.
There are rubber boots on both ends of each cable and you can disconnect them from the cable to expose the wire inside, then you can pack the boots with grease/oil.
Be sure to use silicone lube/grease in those boots.
Regular grease dissolves the rubber.
I'm almost positive that the boots on the LCA ball joints are a different kind of rubber that is grease proof.
I think it's some kind of special rubbery plastic?
The boot is kinda shiny and stiffer.
A tube of silicone grease for your grease gun is kinda expensive but you can use it everywhere on your car.
katapaltes
'03 P5, '17 Miata, stock AF
- :
- Dallas, TX
- :
- 2003 Protege5
Well, I wrapped the ball joint boot and that silicone tape is some pretty neat stuff. I don't know how long it will last in this application, but I can apply it again and again (and hopefully do a better job each time) as needed. It was only $5 a roll at Home Depot. I haven't been driving much and I had not lost any grease, so I did not try to repack the ball joint. With two large tears, it would have been a mess to repack anyway. I cleaned the boot with 100% acetone nail polish remover from the grocery store first. Cleaned or not, the tape isn't really meant to stick to the object being repaired as much as it's meant to stick to itself.
Here's the video I saw on YouTube:
 www.youtube.com
Here's the video I saw on YouTube:
Tie rod or Ball joint boot repair secret Mark's Mechanic Minute
Easy way to repair boots with minor damage on tie rod ends and ball joints.
www.youtube.com
,.. I haven't been driving much and I had not lost any grease, so I did not try to repack the ball joint.
I filled my boots with grease before I installed my new LCAs.
There is very little grease in the boot and I didn't want any air in my boots.
I could put the needle down beside the stud so I didn't have to puncture the boot.
I also used the needle on all the other dust boots I could think of.
I had to puncture those boots, but it just makes a tiny hole that closes up on itself when you pull the needle out.
I pumped the grease in until it came out at the top of the boot at the stud.
Water doesn't get in because there's no where to go.
I remember getting new Calipers and they just had a thin film of grease on the slider pins.
I packed the slider pin dust boots with grease as well.
I've got a pretty cool tool for lubing cables.
You feed the cable through it, and one end seals up around the inner wire, and the other end seals up around the outer cable.
Then you push the little red extension tube from you can of lube in the little hole and spray lube in.
It pushes lube down the entire length of the cable.
New Posts and Comments


- Replies
- 26
- Views
- 54K
- Replies
- 12
- Views
- 493
