Need help with BEGI kit!!!!!!!!!!!!!

1sty

Member
Contributor
:
2006 Toyota Tundra DC
My next task is to cut up the stock up radiator hose. To do his properly do i need to drain the coolant some then purge the engine when iget ready to start her up?

Also pleas tell me our stock oil sensor has a green wire on a clip, otherwise I am going to be in for some extra work.

Also the stock cat had 3 gaskets at each end do I clean them off then put some new oil on them or just leave them alone?

Does the oil return line go into the oil pan? hope so becuase thats what has a new 3/4 hole.
 
My next task is to cut up the stock up radiator hose. To do his properly do i need to drain the coolant some then purge the engine when iget ready to start her up?

Yup;)

As for the gaskets I would leave them alone and the oil return goes to the oil pan, I have mine mounted on the front of the pan. It would even be better if you could get the fitting welded into the pan but tapping it should be fine;)

I am unsure about the o2 sensor....:(
 
I accidently wrongly mounted mine in the back of th eoil pan. These directions aren't anywhere near as good as I hoped. So now I have to take the pan back off, plub the old hole and put a new one in the right place.
 
STOP!!!!
Perhaps Bell specifies that for a reason on your kit. I would do what the instructions say, so if it is a fucup your not responcible:D
 
spoolinmp3 said:
STOP!!!!
Perhaps Bell specifies that for a reason on your kit. I would do what the instructions say, so if it is a fucup your not responcible:D

I think he meant that it wasn't clear where he had to drill the hole.
 
unfortunitly by the time I realized I misunderstood the directions the whole was drilled, the fitings where in and the pan was reinstalled. S now tomarrow I have to Un mount the pan again, patch the, whole and then put it in the right place.

I have come across a few issues though. 1 I dont even see wshades or Keith's power steering cooling loop infront of there intecoolers. Mine went all the way across where the intecooler needed to be and I had to fasten them into the inner bumper to keep it off the intecooler. Also there are 2 nuts I can not get onto the studs for the mainfold. they are the 2nd and 3rd from the left on the bottom row. the 2nd to the left wont allow any length of wrench in becuase of the coolant fittings bellow it and it doesn't look like a good idea to unbolt those fittings unless there is no choice. the 3rd one in doesn't even have room to get a wrench into let alon turn to tighten it. both of these are just barely past finger tight. As far as the studs go the directions mention 3 at 35mm and 10 at 30mm well I have 13 all the same. Also I had 2 studs used on the factory manifold so I left them in instead of swapping them out.

A concern of mine is that none of the turbos fittings have a torque spec.

Well I'm off to bed, Keith if you read this or anyone that has put on this kit please let me know how to deal with these 2 nuts that I just cant tighten.
 
Remove the cat and get them from the bottom. If at all possible replace the studs because the stock ones may stretch. How will you patch the oil pan? Make sure it is sound. How much is a new one?
 
If you need help you can call me. I installed the kit myself so I have already run into all the problems.

Steve
(860) 944-6191
 
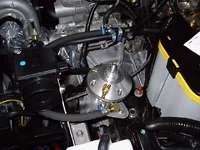
MP3CT does your FPR look like this?


Wshades seems to have a few differences
 

Attachments

  • fpr.webp
    fpr.webp
    44.2 KB · Views: 198
Yes the aluminum piece is an FPR fuel pressure regulator,
Hey spoolin why is this one spliced into the fuel return line and not the line from the tank to the rail?

And the turbo in my kit is a turbonetics, They had some problems locating one.
 
fmu's and fpr's are always located on the return side of the fuel system. they work to restrict how much fuel goes back to the tank and raise the fuel pressure to the injectors. if it was placed in front it would be restricting what fuel gets to the injectors instead which would only raise the pressure between fuel pump and the fpr/fmu without raising the pressure to the injectors.
 
Well the car is up and running now.

But I still have a few issues.
I think I might be getting some knock, basicly after a hard acceleration the check aengine light came on for a minute.

Also was this supposed to happen to the down pipe?:confused:

I didn't think it was supposed to strip its own paint in 30 miles.
 

Attachments

  • sany0003.webp
    sany0003.webp
    37.6 KB · Views: 136
1st MP3 in NH said:
Well the car is up and running now.

But I still have a few issues.
I think I might be getting some knock, basicly after a hard acceleration the check aengine light came on for a minute.

Also was this supposed to happen to the down pipe?:confused:

I didn't think it was supposed to strip its own paint in 30 miles.
Uhh, I think you posted the wrong pic.
 
oops, basicly the pic was of my down pipe shedding its paint, but according to corky its ok.
 
Mine did the same. Thats one of the reasons I had my parts ceramic coated. The paint can not handle the heat.
 
Back