ke20sprinter
Member
- :
- Daily Driver Protege5
First, I know of 2 rear strut tower bars (STB) out there that are for the P5 (Autoexe & GTSpectoo expensive for me), so Im trying to go for the cheapest possible way (eBay bars!)& after looking at different pictures on eBay, I found one that fits perfect!!! The 93-96 Mazda MX6 rear strut tower bar.
So I took a chance and bid on the cheapest bar (including shipping) ~$22.
Things Needed:
-1993-96 Mazda MX6 Rear Strut Tower Bar
-Washers (5/8 I think)
Tools:
-Screw Drivers (to remove panels)
-Ratchet & 17, 14, & 12 mm sockets
-Drill w/1.5 hole saw
-Adjustable wrench (to tighten bar)
Extra:
-Painters Tape/Blue Tape
-Jigsaw/Cut off Wheel
Instructions:
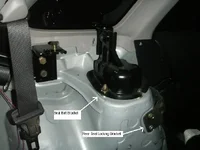
1. Fold the rear seats down, & take apart the rear panels to expose the top perches of the rear struts (manual sec. 06-17-15).
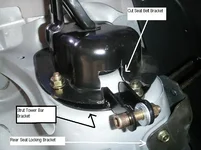
2. Once the panels are removed, you can unbolt the seat belts from the back (17mm), by then youll notice the Seat Belt Bracket over the rear struts. You can either:
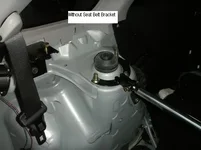
A. Remove the bracket completely and install the rear STB.
B. Cut the bracket to allow the bar to fit underneath the seat belt bracket.
I chose to cut the bracket because I use a baby seat sometimes for my daughter when I drive (the bracket is pretty thick and you are only cutting a small portion).
If you decide to take it out completely, I dont think it should be a problem. I think the Seat Belt Bracket is used to position the seat belt over the rear seats. Also, the rear seats hold the belt high enough not to rub the plastic cover where the belts come out.
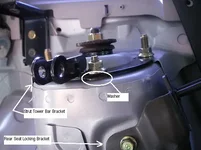
3. Remove the 2 nuts holding the Seat Belt Brackets (14mm) & the 3 nuts holding the rear struts on both sides.
4. Place a washer on the center bolt to even the surface (It keeps the STB bracket from tweaking), & install the 2 STB brackets with the 3 existing nuts on each side.
5. IF YOURE KEEPING THE SEAT BELT BRACKET, continue, if not skip to part 6.
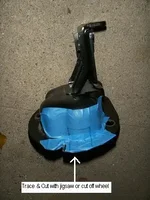
A. Put blue tape/painters tape on the seat belt bracket & place it on top of the bolted STB bracket.
B. Trace the area you are going to cut.
C. Use a jig saw or cut off wheel to cut your bracket.
D. Spray paint it to prevent rust.
E. Bolt it into place.
6. Remove the Rear Seat Locking Brackets (3 bolts each side, 12mm) that holds the rear seats in place and slide the side panels into place temporarily (this is where you mark your holes for the STB bracket). Using a 1.5 hole saw, cut your panels (Its about 15.5 from the bottom of the panel to the center of the STB).
7. Reinstall your Rear Seat Locking Brackets, seat belts (Seat Belt Bracket), & all your panels.
8. Adjust the length & bolt the bar on the STB brackets (you might need washers here to fill in the gap between the STB bracket & aluminum bar), twist the bar to tighten it & tighten the 2 nuts that hold the bar in place.
Enjoy!
WiL
So I took a chance and bid on the cheapest bar (including shipping) ~$22.
Things Needed:
-1993-96 Mazda MX6 Rear Strut Tower Bar
-Washers (5/8 I think)
Tools:
-Screw Drivers (to remove panels)
-Ratchet & 17, 14, & 12 mm sockets
-Drill w/1.5 hole saw
-Adjustable wrench (to tighten bar)
Extra:
-Painters Tape/Blue Tape
-Jigsaw/Cut off Wheel
Instructions:
1. Fold the rear seats down, & take apart the rear panels to expose the top perches of the rear struts (manual sec. 06-17-15).
2. Once the panels are removed, you can unbolt the seat belts from the back (17mm), by then youll notice the Seat Belt Bracket over the rear struts. You can either:
A. Remove the bracket completely and install the rear STB.
B. Cut the bracket to allow the bar to fit underneath the seat belt bracket.
I chose to cut the bracket because I use a baby seat sometimes for my daughter when I drive (the bracket is pretty thick and you are only cutting a small portion).
If you decide to take it out completely, I dont think it should be a problem. I think the Seat Belt Bracket is used to position the seat belt over the rear seats. Also, the rear seats hold the belt high enough not to rub the plastic cover where the belts come out.
3. Remove the 2 nuts holding the Seat Belt Brackets (14mm) & the 3 nuts holding the rear struts on both sides.
4. Place a washer on the center bolt to even the surface (It keeps the STB bracket from tweaking), & install the 2 STB brackets with the 3 existing nuts on each side.
5. IF YOURE KEEPING THE SEAT BELT BRACKET, continue, if not skip to part 6.
A. Put blue tape/painters tape on the seat belt bracket & place it on top of the bolted STB bracket.
B. Trace the area you are going to cut.
C. Use a jig saw or cut off wheel to cut your bracket.
D. Spray paint it to prevent rust.
E. Bolt it into place.
6. Remove the Rear Seat Locking Brackets (3 bolts each side, 12mm) that holds the rear seats in place and slide the side panels into place temporarily (this is where you mark your holes for the STB bracket). Using a 1.5 hole saw, cut your panels (Its about 15.5 from the bottom of the panel to the center of the STB).
7. Reinstall your Rear Seat Locking Brackets, seat belts (Seat Belt Bracket), & all your panels.
8. Adjust the length & bolt the bar on the STB brackets (you might need washers here to fill in the gap between the STB bracket & aluminum bar), twist the bar to tighten it & tighten the 2 nuts that hold the bar in place.
Enjoy!
WiL
Last edited by a moderator:
")