How To: MP3/P5/MSP Front & rear Pad/Rotor Change (No 56K)

TXMazdaSpeeder

T is for Turbo
:
2003 Black Mica MSP #566
How To: Pad/Rotor Change on 2001 MP3 (other 3rd gen Protg may differ)
By: Jeff Boyd (TXMazdaSpeeder)

Please click here for a How-To on the MP3/P5 rear pad install by: Niv

MSP Rear pad replacement!:by evilmonkeyMSP

NOTE: DISREGARD ANY REFERENCES TO THE THREADLOCKER THIS WAS A MISTAKE ON MY PART AND SHOULD BE IGNORED. THANK YOU


Disclaimer: If at any point and time during this procedure you doubt your ability to finish the project please get assistance.


First off Lets start with the tools your going to need for this procedure.

1. Drop Light/Flashlight
2. Tire Iron and Lug Lock Key (if applicable)
3. Car Jack
4. Jack Stands
5. 17MM Socket/Wrench
6. Large C-Clamp
7. Steak Knife or Small Flathead Screwdriver
8. Red Thread locker
9. 8MM Allen Wrench

Reccomended:

1 Pair of Mechanix Gloves
2 Lengths of Ratchet

tools.jpg


Step 1: Jack up car and place jack stands accordingly. (See owners manual for jacking and jack stand points.)
step1.jpg


Step 2: Remove Wheel
step2.jpg


Step 3: Turn wheel with caliper towards outside of car.
step3.jpg


Step 4: Remove dust cap from allen bolt.
step4.jpg


Step 5: Remove Allen Bolt
step5.jpg


Step 6: Remove caliper mounting bolts. Remove Caliper (Note: (WARNING) DO NOT let caliper hang from brake line.)
step6a.jpg

step6b.jpg


Step 7: Open Caliper.
step7.jpg


Step 8: Remove Anti Rattle Springs (or M Springs if you prefer)
step8.jpg


Step 9: Remove outside pad. (Note: DO NOT remove inside pad (pad against brake piston) yet, it will help you in the next step.)
step9.jpg


Step 10: Now take your c-clamp and place one side against the pad and the other against the bolt on the back of the caliper, tighten clamp to press the piston back into the caliper (Note: DO NOT press on piston directly, it could damage it.)
step10.jpg
 
Last edited:
  • Like
Reactions: niv
Con't

Step 11: Now you can remove that other pad.
step11.jpg


Step 12: Ok folks, now look at the back of your old pads. You’ll see some backing plates, transfer them to the back of the new pads. (Here is where the steak knife/flathead comes into play, I had to use the knife to pop the backing plates off the old pads.)
step12a.jpg

(by the way those wires to the left are the anti rattle springs you removed earlier.)
step12b.jpg


Step 13: Install the new pads the same way you removed the old ones.
step13.jpg


Step 14: Install those anti rattle springs.
step14.jpg


Step 15: Close caliper and reinstall the allen bolt you removed earlier. Reinstall dust cap.
step15.jpg


Step 16: Put some red thread lock on both caliper mounting bolts.
step16.jpg


Step 17: Mount caliper back onto mounting bracket and tighten bolts down.
step17.jpg


Step 18: Reinstall wheel and torque lug nuts to proper specifications. (See owners manual for proper torque specs.)
step18.jpg


Step 19: (THE LAST ONE!) Take a quick trip around the block at a low speed and test out your brakes before you get out on the highway at 75mph and realize you forgot to put a pad in or something of the like. (Could turn out a bit bad.)

step19.jpg

 
Last edited:
Excellent Writeup. Just an FYI for people.....if you are not changing the rotors, you don't have to remove the caliper mounting bolts. All you have to remove is the 8mm allen screw.
 
mazdadan said:
Excellent Writeup. Just an FYI for people.....if you are not changing the rotors, you don't have to remove the caliper mounting bolts. All you have to remove is the 8mm allen screw.

i found it easier (you dont have to be a contortionist) if you remove the caliper, i understand some people have had problems with removing the caliper though so do whatever feels comfortable to you.
 
Yeah, there really is no right or wrong way to do it.....as long as there aren't parts left over in the end :)
 
EXCELENT WRITE-UP!

you just saved me money ... where can I send half of my savings to? paypal? home address?

J/k but thanks!
 
Damn, when I did mine, I don't think i took those metal plates off my old pads. What are they for?

Also, I don't recall having to unscrew an allen screw...but I hope I'm wrong about that.
 
im really not sure what the purpose of them is but i do know your supposed to transfer them, thats the one thing i found these brakes have in common with normal disc brakes. by the way the rear are totally different. i may have to write a how to in them tonight as well.


by the way you can send your money to.....:D
 
mazda03speed said:
The metal pads are shims aren't they? I thought they helped in preventing the brakes from squeaking

DAMMIT, that's why my brakes are squeaking! What's the PN on that? Bueller?
 
Ok, one thing I don't understand on this HOWTO. When you C-clamp the inside pad and the piston bolt, how does that allow you to remove the inside pad (being that its clamped!) ???

Mazdaformance front/rear pads include the new mounting plates and "M-springs" it seems you can reuse these (at least once) so where can you get OEM pads ONLY?

Thanks for the writeup. I need to order my pads...

Chris
 
DooMer_MP3 said:
Ok, one thing I don't understand on this HOWTO. When you C-clamp the inside pad and the piston bolt, how does that allow you to remove the inside pad (being that its clamped!) ???
The clamp is used to push the piston in the caliper back so you'll be able to fit the caliper over the new pads. He is using the old pad there just as a flat base to push against the piston, otherwise you'd have to push on one of the sides of the piston -the piston is hollow, so you can't just push at the center. After the piston is pushed back it will stay pushed back, you can then remove the clamp and the pad.


Good write-up, here are some more tips on that:

-Before removing the caliper, take out the first clip in the brake line so you can move the caliper around more.
-It's easier to get to the 2 bolts that hold the mounting support (the thing that holds the actual brake pads and rotor in place) if after removing the allen screw that holds the caliper to the mounting support, you just swing the caliper up and then push it back to separate it from the mounting support.
-The squeaking from the brakes is probably because you didn't use brake grease. The Hawk pads I have already have shims built into the pad and I can't reuse the old ones. Kooldino, you have Hawks, right? So just grease it up like the manual says and see if that works.

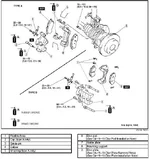
I attached the service manual directions, it's a good guide and has torque specs.
 

Attachments

  • brakes.webp
    brakes.webp
    28.8 KB · Views: 2,823
Last edited:
Great Info. Just made me sign up for Mazda Forums...

Great stuff and pictures, I am going to do it myself now. I've been spending so much money on services I've decided to do it myself. Do you know of any manuals, like Chilton's or Hayne's for a 2001 Protege? I bought the front brake pads for $20.00 and Mazdadealership wanted $150.00 are they insane????? or what?
Again, I want to thank you for the motivation you've given me.
 
****...im trying to take of the ******* allen screw and i cant do it....it pissing the off so bad....why whould mazda use an Alllen screw, its not like we are working on RemoteControlled cars hear...every car i ever worked on has a norman bolt/nut, none of this allen s***...
 
snowman4us said:
****...im trying to take of the ******* allen screw and i cant do it....it pissing the off so bad....why whould mazda use an Alllen screw, its not like we are working on RemoteControlled cars hear...every car i ever worked on has a norman bolt/nut, none of this allen s***...
whats a norman bolt?
(silly)
 
took me like an hour to do my brakes after i went to my friends house to grab an 8mm allen wrench....seriously made me feel like i was working on my RC car...
i got the Hawk Street/Race pads, and they are AWSOME compared to stock....my stock pads had Cracks in them from overheating i belive, kinda blew me away.
 
You rock, TXMazdaSpeeder. (rockon) This how-to saved my bacon. If you hadn't gone to the trouble to take the pics and write up the instructions, I'd have had my car on a flatbed, headed to the dealer right now. Instead, I'm washing up after successfuly changing my pads and rotors. Big thanks. (drinks)
 
This writeup is pretty good, but I have to question the spec for red Locktite on the caliper bolts. That stuff is (theoretically) non-service removeable, so you'd need to heat the bolts with a blowtorch if you ever wanted to take 'em off again.

Does Mazda actually specify red? If so, that's wacky. I could see possibly blue Locktite if you really needed something...

-Brian
 
Back