
You are using an out of date browser. It may not display this or other websites correctly.
You should upgrade or use an alternative browser.
You should upgrade or use an alternative browser.
How To: headlight black out for P5!
- Thread starter xswimordiex
- Start date
- :
- 2016 GT ST 47A
so i dont have to take the grill off separate? it will just come off w/ the bumper?
No, you will have to remove the grill first. Sorry, thought you had done this already. Grill is simple - two bolts, then pull out the plastic screws (using a flathead) then pull up at an angle.
shane02pro5
25ish_psi
- :
- New Caney TX
Remove all the fender lining 2 screws behind the headlights and 2 underneath that I remember. Be careful you don't break the little taps off the bumper under the headlights. Putting it back on is much easier with an extra set of hands!!
Remove all the fender lining 2 screws behind the headlights and 2 underneath that I remember. Be careful you don't break the little taps off the bumper under the headlights. Putting it back on is much easier with an extra set of hands!!
i dont see anything behind the headlights, does the grill have to be off first?
- :
- 2016 GT ST 47A
No screws under the grill. Just remove the others I mentioned and set the bumper to the side....don't forget the wiring for the fogs unless you disconnected them.
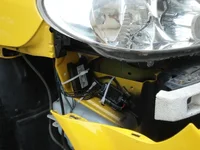
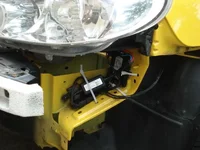
Once the bumper is off you will see the three bolts holding the lights on. But before removing the lights, remove the black plastics pieces (two bolts) at the bottom of the light. It is much easier to remove the lights with these out of your way.
Once the bumper is off you will see the three bolts holding the lights on. But before removing the lights, remove the black plastics pieces (two bolts) at the bottom of the light. It is much easier to remove the lights with these out of your way.
- :
- 2016 GT ST 47A

grill came off as one w/ the bumper...
Cool!
Good News: Everything is back on my car that I took off
Bad News: Lights aren't painted b/c i couldnt get the plastic off even after heating 3 times in oven. i got it pryed a lil but wouldnt come off and i have somewhere to be at 630 so i had to put everything back on. hopefully i can try again next week
Other good news: so i didnt completely waste my day, i moved my ballasts so they arent in the engine bay anymore. also all the nuts and screws are gone, so everything i took off found it's way back on.
Attachments
Last edited:
shane02pro5
25ish_psi
- :
- New Caney TX
Man that sucks! I need to do this one day, only all the way thru!
Did this Mod yesterday.
Changed a few things here and there, improvised a bit, but it all went quite smoothly.
We didn't sand at all. Also didn't use Hi-Temp paint. Might seem like a bad idea, but my friend that helped me did this to his Volkswagen VR6 over a year, and hasn't has any issues. But yeah.... it looks great.
Changed a few things here and there, improvised a bit, but it all went quite smoothly.
We didn't sand at all. Also didn't use Hi-Temp paint. Might seem like a bad idea, but my friend that helped me did this to his Volkswagen VR6 over a year, and hasn't has any issues. But yeah.... it looks great.
New Posts and Comments
- Replies
- 190
- Views
- 19K
- Replies
- 12
- Views
- 793

- Replies
- 10
- Views
- 14K