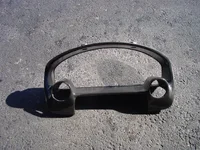
Well i just finished painting my new gauge pod and i like the mold but i think im going to refinish the paint.... It turned out kinda uneven.. Only took me a day to mold and a day to prime and paint.... Not to bad.. I have done two of these now. Here is a pic i will get a pic of it in the car when i get my car back from stupid exhaust shop... Tell me what you guys think..
You are using an out of date browser. It may not display this or other websites correctly.
You should upgrade or use an alternative browser.
You should upgrade or use an alternative browser.
Gauge Pod
- Thread starter Blackrose
- Start date
khaosman said:Looks nice! Can you explain the process of making it? And progress pics would be awesome. I want to make one of these
I was going to do progress pics but the battery on my camerra was messed up and i did not want ot wait....
The prossess...
First off if you dont have patients.... do not try this....
Second if you have never done any kind of molding... Read up on it.
First i removed the bezel.
Snaped off the top molding around the sterring wheel and then removed the two screws on the top of the bezel. Then you just grab the bottom of the bezel and firmly pull back.
Then i got me some pods. Anything from almost any kind of a-pillar will work.
I chopped them up and cut them flush with the front of the pod about half way up the gauge opening.
Then i measured the pods up and cut the bezel were i was going to mount the pods.... this does not have to be perfect but should be close.
I then used a good solid apoxy and fused them all together. After the apoxy dried.... (about 5 minutes) i applyed a thin coat around the outside of the pod.
Here comes the time consuming part.... I took bondo and applyed a light coat around all the seams.... let it dry (about 30 minutes if you mixed it correctly) and sanded it smooth. Wipe the access and did it another 6 times. I sanded with 80 grit paper.... i then took 180 grit and "feather edged the bondo" This is simply making the bondo flush with the surface and smooths it out.
I then let it set for a day and applyed 3 coats of primer and 7 coats of paint.
Its kinda hard to instruct this in words... but this is one way to do it... some peeps use fiberglass and only use the bondo for minor shapping.... i only do this for car audio stuff. The bezel will not hit any major stress levels like a sound system does... The most impotant thing is measure and then measure again.. If you mess up the bondo part it can be fixed easily... The cuts canot and a new bezel from mazda is well over $100.
I would tinker with the bondo for a while so you know how it spreads and you get an idea of how Quickly it starts to cure.... In about 4 minutes it becomes almost unworkable.
I would do this for peeps but i cant see doing it for cheap. But you cant beat the look of this kind of pod.
Good luck and feel free to PM me with any questions....
Congratulations! Dude, that has to be one of the best ideas I've seen yet for our cars. I've never wanted an A-pillar pod because I don't want it in my line of sight through the windshield.
Could some sort of resin be used in place of the bondo for a piece that's guaranteed not to split down the road? Figure out a fair price for a nicely finished one. I might go for it.
Could some sort of resin be used in place of the bondo for a piece that's guaranteed not to split down the road? Figure out a fair price for a nicely finished one. I might go for it.
MrDiggler said:Congratulations! Dude, that has to be one of the best ideas I've seen yet for our cars. I've never wanted an A-pillar pod because I don't want it in my line of sight through the windshield.
Could some sort of resin be used in place of the bondo for a piece that's guaranteed not to split down the road? Figure out a fair price for a nicely finished one. I might go for it.
Yeah a resin can be used it would just take longer. Bondo would still have to be used for shaping
srd555 said:
Yep same concept but both done with a resin base.... Looks good to.
Similar Threads and Articles
- Replies
- 16
- Views
- 1K
- Replies
- 2
- Views
- 3K
New Posts and Comments
- Replies
- 169
- Views
- 22K
- Replies
- 26
- Views
- 3K
- Replies
- 10K
- Views
- 2M

