
You are using an out of date browser. It may not display this or other websites correctly.
You should upgrade or use an alternative browser.
You should upgrade or use an alternative browser.
Carbon Fiber SRI/CAI anyone?
- Thread starter Riles
- Start date
Na, actually I should be able to fix the stalling issue. The main reason it is stalling is because the fitting is too close to the MAF, so when the rush of air comes in, some of it goes back out towards the air filter, messing up the readings from the maf. It should be an easy fix- Perrin fixes it by having a little piece that directs the air towards the turbo, and other intakes fix it by just lowering the recirc fitting.
I'm going to play around a little with it and shouldn't have much trouble with it.
I'm going to play around a little with it and shouldn't have much trouble with it.
slug420 said:im more interested in the SRI anyways.
And I wouldnt worry about the almost stalling....since I believe the solution is adding a second flange to a hardpipe kit and running 1 recirc and 1 bov...i wouldnt worry about any issues the intake created since its up to the person to buy a hardpipe kit that will fix it no?
I sure as s*** hope not....(doh)
I believe I fixed it. I went with the Perrin way- a small tube that points the blow off towards the turbo. It's drying right now, so we'll find out in a few hours. If this fixes it, then these babies are ready for production!
Keep an eye on this thread- in a day or two I will be looking for one person from a warm climate to buy the first CAI or SRI (I don't care because the SRI section is really the only part that needs testing) at cost . That person can also have it in their choice of colors since he or she will be paying cost. Thats a sweet deal, and all you have to do is drive it for at least an hour and let me know if anything goes wrong. If anything goes wrong, I'll give your money back.
Keep an eye on this thread- in a day or two I will be looking for one person from a warm climate to buy the first CAI or SRI (I don't care because the SRI section is really the only part that needs testing) at cost . That person can also have it in their choice of colors since he or she will be paying cost. Thats a sweet deal, and all you have to do is drive it for at least an hour and let me know if anything goes wrong. If anything goes wrong, I'll give your money back.
Riles said:I believe I fixed it. I went with the Perrin way- a small tube that points the blow off towards the turbo. It's drying right now, so we'll find out in a few hours. If this fixes it, then these babies are ready for production!
Keep an eye on this thread- in a day or two I will be looking for one person from a warm climate to buy the first CAI or SRI (I don't care because the SRI section is really the only part that needs testing) at cost . That person can also have it in their choice of colors since he or she will be paying cost. Thats a sweet deal, and all you have to do is drive it for at least an hour and let me know if anything goes wrong. If anything goes wrong, I'll give your money back.
Hey I can be your snow tester?!?!?!?(attn) (yes) (yes) (yes) (yes)
GHOSTWHISPER
Member
What did you use to wrap the orginal pipe, pretty much what is your first layer, it cant be fiberglass? Can it?
ZeroAccess
Member
Hell I'm in georgia
It snowed yesterday,today is windy, tommorow 80+ degrees
(exagerating a lil about 80 degrees)
I'll buy one the minute ya make it just let me know price and when.
It'll be tested highway speeds for well over an hour , city driving, cold, hot, rain, day, night, snow,ice, hell I'll stand outside with the sprinkler if I have to lol
GHOSTWHISPER said:What did you use to wrap the orginal pipe, pretty much what is your first layer, it cant be fiberglass? Can it?
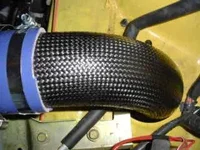
Naw, just on the first prototype it was fiberglass to make adjustments easier. In the production models, it will be a medium thickness carbon fiber cloth, and then the outer layer will be a heavy thickness cloth. Right now, the cold air pipe (pre-maf) is made of one layer of heavy, and it is very strong. So the production pieces will be even stronger.
As for the testing- I am just awaiting a contact from Antoine about AMM status to make sure I play by the rules. I'd say its safe to say one of the three who offered will be doing the test for me.
Now, for the reason I came on the computer-
(attn) (attn) SUCCESS!!! (attn) (attn)
I installed the tube into the BPV tube, and there is ZERO stalling/stuttering, and no performance loss. On top of that, I'm not sure how Perrin does it, but the way I do it, the portion of the flow director that is outside the intake is larger than the inside, so it can't be sucked into the intake.
Here are pics of it installed! One of the pics shows the intake as an SRI, and the other shows it as a full CAI. Do you guys think it is short enough to be an SRI? If its not, I can trim a whole bunch off, it would just take extra development time to figure out how to hook up the BPV to an even further away fitting.
Anyway, enough of my talking- here are the pics (excuse the grungy air filter, you guys will obviously get a new one)
Attachments
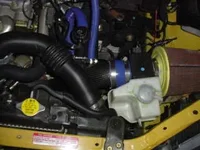
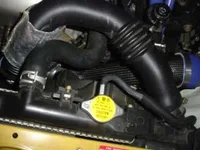
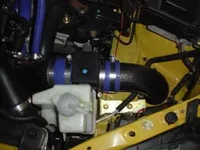
Oh, and a quick note about the coolant overflow tank- there was no drilling required to move it there. There was a bolt that was aparrently holding nothing sitting right where the tank needed to be, and it was the same threads as one of the holes. So, I made the love connection between the two and it holds very strong.
Riles said:Anyway, enough of my talking- here are the pics (excuse the grungy air filter, you guys will obviously get a new one)
Hey man..
Is there any way you can Pm me and discuss how you made these pipes? I work with fiberglass as a hobby for my car, and I am real interested how you get these pipes made, removing the innerpipes from the mold, getting the resin so smooth, etc..Im just a broke college kid so dont think I am trying to steal business...Thanks for any help you can give me...
I was wondering about how you got the molds out as well. I figured that you probably just cut the inner CF tubes longitudinally on both sides and then took the pipe out of the centre. Then you could place the two halves back together and then build all the remaining layers on top of this inner sleeve.
When everything is said and done, show us some pix of the finished pieces before they go on the car.
R
When everything is said and done, show us some pix of the finished pieces before they go on the car.
R
Rainman said:I was wondering about how you got the molds out as well. I figured that you probably just cut the inner CF tubes longitudinally on both sides and then took the pipe out of the centre. Then you could place the two halves back together and then build all the remaining layers on top of this inner sleeve.
When everything is said and done, show us some pix of the finished pieces before they go on the car.
R
The method is similar to what you've mentioned, but it only uses one cut- medium thickness carbon fiber has some flex to it.
I'll definitely get some pics of the next one I make- the one right now isn't too visually pleasing because I had to put stuff on, cut it off, move it, put it back on, etc.... until everything fit. So, I'll make the next one after spring break (sorry guys, intakes come second after hot college girls at the beach) which is in a few days- I'll definitely have some pics. I'm hoping to do a colored one to show how pretty these things can get.
New Posts and Comments
- Replies
- 0
- Views
- 47
