Digbicks1234
16.5 CX-5 Touring/2023 CX-9 Touring
Hi All,
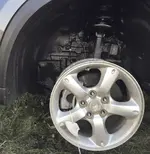
It's that time a year again when something breaks in my car (approximately 86k miles) and I need to replace it. When I was driving, I noticed a clunking/thumping noise when rolling over bumps/uneven pavement. At first, I thought it was something in my trunk causing this noise but after inspecting the shock absorbers, I noticed that the driver side did not look like the passenger side. I am guessing it's a bushing or something but I am not entirely sure. When I was digging around the Mazda parts sites, it appears that there are (2) variations of the same strut with one being more expensive. If anyone can provide some more context to my questions, that would be greatly appreciated!
Parts I am purchasing:
(x2) Shock Mount Bolt (9YA0-21-450)
(x2) Shock Washer (KD45-28-999)
(x2) Shock Mount Nut (9YB0-41-033)
(x2) KD35-28-910K or KA0G-28-910G
Questions:
 www.mazda-parts.com
www.mazda-parts.com
www.mazda-parts.com
Driver (Rear) Shock Absorber


Passenger (Rear) Shock Absorber


It's that time a year again when something breaks in my car (approximately 86k miles) and I need to replace it. When I was driving, I noticed a clunking/thumping noise when rolling over bumps/uneven pavement. At first, I thought it was something in my trunk causing this noise but after inspecting the shock absorbers, I noticed that the driver side did not look like the passenger side. I am guessing it's a bushing or something but I am not entirely sure. When I was digging around the Mazda parts sites, it appears that there are (2) variations of the same strut with one being more expensive. If anyone can provide some more context to my questions, that would be greatly appreciated!
Parts I am purchasing:
(x2) Shock Mount Bolt (9YA0-21-450)
(x2) Shock Washer (KD45-28-999)
(x2) Shock Mount Nut (9YB0-41-033)
(x2) KD35-28-910K or KA0G-28-910G
Questions:
- What is the difference between (KD35-28-910K) & (KA0G-28-910G)? They seem relatively similar with one that costs $84.08 and the other that costs $119.31.
- Is there anything else that I need to replace aside from the strut mounts for both the driver and passenger as they are a pair?
- Is there any tips/tricks for replacing rear struts or is it pretty straight forward? I was looking at the service manual and it appears that I may need to use the jack stand to lift up the rear lower control arms in order to install the rear shock absorber upper nuts.
2015-2016 Mazda CX-5 Suspension Shock Absorber KA0G-28-910G | Mazda-Parts
2015-2016 Mazda CX-5 Suspension Shock Absorber KA0G-28-910G
www.mazda-parts.com
2013-2016 Mazda CX-5 Shock Absorber KD35-28-910K | Mazda-Parts
2013-2016 Mazda CX-5 Shock Absorber KD35-28-910K
www.mazda-parts.com
Driver (Rear) Shock Absorber
Passenger (Rear) Shock Absorber