Scissor jack not fitting properly to lift vehicle, doesn't match illustrations? (2016 CX-5 GT)

Good evening, everyone. We had a flat tire earlier this week on our 2016 CX-5 GT and when we attempted to use the included scissor jack from the spare kit, we were stumped at the owner manual's illustration vs the reality of the fit.

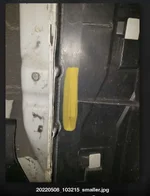
The image below resembles the illustration in the manual. It shows a fairly shallow groove in the jack head, where the pinch weld rail makes contact with the bottom of the groove. Per illustration, the vehicle would be lifted via force applied to the bottom of the rail.

jackng-position_o.png


In my case, the jack head's groove was much taller, and the pinch weld rail was pretty short, so the bottom of the groove didn't come close to making contact with the rail. If I would have raised the jack, the force would have been applied by the top of the jack head to the underbody surface above & next to the rail. This didn't seem right at all, as I was seeing plastic materials there, etc, so I aborted and did not use the jack.

I purchased the vehicle 2 years ago, so am not the original owner. My first thought was that a previous owner or the used car dealer had swapped in a similar jack (it fits nicely in its spot in the cargo area) that is slightly wrong for my year, model, or trim. But, when I searched online for images of the CX-5 jack, all the results seem to match what mine looks like -- having the deeper groove.

Very confused!
 
Your jack is fine. The picture is misleading. The force should be applied to the flat area above the rail, not to the pinch rail itself.
 
The picture is misleading. The force should be applied to the flat area above the rail, not to the pinch rail itself.

Thank you for the input. So, the one side of the jack head will meet up with the plastic on the outside of the rail while the other side of the jack head will meet up with the metal on the inside of the rail? I included a couple photos below from the driver's rear.

This definitely threw me off. First, because of what the picture in the owner's manual illustrates, but also it just doesn't seem right to jack up the vehicle against plastic on one side and against the slightly-contoured-and-bulbous underbody metal on the other side....


20220508_102622_smaller.jpg
20220508_103215_smaller.jpg
 
Good to know. Thanks everyone. I'll be better prepared now if there's a next time.

Kinda crazy how misleading that picture is in the owner's manual. For something as critical as jacking up the vehicle, where you want to be extra careful to avoid damaging the vehicle or hurting yourself, the picture gives a completely opposite impression of how the force should be applied. Sheesh.
 
Last edited:
As an additional thought, I would suggest to anyone, some nice day when you have nothing important going on, take 30 minutes to do a little "practice run" at manipulating the jack and lug wrench for changing a tire. Familiarize yourself with the procedure, get a feel for how much force is required to break lug nuts free with the supplied wrench, how stable the jack is, etc. It's a whole lot easier to figure this stuff out in the comfort of your driveway (et al) with a cool drink to sip on then it is in the pouring rain on a dark roadway.
 
As an additional thought, I would suggest to anyone, some nice day when you have nothing important going on, take 30 minutes to do a little "practice run" at manipulating the jack and lug wrench for changing a tire. Familiarize yourself with the procedure, get a feel for how much force is required to break lug nuts free with the supplied wrench, how stable the jack is, etc. It's a whole lot easier to figure this stuff out in the comfort of your driveway (et al) with a cool drink to sip on then it is in the pouring rain on a dark roadway.
Good advice. I did that awhile back and found that I couldn't get the locking lugs off. Came back the next day and was finally able to get them off. I would of been really pissed off if I'd got a flat tire one cold night in the middle of nowhere and couldn't get the tire off because of the locking lug.
Couple weeks later I had an appt. at the dealer and had them swap the locks for regular lugs.

I bet a lot of people don't even know they have locking lugs or how to remove them.
 
Another thing… you may want to carry a short piece of 2x6” or 2x8” to go under the jack. It will provide some added stability if jacking up on gravel or softer soils and adds a couple of extra inches in jacking height if you have 19+ inch tires. With larger tires the jack just about reaches its maximum height to get the tire off the ground.
 
You should probably clarify, that with the blocks you are refering to, would be lifting against the bottom edge of the weld pinch.
Sorry, not following your point. The block has a groove that the pinch weld goes into. Are you suggesting you want a block that fits into the groove that is deep enough where the sides come in contact with actual frame? I’ve been using the blocks I linked to for quite a while with no issues.
 
Last edited:
Sorry, not following your point. The block has a groove that the pinch weld goes into. Are you suggesting you want a block that fits into the groove that is deep enough where the sides come in contact with actual frame? I’ve been using the blocks I linked to for quite a while with no issues.
yes, you got it. Groove deep enough that the sides pushing up against the underneath rail (frame)
 
yes, you got it. Groove deep enough that the sides pushing up against the underneath rail (frame)
I haven’t seen one that deep. If you find one, please post a link. If you can find a tall block, maybe you can cut a deep groove into it. my Quickjack came with big blocks. Suppose a 1” deep groove could be cut into them
 
I haven’t seen one that deep. If you find one, please post a link. If you can find a tall block, maybe you can cut a deep groove into it. my Quickjack came with big blocks. Suppose a 1” deep groove could be cut into them
3/4 appears to be the required depth. Here are two pucks glued + screwed together. 20231105_105122.jpg
 
not sure I’d trust anything that wasn’t one solid piece. I just measured my pinch weld, it’s 1”.
I am with you. This was just a quick design test. Lets call it a prototype. Someone has posted a link from Flying Miata ??? Website where they had a solid piece with 3/4 deep slot....
 
Seems something that was metal and welded would be ideal. I have used the blocks i linked to on my Quickjack and it’s very stable. the pinch welds haven’t bent at all. I think when you lift, the sides of those blocks combined with the downforce from the weight of the car prevent the welds from bending. But i think I agree with you it would be more ideal to have support on each side of the weld.
 
Back