My First Oil Change Was a Failure!

Didn't know there was a '09 and '09.5 model for the MZ5 (how can you tell?). Hopefully they stayed with the spin-on for '10 as well. Is the hole still misaligned with your undertray?

they are all '09's. it's just that somewhere during production, they switched. if you look in the oil filter book at the auto parts store, they list both, and tell you which letter in the VIN identifies which one.
I do believe the hole is misaligned, but I haven't had my eyes directly underneath to look.
 
I haven't attempted to work on my MZ5 since I've needed to and only have had it for about a moth. I have an '03 Audi A4 and I can say that some of the parts in this car isn't the most durable also. The car is well designed but like any car, there's always something that will and can easily break. I believe Mazdas are no exception..
 
..
Secondly, or for the umpteenth time, the access hole isn't an access hole, but an inspection hole for the factory. Remove the tray.

I agree. Even if the hole is aligned with the oil filter, one still needs to remove the entire plastic shield. And rightly so. When I first did my own oild change, I saw dirt/sand that had accumulated over the shield. Removing the shield also allows you to check other parts of the engine. I caught the steering pump hose to be 'sweating' oil. for example.
 
You can reach the other end of the bolt by reaching inside at the back of the radiator. its tight in there but can be done. cant remember what size of wrench I used whether its 10mm or ?
 
Last edited:
the 6 bolts ARE 10mm (a VERY common size on Japanese vehicles, bicycles too) and they don't have to be very tight. I use a 1/4" drive socket. you can tell Mazda intended you to drop the whole cover for an oil change because they have the 2 plastic push pins at the front to allow the whole pan to hang down.
I remove the push pins anyway and take the cover out of the way because I change the oil in the street w/o jacking it up.
 
Quick update. My car seems to have a combination of leftover and new parts.?.

There are 7 (10mm) main bolts securing the tray onto clips and 2 Phillips screws (not in pic) securing the tray to the front bumper guard (not sure what you call that). To properly drop the tray, you have to remove 9 bolts/screw combos. The front 3 bolts are secured onto clips that have a rotating nut (10mm). Rotating as in the nut actually spins in place on the clip think of the nut as riveted onto the clip they are NOT 2 separate parts! This is actually a practical design if the nut was completely welded onto the clip OR you can get easy access to the nut. They appear to be the pre-modified clips.


http://www.finishlineperformance.com/pdf/mazda5/bulletin/09-012-07-1747.pdf

There are 4 bolts in the rear, 2 on each side, and they seem to be the secured onto modified versions of the clip -without the nut on top. It is one integrated clip with a threading for the mounting bolt (10mm). For long term use, I dont think the modified version is any better. 3 out of the 4 rears were also rusted tight and without a top nut to work with, it was HARDER to take off than the front 3. They were hard to remove even with full access b/c you the soft plastic is not sturdy enough to hold the clip in place while you attempt to toque it off. Continuing doing so will spin the clip itself around and the metal clip will cut a full circle out of the soft tray (at least it will come off). Had to wedge a screw driver through the two loops in the clip and even then it was quite tough to spin out.


Since I was not able to remove the rear blots to tackle the front ones from the back, I had to look for other options. It turns out the misaligned filter hole gives you enough space to reach in and touch the middle and passenger side nut (hole is off center to the passenger side so you cannot reach the driver side nut unless you have realllly long arms. By touch/feel, youd have to use a box end or flare nut wrench to hold nut and torque out the bolt below. Once you get the two off, you can wiggle enough space to get the rest off. My car was also missing the passenger side wheel liner cover. With the wheel off the liner off, you have full access as well. However, I 'think' part of the liner is bolted down(?) -didn't take a good look but it could be an easier alternative.


I fully intend on making this a much friendlier (and cleaner) routine the next go around. I installed the Fumoto value and ordered the conversion to canister kit. At fist, I have the flip switch facing down for easy access but since I am going tray less for the next few weeks (to modify the tray), it may not be such a good idea -upwards it goes. Keep forgetting to buy attachment drain hose as well.


For anyone interested, the 2008 does indeed have oil cooler attachments. Wasnt sure at first hence I did not order the kit for my first oil change. The cartridge filter is an unnecessary mess to change compared to a canister.
 
You've experienced my very first oil change on this vehicle as well. Hope the conversion works out for you.
 
Are you guys who are having these disastrous oil changes using the canister filter's drain plug? I don't have these issues. I can't figure out what the big deal is.
 
I was only referring to the frustration of removing the undercarriage tray - for the first time. I always remove the filter drain plug.
 
Are you guys who are having these disastrous oil changes using the canister filter's drain plug? I don't have these issues. I can't figure out what the big deal is.
I think you meant cartridge? Don’t you have to remove the drain plug and pre-drain before you can take off the cartridge housing? If you don't I would image you will get more than a splatter!
 
I think you meant cartridge? Dont you have to remove the drain plug and pre-drain before you can take off the cartridge housing? If you don't I would image you will get more than a splatter!

That's my point. If you use it there is no splatter so I don't see why it's messy or a hassle. It takes less than five minutes to remove the cover and it keeps the belts and engine dry. Tired of the topic. I'm out.
 
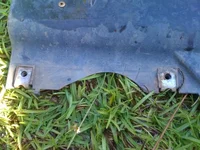
As you can see, the one on the right received jb-weld because it cut into the tray.


attachment.php

IMG_1307.webp


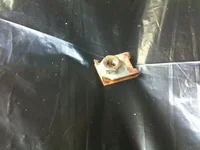
The nut here received it because it was spinning.


attachment.php

clip nut.webp


No issues since.
 
good gravy! your nuts look worse than mine with rust, and i'm in the north east and you're in florida!
 
Over a year and 2 or 3 oil changes later. Seems to be holding up fine.

Happened to me too.

Must be caused by the dealer or lube technician using air tools to over tighten these fasteners. Because oil change interval is long, rust will gather and can seize the the bolt to the fastener. So when it was 'my time' to change the oil, It was seized and the fastener turned slicing the plastic before the bolt loosened.

I now lubricate these fasteners before I remove them, and smear them with grease before I mount the cover back up
 
Yeah, I finally greased mine when I changed the oil yesterday. They were getting pretty rusty. Next time I am going to do Aaron's JB Weld trick.
 
don't use grease, its not made for preventing bolt seizure. you really should use silver anti-seize.
 
Did my 3rd oil change, first since my conversion and got to try a few things to make oil changes easier and mess free.

1) How to take off a spin-on filter without making any mess:
-Use a plastic bag (lined with old newspaper or something absorbent) and COVER the whole filter and spin it off. All oils drains into bag. I recommend Target bags over Walmart bags. Seriously, Target bags are much thicker and better quality than Walmart. Grocery vegetable bags are pretty air tight too :p

-Can also try tapping a hole with a nail or small hollow metal tub to pre-drain, ala cartridge filter housing. Will try next time.

2) How to drain oil without a mess:
-Get a Fumoto valve that has the nipple extension. Get a 3/8” ID attachment hose (6” should be enough if draining straight down, recommend clear hose so you can see flow) and drain the oil while hot and straight into your disposable container. Wear gloves or wrap old piece of clothing to cover the valve slip switch as it can be hot (or you can let it cool). My hose was foot long (too long) but is meant for something else so I couldn’t cut it.


3) How to never have rusty bolts and clips.
-Use anti seize but need to reapply every time and can be a bit messy.
-Use nylon bolts with metal U clip or plastic U clip (if you can find a suitable one) with metal bolts. http://www.mazdas247.com/forum/show...-cover-for-11-(or-less)&p=5911903#post5911903
 
Last edited:

New Threads and Articles

Back