
You are using an out of date browser. It may not display this or other websites correctly.
You should upgrade or use an alternative browser.
You should upgrade or use an alternative browser.
Lets do it again! - GRM $2007 Turbocharged Miata Build!
- Thread starter kcbhiw
- Start date

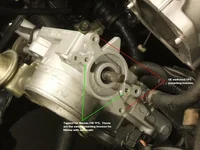
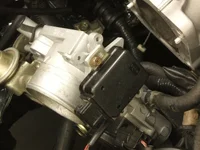
TPS Swap
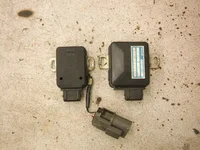
In order to ready the car for the MS and boost control, I undertook the task of swapping the throttle position sensor tonight. The 1st gen 1.6L Miatas with manual transmissions use a TPS that indicates to the ECU either a full closed or full open throttle position (switched). In order to properly implement boost control, I needed to employ a true analog throttle position sensor. Normally, one would swap the throttle body with one from an automatic Miata or first gen Protege. Holding true to my nature, I took the alternate route.
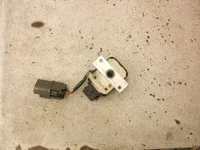
I discovered that a TPS from some generation of Nissan 240 with an automatic tranny have a similar footprint to the manual Miata's TPS (hooray junkyard browsing). The 240 sensor has both switched and analog circuits on two separate connectors. Furthermore, the switched portion uses the same pinout and connector as the manual 1.6 Miata...but the switched circuit won't be used in my application. Confused yet?
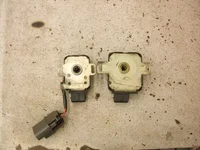
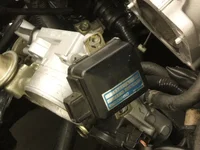
All 1.6 Miata throttle bodies share the same casting. Therefore, they have mounting bosses for either a switched or analog TPS. It's the actuation rod that differs. That said, the mounting tabs of the TPS from the 240 have nearly identical spacing to the mounting bosses of the automatic Miata's TPS. In order to make the 240 TPS work with my throttle body, I tapped the appropriate mounting bosses on the TB and slightly enlarged the holes on the mounting tabs of the 240's TPS. The Miata's TPS receiver is about 1/8" deeper than that of the 240's. To prevent the new TPS from binding and/or mounting funky, I fabbed a spacer plate from a peice of scrap aluminum.
All in all, this required way too much typing for a simple sensor swap") . It took less time to swap the sensor. The primary advantage of using this set up allows one to swap to the stock ECU for whatever reason without having to exchange the throttle body. As previously stated, the 240 TPS uses an identical switched circuit. Simply move the Miata's harness from the analog circuit to the switched circuit. Note, also, that the throttle body will need to be removed to facilitate removal of the OE TPS.
. It took less time to swap the sensor. The primary advantage of using this set up allows one to swap to the stock ECU for whatever reason without having to exchange the throttle body. As previously stated, the 240 TPS uses an identical switched circuit. Simply move the Miata's harness from the analog circuit to the switched circuit. Note, also, that the throttle body will need to be removed to facilitate removal of the OE TPS.
On to pictures for clarification (two posts)....
In order to ready the car for the MS and boost control, I undertook the task of swapping the throttle position sensor tonight. The 1st gen 1.6L Miatas with manual transmissions use a TPS that indicates to the ECU either a full closed or full open throttle position (switched). In order to properly implement boost control, I needed to employ a true analog throttle position sensor. Normally, one would swap the throttle body with one from an automatic Miata or first gen Protege. Holding true to my nature, I took the alternate route.
I discovered that a TPS from some generation of Nissan 240 with an automatic tranny have a similar footprint to the manual Miata's TPS (hooray junkyard browsing). The 240 sensor has both switched and analog circuits on two separate connectors. Furthermore, the switched portion uses the same pinout and connector as the manual 1.6 Miata...but the switched circuit won't be used in my application. Confused yet?
All 1.6 Miata throttle bodies share the same casting. Therefore, they have mounting bosses for either a switched or analog TPS. It's the actuation rod that differs. That said, the mounting tabs of the TPS from the 240 have nearly identical spacing to the mounting bosses of the automatic Miata's TPS. In order to make the 240 TPS work with my throttle body, I tapped the appropriate mounting bosses on the TB and slightly enlarged the holes on the mounting tabs of the 240's TPS. The Miata's TPS receiver is about 1/8" deeper than that of the 240's. To prevent the new TPS from binding and/or mounting funky, I fabbed a spacer plate from a peice of scrap aluminum.
All in all, this required way too much typing for a simple sensor swap
. It took less time to swap the sensor. The primary advantage of using this set up allows one to swap to the stock ECU for whatever reason without having to exchange the throttle body. As previously stated, the 240 TPS uses an identical switched circuit. Simply move the Miata's harness from the analog circuit to the switched circuit. Note, also, that the throttle body will need to be removed to facilitate removal of the OE TPS.On to pictures for clarification (two posts)....
Attachments

Last edited:
you going to run a big nasty sway bar, or are you going to go "OMG oversteer" again?
It all depends on the budget. I'm pretty sure things are a bit tight right now. I'd love to run a fatty front bar, but it may not be possible. I will say that there is a lot more grip on the GRM challenge lot thatn there is at Turner or GCFG. The car actually handles relatively well there.
get some rebar @ home despot, bend it, drill a couple holes. Done.
EDIT: Since you won't be using the CSP car that weekend, steal that one.
The thought has crossed my mind, but I want to keep this thing legal. I'm pretty happy with having done so this far
") .
.Rebar? I'm not that grassroots, hehe.
How's the flange holding up? I need to make a new manifold, and relocate the turbo. I don't want to spend $60 for a flange... So I might go homebrew too.
I have over 100 miles on it with lots of idle time. It seems to be holding just fine. No distortion or leaks.
So I have an idea on how you can save some weight.

I'm sure you can bolt a seat to this thing
From this page:
http://www.flyinmiata.com/projects/current_projects_flip.php?x=728
I'm sure you can bolt a seat to this thing
From this page:
http://www.flyinmiata.com/projects/current_projects_flip.php?x=728
So a month later and a Megasquirt install (and tune) later, she finally passed emissions. I'm super happy. I'll pick up the license plate tomorrow morning. A street legal challenger, gotta love it. Furthermore, the launch control sounds and feels absolutely wicked...almost like a jet throttling up for take off. Turbocharger + 10* ATDC timing retard = smiles for all. Video coming eventually.
The boost control gets turned on this weekend .
.
The boost control gets turned on this weekend
.
Last edited:
sorry to say, but I won't see you guys out there this year. Or to put it another way... won't be competing this year so I doubt I'll be upGood luck to everyone though!
Arg. I'm sorry to hear that
. What happened? Would it be possible for you to at least attend to spectate? The hotel croud is definately worth it.Ya... that's what I was thinking. Depends on if I have work or not. We might be back next year. I really wanted to compete this year but the rest of the crew had a major project on their hands the past 6 months, so no time for grm really Even though we could have re-entered last years car easily, it would mean finding parts to sell off for new tires and suspension. Think we came second to last in autox, so no real use in coming this year unless we could get competitive in autox. Anyways best of luck, and I'll let you know if I'm heading up.
Arg! Again!
So much for that turbo .
I wanted to confirm oil flow through the turbo (for various reasons). I disconnected the drain line and stuffed it into a beer bottle (hey, it was handy) to catch the oil. The tube in the bottle sealed remarkably well as it was a snug fit. Unfortunately, when i started the car, the air in the bottle had no where to go except through the weakest point. The weakest link was the oil seals in the turbo. It popped both seals and spewed oil into the down pipe and intake. When i was running the car, I turned away for a second and when i turned back around, the garage was full of smoke. There was a significant puddle of oil below the end of the DP. That's definately not a good sign of anything....
I always say: "A good racer has spares". Trying to live up to that, and having a perpetual junkyard in my basement, I pulled the old turbo off, swapped the compressor wheel and housing onto the spare I had, and have nearly completed the swap. The bonus is that I purchased the spare strictly for its hotside housing to be used on this car. It was already included in the budget, so I won't be taking any hits there.
Bonus #2: I cofirmed oil was flowing into the turbo.
Bonus #3: I found a huge hole (read: boost leak) in the coupling connecting the turbo to the lower I/C pipe.
Yay! Two weeks to go with a mystery turbo. There's no pressure at all (no pun intended)!
So much for that turbo
.I wanted to confirm oil flow through the turbo (for various reasons). I disconnected the drain line and stuffed it into a beer bottle (hey, it was handy) to catch the oil. The tube in the bottle sealed remarkably well as it was a snug fit. Unfortunately, when i started the car, the air in the bottle had no where to go except through the weakest point. The weakest link was the oil seals in the turbo. It popped both seals and spewed oil into the down pipe and intake. When i was running the car, I turned away for a second and when i turned back around, the garage was full of smoke. There was a significant puddle of oil below the end of the DP. That's definately not a good sign of anything....
I always say: "A good racer has spares". Trying to live up to that, and having a perpetual junkyard in my basement, I pulled the old turbo off, swapped the compressor wheel and housing onto the spare I had, and have nearly completed the swap. The bonus is that I purchased the spare strictly for its hotside housing to be used on this car. It was already included in the budget, so I won't be taking any hits there.
Bonus #2: I cofirmed oil was flowing into the turbo.
Bonus #3: I found a huge hole (read: boost leak) in the coupling connecting the turbo to the lower I/C pipe.
Yay! Two weeks to go with a mystery turbo
. There's no pressure at all (no pun intended)!
Last edited:
Lacking pics, I see....
I depart for the Challenge in a touch less than 12 days.....and I have so much to do. Mid-summer, I said to myself: "Self, there isn't nearly as much work needed on the Challenger this year as there was in the past two years, I'll work on the CSP Miata today." Day after day, I did that and now I'm paying for it. However, things are well and I'm sure I'll have her up to snuff in time.
The turbo has been swapped and operates perfectly, as far as I can assess to this point. After replacing the holey coupling, the car boosts much more smoothly as opposed to the boost coming in like a freight train at full bore. I'm saitisfied...for now. Boost control is the next step, so I'm sure that'll open a whole other can of worms.
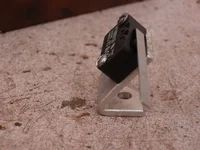
In the mean time, a few pics are in order. The first image depicts the launch control switch bracket. Anyone who has spent any amount of time under the driver's side dash knows how painful it is to do any work there. I've found myself in contorted positions that I was previously unware I could perform. Anyway, the switch is activated when the clutch pedal is fully pressed.
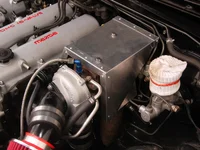
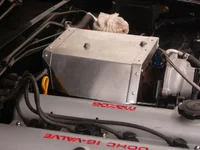
The next three images detail the new turbo heatsheild that was completed tonight. I wanted more shielding around the brakes' master cylinder and proportioning valve. It's basically an elaborate box with adequate clearance for the brake components and dip stick. I added a bit of edge bracing as well to keep vibration and noise down. This was built from a single peice of sheet metal.
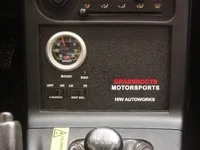
Last is the new radio delete panel. The past two years' panels were quickly constructed and rather gaudy and vague. For the latest panel, I used the CNC engraver at work to cut the text and painstakingly painted the wording....something I'll never do again, heh. I blew four hours completing it. It took less time to swap the turbo. Nonetheless, I think it was worth it.
(Sorry about the large pics)
I depart for the Challenge in a touch less than 12 days.....and I have so much to do. Mid-summer, I said to myself: "Self, there isn't nearly as much work needed on the Challenger this year as there was in the past two years, I'll work on the CSP Miata today." Day after day, I did that and now I'm paying for it. However, things are well and I'm sure I'll have her up to snuff in time.
The turbo has been swapped and operates perfectly, as far as I can assess to this point. After replacing the holey coupling, the car boosts much more smoothly as opposed to the boost coming in like a freight train at full bore. I'm saitisfied...for now. Boost control is the next step, so I'm sure that'll open a whole other can of worms
.In the mean time, a few pics are in order. The first image depicts the launch control switch bracket. Anyone who has spent any amount of time under the driver's side dash knows how painful it is to do any work there. I've found myself in contorted positions that I was previously unware I could perform. Anyway, the switch is activated when the clutch pedal is fully pressed.
The next three images detail the new turbo heatsheild that was completed tonight. I wanted more shielding around the brakes' master cylinder and proportioning valve. It's basically an elaborate box with adequate clearance for the brake components and dip stick. I added a bit of edge bracing as well to keep vibration and noise down. This was built from a single peice of sheet metal.
Last is the new radio delete panel. The past two years' panels were quickly constructed and rather gaudy and vague. For the latest panel, I used the CNC engraver at work to cut the text and painstakingly painted the wording....something I'll never do again, heh. I blew four hours completing it. It took less time to swap the turbo. Nonetheless, I think it was worth it.
(Sorry about the large pics)
Attachments

Last edited:
Cool pics! Lookin' good (thumb)
12 days! Please tell me Rickman finally sent you the decals!?!? (boom06)
Nothing yet. (scratch)
New Posts and Comments

- Replies
- 2K
- Views
- 567K
- Replies
- 9K
- Views
- 3M
- Replies
- 12
- Views
- 973
- Replies
- 4K
- Views
- 1M