iracemine's purpose built N/A ST2 thread

So the next question is I find that people are soldering in the "flying harness" by the sensors and not down by the factory ECU. Any reason/benefit for this??? Are they not they the same wire down there as they are up by the sensor?

I would like to just make all my terminations right by the ECU and call it a day. I have no interior and think this might be a benefit and look good. No?

No real benefit to tapping in at the sensors as opposed to the near the ECU. Some people might just think that its easier to get access to the wires near the sensors, rather than the ECU - your case would probably be different.
It is best to tap the CAS (cam angle sesnor) and CKS (crank angle sensor) wires in the cabin and away from all the electrical "noise" in the engine bay.
The other thing I would recommend is getting a second water temp sensor for the Microtech installed into the water neck. It will make things a bit easier and means that the temp gauge on your cluster will continue to work.
 
OK so with the millions of post in this forum I did find some good stuff. NSN published there install manual. So I can connect everything except the cam and crank sensor in the passenger foot well. I will have to do a bit of loom repair. I need to find some wire shielding (hopefully at menards) and but of new wire. After that the microtech was connected to the stock O2 sensor. Which makes me happy. I just want the tune shop to tune it and I can forget it. But will see......

The other thing I was worried about is engine break-in. Should I leave the microtech out and just get the motor started up and running (with instalshields tips) and break the motor in that way and then take it to the tune shop?????? I also keep seeing people using convetional motor oil to help seat the rings. Any tips would help. I cannot drive this thing on the street so for me to go 3K would be like 3 years racing. So keep that in mind.
 
Also thanks to darryl for the cam gear! But I got a question for you.. I like the idea of a j&s knock guard. Does that thing come on much, and if so how do you have it hooked up? separately or through the microtech?
 
Also thanks to darryl for the cam gear! But I got a question for you.. I like the idea of a j&s knock guard. Does that thing come on much, and if so how do you have it hooked up? separately or through the microtech?

No worries. Glad to hear it got there - and quickly too.

As for the J&S, I really wouldn't know how often it comes on as I haven't looked up any kind of monitoring for it. I really should just mount an LED somewhere on the dash to keep an eye on it.

With my Microtech, I have the additional X4 ignitor box and coils for the ignition system - allows sequential ignition rather than waste spark. So the J&S sits between the Microtech and X4 and monitors things from there and can retard timing on an individual cylinder. Due to the waste spark of the stock ignition system, the J&S would only operate on the two signal wires.

Hope that helps :)
 
has the rebuilt engine been started yet?

A common trick for seating the rings is to hit the cylinders with wd-40 before the first start...just remove the plugs and fire a second or so of it in each cylinder. the WD-40 will help with initial lubrication before the oil pump gets any oil up there, but will also quickly flame off and heat the rings...exactly what you want for a first time start...then move the engine speed between 1,000 and 2500 rpm or so, sustaining at both ranges for 10 seconds at a time...the thing is you don't want the engine to just idle through warm up...idle speed is fine when the oil is cold, but you want to keep pressure well above 30 psi for this critical break in...as the oil heats up, pressure will quickly drop to around 25'ish psi...not terrible, but also not ideal...don't load the engine until its been cycled up to fully heated...

after that...at least with my last build...just change the oil after 250 to 500 miles, as well as the filter...it doesn't hurt anything to use synthetic, that is kind of a myth...its just also a waste as you're only using that oil for a brief period to remove any residual machine dust/dirt from the fresh engine parts...standard oil will do fine for a 500 mile break in period, just switch to synthetic when you increase intervals between changes...
 
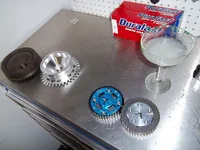
OK will do. The collection of parts as I wait for my cams. They are a week late at this point.

attachment.php
 

Attachments

  • 100_1786.JPG
    100_1786.JPG
    146.2 KB · Views: 538
OK so instalshield's thread freaked me out enough to measure the thickness of these cam gears and the one new pulley. The stock cam gear is 7.10 thick while the focus was 6.80 and the K gear cam in at 6.86. Not too much difference. He might have had a bolt stretch thing. So I am not going to fret too much about that. I will still measure the bolt plunge when I get the cams in. The crank pulley over stock is <1mm thicker too. So no worries about that.

Cams are also coming in tomorrow as well. I guess the "call you when there on there way" thing was over looked. No biggie. That is why I keep up with this stuff. So a money order is waiting and the dry install will happen shortly after that to make sure my valve shims will be correct. A nice update (engine start) will be shortly there after.

Will try the WD-40 trick along with hitting up the track Gingerman in Michigan to get some "break in" time on the motor. After that I will complete the LT10s install and most likely install a J&S and wide band for monitoring and logging. THEN off to the dyno for some results!!
 
Last edited:
an easy check you could do is just put a dab of something on the end of the cam gear bolts and thread them in with the gears on...all by hand on your bench...you'll know if its bottoming out...my problem was that it would torque up to 50 or so lb/ft...but it would slowly back out...so i was that close to ok...

i can't remember if i posted it...but my fix was just cutting about 3 threads off of each bolt with a hack saw...then hand filing them to make sure they didn't cross thread or anything...the fix took 5 minutes...the problems they caused took nearly 3 weeks haha...
 
So the cams cam in on time. Megacycle was awesome to deal with. NO PROBLEMS. journals where not touched. No need. They obviously worked just fine So they bolted in just fine. The ends came plugged with stock balls so no need to deal with getting them plugged up.. I also was a idiot and sent my cams out with my fricking cam gear bolts. They also cam back along with in a bag too!!! Great as promised service. I recommend these people over the other people that are for a good reason no longer in business.

OK all the cam to valve leash are all over the place (most likely came that way from Mazda). So I rearranged the 16 (that ranged from .08 to .13) with some amazing math skillzs and wound up only having to buy three new shims. I will have all 16 within .11 and .12. In the mean time I cut out the valve cover so the tuners can have easy access to the cam gears. The cam gear bolts had plenty of threads left. However the K gear hit the head. I saw that the k gear had some rub issues before it cam along. SO I just dremeld out some more material from the k gear and it spun fine. Well almost. The combination of the 385 cams and the 10.4 pistons have interference. I hope I get this thing timed up right from the get go..........


More to come.
 
also where can I find good stock coils and wires????? I lent mine out to my daily driver P5 and now they are rusted (within 2 months). Thanks napier for buy a hood with holes in it.....
 
OK put in autozone coils in the daily driver P5 and now the car stumbles so bad the check engine light came on. What are you guys using?
 
weird man...

i've been using Beck/Arnley coils from parts geek for about 8 months, i think it came out to about $90 shipped...extended NGK plugs, and Denso OE wires...with an mp3 computer...no issues with my ignition since i installed all that...

i went with aftermarket coils as i don't know exactly what i'll run with an ems in the future...and even factory coils are far from great...so whatever...i lucked out for now haha.
 
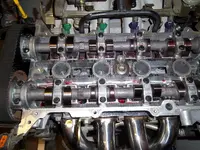
OK so I hope they are in correct. I am 99% sure megacycle labeled my cams backwards. They ground off the "IN" on the one and my other one had no markings of any significance. You see.... I sent in the "j-spec" cams I bought from sr motorsports back in 03'. SR motorsport's version of that was to sell you two of the same cam. Its just the intake cam is re-pined to be a exhaust cam, and then the "IN" is ground off along with the cam model. So I think Megacycle kinda got messed up with that. So after re-installing them and re-checking the valve leash I feel pretty comfy with the leash numbers. I then had to cross off megacycles "IN" and "EX" and engraved my own. Left the serial numbers for any sap that needs them if I ever total this thing. I could tell they where in backwards the first time because the #1 lobes on both cams where pointed in the wrong directions, some small stampings on each, and the number off timing keys between #3 and #4.

But they are the stage 3 cams. Lift is 385 and duration at .050" is 239. They did not provide me with the overlap numbers. They are now sending the valves far enough into the cylinder to hit the piston. So if I ever loose a timing belt I am screwed! Here is a couple of pics of me getting them in right. I like treads with pics. Its like reading books with pictures in them. Much better that way!

attachment.php

attachment.php
 

Attachments

  • 100_1791.JPG
    100_1791.JPG
    109 KB · Views: 506
  • 100_1792.JPG
    100_1792.JPG
    433.4 KB · Views: 510
The motor will be going back in tomorrow. BUT before I do I need to: retard the intake cam 3* and advance the exhaust cam 3* to bring the power band down and improve idle.

Along with that I need to back out (close it) the intake butterfly 1 1/2 turns to create more vacuum in the intake manifold for improved idle or coming back off to idle control.

And squirt a few into each cylinder of WD-40 for better piston seating. And keep the revs around 2000 to 3000 for the first few minuets maring sure the oil pressure is above 30lbs.

Right???
 
adjust the small screw just 'behind' (firewall side) the IAC valve on top of the throttle body...its in a small recess, but can be easily reached with a phillips screw driver around the strut tower bar...DO NOT mess with the throttle plate adjustment screw, which is on the back of the throttle body below the throttle linkage/cable...that will adjust your TPS readings, and will create a nightmare for tuning on your microtech...and will cause all kinds of fuel issues with a stock computer, if you're still using one...

I'd say, don't worry about messing with that screw though until after a few starts...you're correct on everything else...Start engine after hitting each cylinder lightly with WD-40...it'll race initially as the wd burns off, but don't be worried about that, oil pressure will go sky high at start up and that is exactly what you want...after 10 or so seconds of high idle, which will quickly begin to settle down to 1200 rpm or so, bump it up to about 2500 rpm and try as best as possible to keep it there...do not exceed around 3,000 rpm if possible, and also don't load the engine for the first few minutes of this...

After a few minutes of that, the rings will be seated nicely...and you can safely drive around with light load...I'd say don't go over 4,000 rpm for about 250 miles of driving or so...at which point, change the oil/filter, and use whatever you're going to use normally...also, after the initial break in, see how your idle is...and adjust that thing accordingly...backing it out quickly increases idle vacuum, closing it the opposite...if you're stalling often on throttle lift after the engine is fully warm...start by backing that screw out a full 360 degrees and try again...it took turning mine about 1.5 full turns, haven't stalled since...
 
^ah ok, didn't know that...You 'can' also do that on the stock computer, but you need the dealership tool thing that is more than a stand alone to begin with haha.
 
I wish I did not sell the gopro. This thing sounds like a cigarette boat. I will try to take a vid with my gf crappy camera. Contacted J&S safegaurd to get that ordered up. What the best wideband for the microtec??
 
Back