
This walkthrough was provided by ouch1101 and Sokool from mazda 3 forums and has been posted here with their permission. Thanks guys for the excellent walkthrough and information.
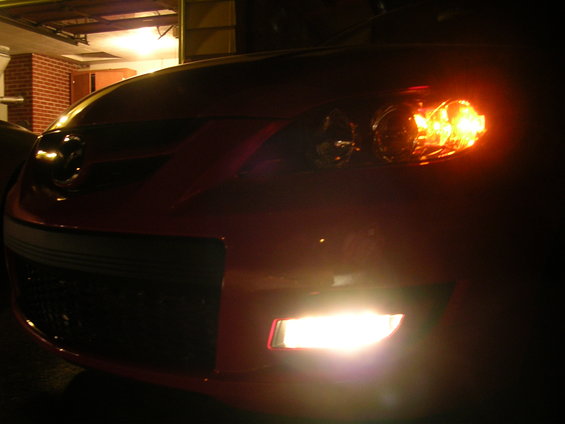
This is designed to make it so that you can turn on your fog lights with only the parking lights on, OR you can make it so that they come on anytime the key is in the ACC or ON position, depending on how you choose to wire it. Whichever way you wire them the fog light switch will still control the lights.
*NOTE* This mod will ONLY work if your car has OEM halogen headlights. This WILL NOT work with the OEM HIDs due to changes in the wiring between halogen and HID equipped cars. If you have added a HID kit, or done a HID retrofit this modification will work for your car as the wiring is still that of a halogen car.
MATERIALS NEEDED
3 Small Tie-wraps
Electrical Tape
2 Butt Connectors
1 Wire Tap (optional)
TOOLS NEEDED
10mm Wrench or Socket and Ratchet
Pliers
Wire stripper/crimper/cutter (usually 1 tool)
Flashlight (optional)
*NOTE* If you have any problems with lying on your back to work underneath the dash, consider removing the glove box. This will allow you to do the majority of the job from the passenger seat, as opposed to lying on your back.
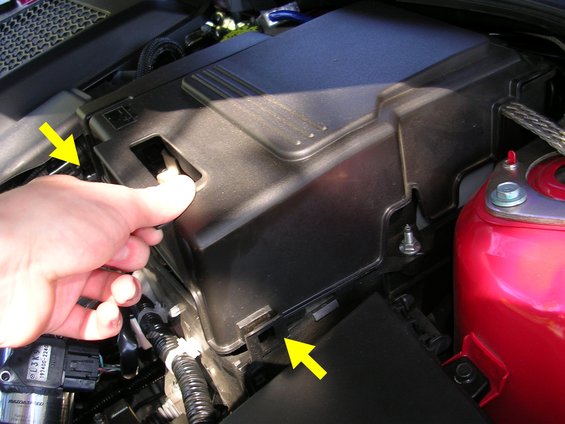
1) Pop the hood and remove the battery cover. There are 2 tabs on the front edge that you need to release, then lift up and pull forward to remove the cover.
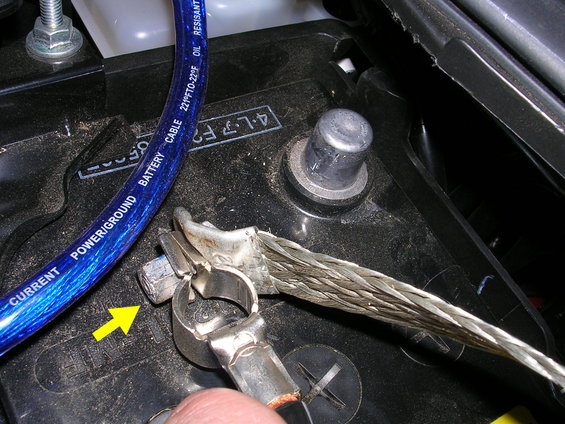
2) Loosen the nut on your negative battery terminal (should be closest to the firewall) and remove the negative battery cable. Be sure to put it somewhere so that it won't spring back and contact the negative terminal while you are working.
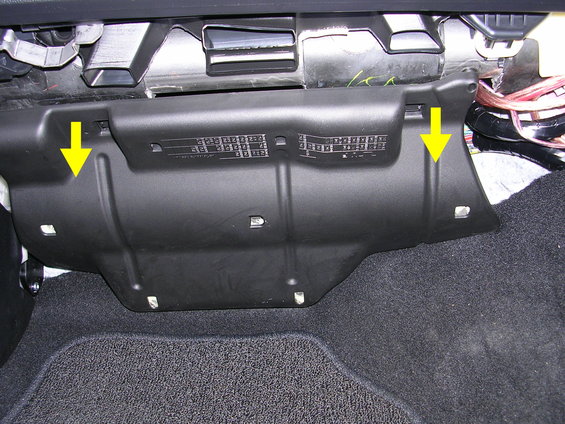
3) Under the glove box on the passenger side, find the plastic cover. Grab it on the front edge and pull straight down to remove it.
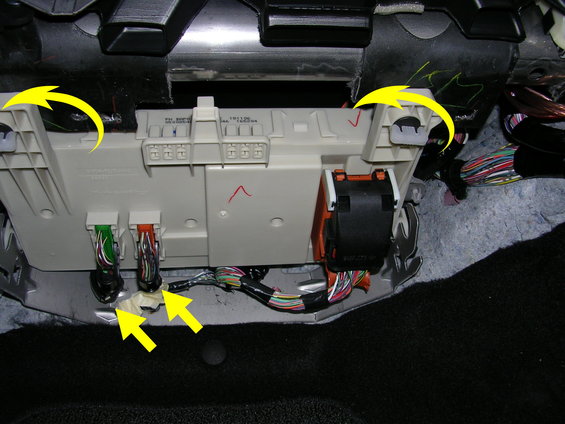
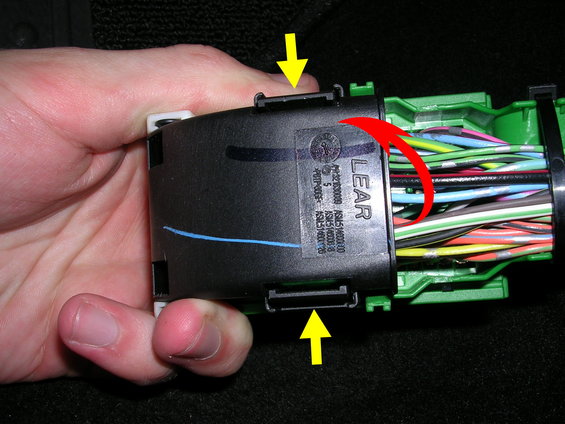
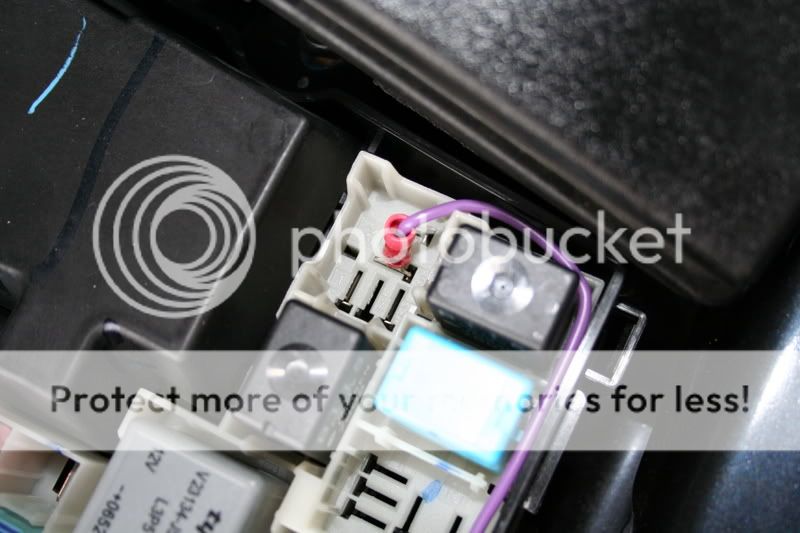
4) You will now see what is pictured in the top picture here. You need to disconnect the 3 plugs first. On the smaller plugs, grab the black plastic loops on the front edge and pull back towards you, then remove the plugs. On the larger plugs, refer to the 2nd/bottom image. You need to push in on the 2 tabs on the side, then pull the black plastic handle back towards you, and remove the plug. Then, twist the 2 "winged" bolts at the rear edge of the fuse panel to lower it.
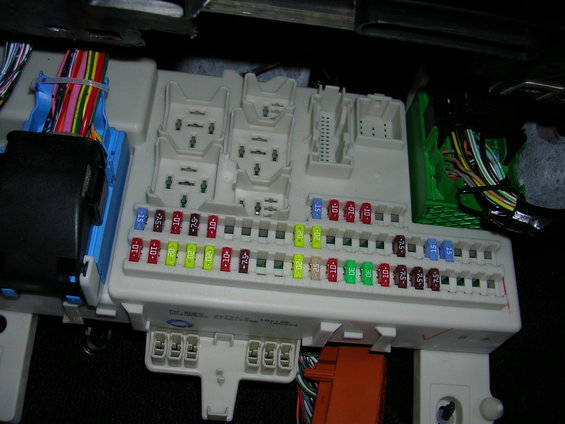
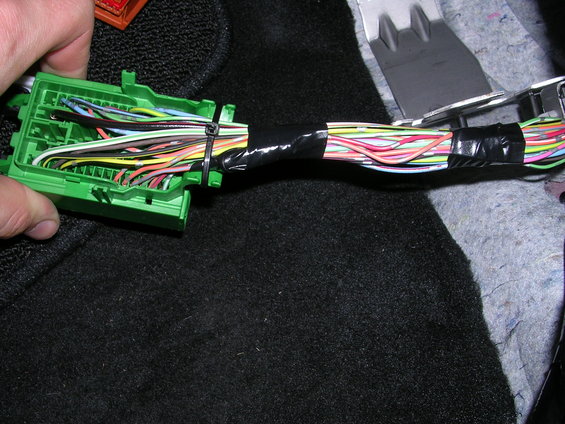
5) Once the fuse panel swings down, you will see this. Disconnect all the electrical connections the same way as before. Lift the fuse panel and pull it back towards you to remove it.
6) For the purposes of this modification, you will only need to work with 3 of the connectors we have just removed:
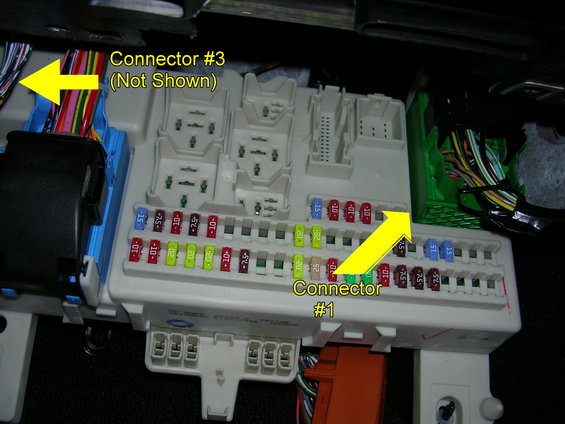
#1 The large, green connector
#2 The small, green connector
#3 The small, blue connector
We will start with the #1 harness
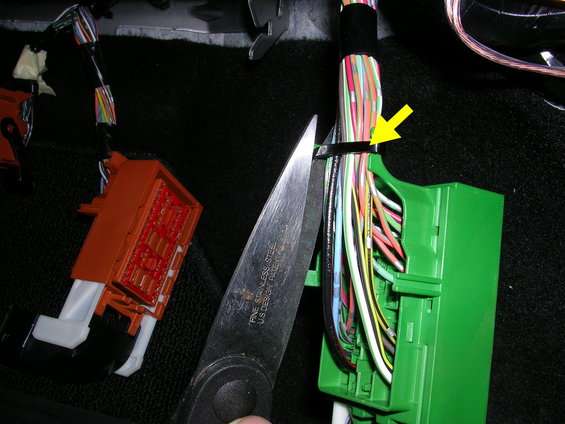
7) Cut the tie-wrap holding the wires to the connector. Also carefully cut the electrical tape bundling the wires together so that you can spread out the wiring for easy access.
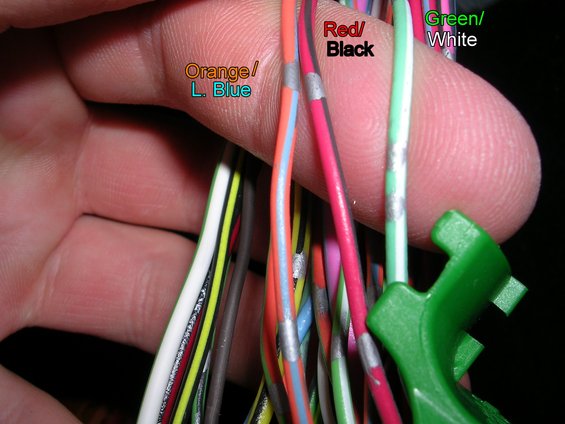
These are the 3 wires we are concerned with on this connector
Wire D - Red with a black stripe
Wire K - Orange with a light blue stripe
Wire B - Green with a white stripe
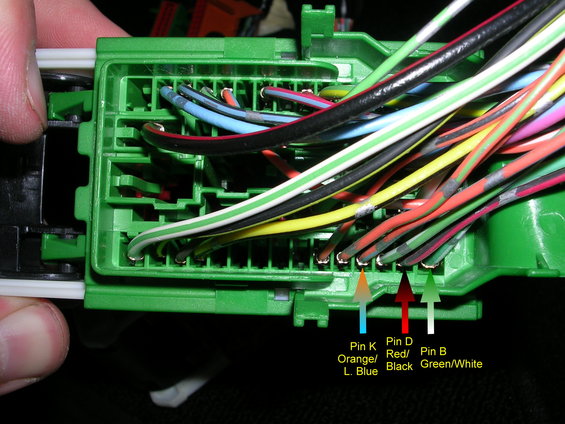
8 ) Locate the Red/Black wire on connector #1. If you hold the connector with the wiring pointing out to the right, it will be on the bottom row, 2nd pin in from the right. Follow the wire about 2" up from the harness, and cut the red/black wire.
Now, you have a couple of choices to make.
First, you need to decide when you want the fog lights to come on. You can choose to either have them come on with the park lights, or come on whenever the key is in the ACC or ON positions.
If you want the fog lights to come on with the park or headlights, use wire K, the orange/l. blue wire.
If you want the fog lights to come on with the key in ACC or ON, use wire B, the green/white wire.
You will need to splice the red/black wire into the wire that gives the fog lights the function you want, as described above.
I chose to have the fog lights come on with the park/headlights, so that is what the pictures will show. If you want them to be on anytime the car is on, use the green/white wire instead of the orange/l. blue wire.
Next you need to decide how you want to splice the wires. I'll describe the easiest and probably most common method first, then I'll describe the method I used.
9a) The easiest method to splice into a wire is to use a wire tap, also sometimes referred to as a Scotch-Loc. This allows you to tap into the wire without cutting it.
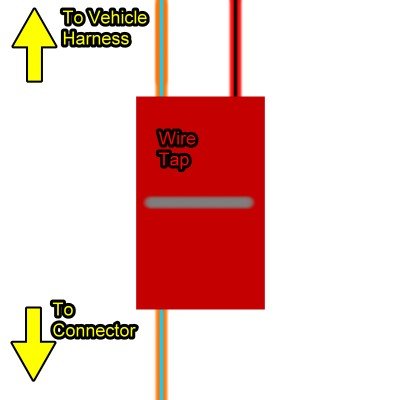
I do not have any pictures of the splice done with a wire tap, since I didn't do it this way, but it will look something like this. Basically, you will run the wire you are splicing (either orange/l. blue or green/white) through the side the wire-tap that is open all the way through, then insert the red/black wire into the side of the wire-tap with the stop. Clamp down on the metal bar with a pair of pliers to complete the tap, then close the lock. You may also want to tape the wire-tap shut with some electrical tape for safety.
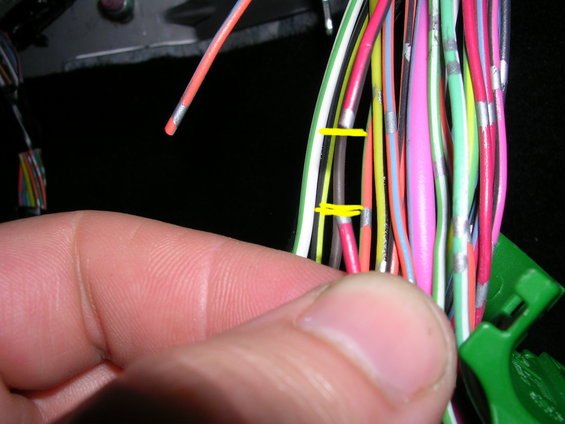
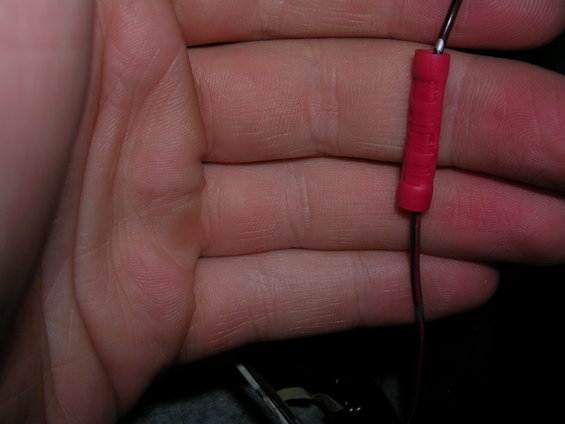
9b) The method I chose to do is to manually splice the wires using a butt connector. This allows for a better and more secure connection, IMO. Trace the wire you are wanting to splice in to (either orange/l.blue or green/white) a couple inches back from the connector and cut the wire. Strip about 1/4" of insulation off of both ends of the wire you just cut, as well as the harness side of the red/black wire. Take the harness side of both wires you've cut and twist them together tightly. Insert them into 1 side of the butt connector and crimp the connection. Insert the other wire on the connector side that you just stripped into the butt connector and crimp this connection. The end result should look like this:
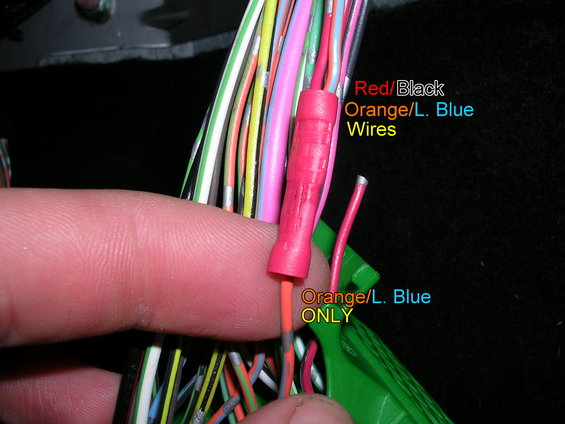
Again, use the green/white wire instead of the orange/l.blue wire if you want the fog lights on any time the car is on.
10) Tape up any connections or loose wires left from your work on connector #1.
11) Install a new tie-wrap on the connector and re-tape the wires together in a bundle so that it is as neat as it was before you worked on it.
12) Position connector #1 out of the way, because you are done working with this connector!
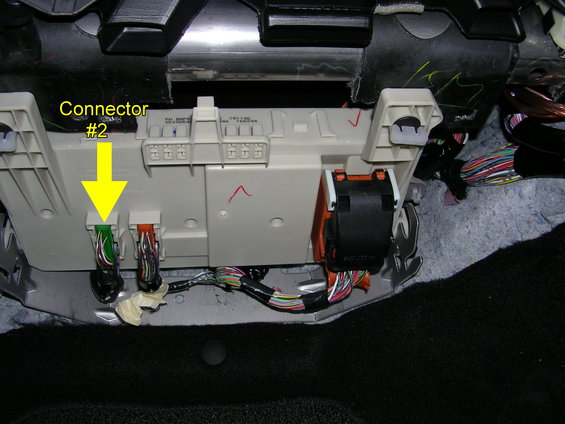
13) Locate connectors #2 and #3. Cut the tie-wraps/tape off of these connectors so that you can access the wiring.
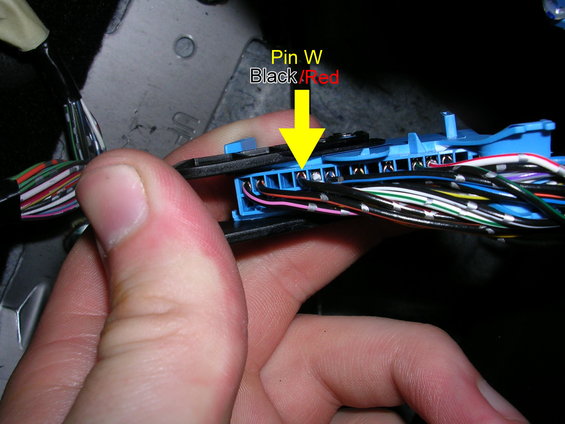
14) On connector #3, locate the black/red wire. If you hold the connector so the wires are pointing out towards the right, it will be on the top row, 5th wire in from the left.
15) Trace the black/red wire about 2" back from the connector and cut the black/red wire. Tape off the loose end from the connector.
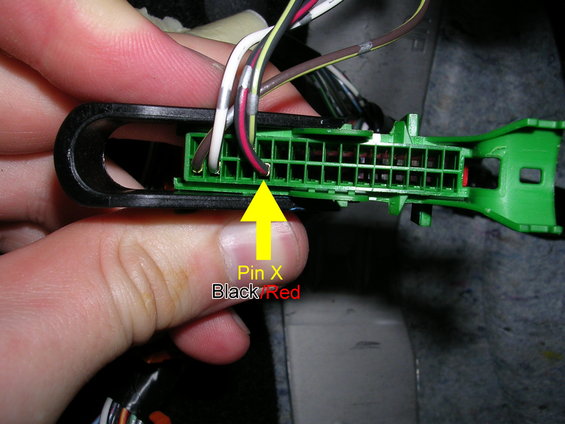
16) On connector #2, locate the black/red wire. If you hold the connector so the wires are pointing out towards the right, it will be on the bottom row, 5th wire in from the left.
17) Trace the black/red wire about 2" back from the connector and cut the black/red wire. Tape off the loose end from the connector.
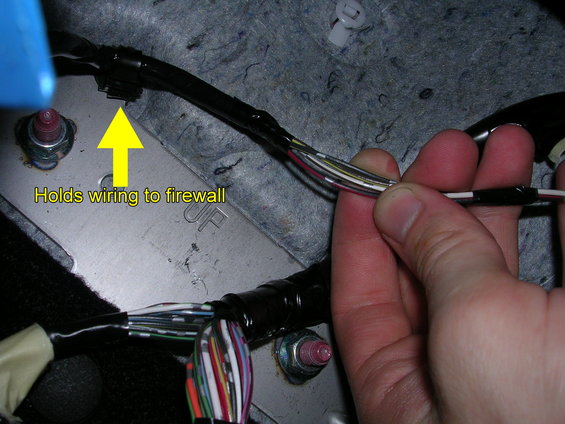
18) Pull the black/red wire out until it is on the opposite side of the clip holding the wires to the firewall. This is necessary in order to be sure that you have enough wire to make a good connection.
19) Strip about 1/4" of insulation from both black/red wires you've just cut.
20) Using a butt connector, connect both black/red wires directly together. Crimp the connection. Position this wire so that it is out of the way. Tape or zip-tie it to something if necessary.
21) Slide the fuse panel back under the dash. Connect the appropriate connectors back into this side of the fuse panel.
22) Lift the fuse panel back into place and twist the retaining pins until they lock. Connect the appropriate connectors into this side of the fuse panel.
23) Reinstall the black plastic cover by sliding the foam covered tabs into the metal slots under the dash, then line up the pins on the front side and push it firmly up. It should lock into place.
23) Reinstall your negative battery cable and tighten the nut.
24) Test your work. If it works as it should, you are DONE!
Even though there appears to be a lot of steps to this task, its mainly because I wrote a fairly detailed how-to. In reality, pretty much anyone should be able to have this finished in an hour or less. This modification has been performed by owners of '04-'08 models on both Mz3's and MS3's.
This is designed to make it so that you can turn on your fog lights with only the parking lights on, OR you can make it so that they come on anytime the key is in the ACC or ON position, depending on how you choose to wire it. Whichever way you wire them the fog light switch will still control the lights.
*NOTE* This mod will ONLY work if your car has OEM halogen headlights. This WILL NOT work with the OEM HIDs due to changes in the wiring between halogen and HID equipped cars. If you have added a HID kit, or done a HID retrofit this modification will work for your car as the wiring is still that of a halogen car.
DISCLAIMER:
This How To is for informational purposes only. I take no responsibility for any damage caused to your vehicle while you attempt this install. Be advised that wiring color codes can change between years/models, so confirm you have the correct wires before cutting anything. Be safe and have fun.
This How To is for informational purposes only. I take no responsibility for any damage caused to your vehicle while you attempt this install. Be advised that wiring color codes can change between years/models, so confirm you have the correct wires before cutting anything. Be safe and have fun.
MATERIALS NEEDED
3 Small Tie-wraps
Electrical Tape
2 Butt Connectors
1 Wire Tap (optional)
TOOLS NEEDED
10mm Wrench or Socket and Ratchet
Pliers
Wire stripper/crimper/cutter (usually 1 tool)
Flashlight (optional)
*NOTE* If you have any problems with lying on your back to work underneath the dash, consider removing the glove box. This will allow you to do the majority of the job from the passenger seat, as opposed to lying on your back.
1) Pop the hood and remove the battery cover. There are 2 tabs on the front edge that you need to release, then lift up and pull forward to remove the cover.
2) Loosen the nut on your negative battery terminal (should be closest to the firewall) and remove the negative battery cable. Be sure to put it somewhere so that it won't spring back and contact the negative terminal while you are working.
3) Under the glove box on the passenger side, find the plastic cover. Grab it on the front edge and pull straight down to remove it.
4) You will now see what is pictured in the top picture here. You need to disconnect the 3 plugs first. On the smaller plugs, grab the black plastic loops on the front edge and pull back towards you, then remove the plugs. On the larger plugs, refer to the 2nd/bottom image. You need to push in on the 2 tabs on the side, then pull the black plastic handle back towards you, and remove the plug. Then, twist the 2 "winged" bolts at the rear edge of the fuse panel to lower it.
5) Once the fuse panel swings down, you will see this. Disconnect all the electrical connections the same way as before. Lift the fuse panel and pull it back towards you to remove it.
6) For the purposes of this modification, you will only need to work with 3 of the connectors we have just removed:
#1 The large, green connector
#2 The small, green connector
#3 The small, blue connector
We will start with the #1 harness
7) Cut the tie-wrap holding the wires to the connector. Also carefully cut the electrical tape bundling the wires together so that you can spread out the wiring for easy access.
These are the 3 wires we are concerned with on this connector
Wire D - Red with a black stripe
Wire K - Orange with a light blue stripe
Wire B - Green with a white stripe
8 ) Locate the Red/Black wire on connector #1. If you hold the connector with the wiring pointing out to the right, it will be on the bottom row, 2nd pin in from the right. Follow the wire about 2" up from the harness, and cut the red/black wire.
Now, you have a couple of choices to make.
First, you need to decide when you want the fog lights to come on. You can choose to either have them come on with the park lights, or come on whenever the key is in the ACC or ON positions.
If you want the fog lights to come on with the park or headlights, use wire K, the orange/l. blue wire.
If you want the fog lights to come on with the key in ACC or ON, use wire B, the green/white wire.
You will need to splice the red/black wire into the wire that gives the fog lights the function you want, as described above.
I chose to have the fog lights come on with the park/headlights, so that is what the pictures will show. If you want them to be on anytime the car is on, use the green/white wire instead of the orange/l. blue wire.
Next you need to decide how you want to splice the wires. I'll describe the easiest and probably most common method first, then I'll describe the method I used.
9a) The easiest method to splice into a wire is to use a wire tap, also sometimes referred to as a Scotch-Loc. This allows you to tap into the wire without cutting it.
I do not have any pictures of the splice done with a wire tap, since I didn't do it this way, but it will look something like this. Basically, you will run the wire you are splicing (either orange/l. blue or green/white) through the side the wire-tap that is open all the way through, then insert the red/black wire into the side of the wire-tap with the stop. Clamp down on the metal bar with a pair of pliers to complete the tap, then close the lock. You may also want to tape the wire-tap shut with some electrical tape for safety.
9b) The method I chose to do is to manually splice the wires using a butt connector. This allows for a better and more secure connection, IMO. Trace the wire you are wanting to splice in to (either orange/l.blue or green/white) a couple inches back from the connector and cut the wire. Strip about 1/4" of insulation off of both ends of the wire you just cut, as well as the harness side of the red/black wire. Take the harness side of both wires you've cut and twist them together tightly. Insert them into 1 side of the butt connector and crimp the connection. Insert the other wire on the connector side that you just stripped into the butt connector and crimp this connection. The end result should look like this:
Again, use the green/white wire instead of the orange/l.blue wire if you want the fog lights on any time the car is on.
10) Tape up any connections or loose wires left from your work on connector #1.
11) Install a new tie-wrap on the connector and re-tape the wires together in a bundle so that it is as neat as it was before you worked on it.
12) Position connector #1 out of the way, because you are done working with this connector!
13) Locate connectors #2 and #3. Cut the tie-wraps/tape off of these connectors so that you can access the wiring.
14) On connector #3, locate the black/red wire. If you hold the connector so the wires are pointing out towards the right, it will be on the top row, 5th wire in from the left.
15) Trace the black/red wire about 2" back from the connector and cut the black/red wire. Tape off the loose end from the connector.
16) On connector #2, locate the black/red wire. If you hold the connector so the wires are pointing out towards the right, it will be on the bottom row, 5th wire in from the left.
17) Trace the black/red wire about 2" back from the connector and cut the black/red wire. Tape off the loose end from the connector.
18) Pull the black/red wire out until it is on the opposite side of the clip holding the wires to the firewall. This is necessary in order to be sure that you have enough wire to make a good connection.
19) Strip about 1/4" of insulation from both black/red wires you've just cut.
20) Using a butt connector, connect both black/red wires directly together. Crimp the connection. Position this wire so that it is out of the way. Tape or zip-tie it to something if necessary.
21) Slide the fuse panel back under the dash. Connect the appropriate connectors back into this side of the fuse panel.
22) Lift the fuse panel back into place and twist the retaining pins until they lock. Connect the appropriate connectors into this side of the fuse panel.
23) Reinstall the black plastic cover by sliding the foam covered tabs into the metal slots under the dash, then line up the pins on the front side and push it firmly up. It should lock into place.
23) Reinstall your negative battery cable and tighten the nut.
24) Test your work. If it works as it should, you are DONE!
Even though there appears to be a lot of steps to this task, its mainly because I wrote a fairly detailed how-to. In reality, pretty much anyone should be able to have this finished in an hour or less. This modification has been performed by owners of '04-'08 models on both Mz3's and MS3's.
 just did this and it works fine
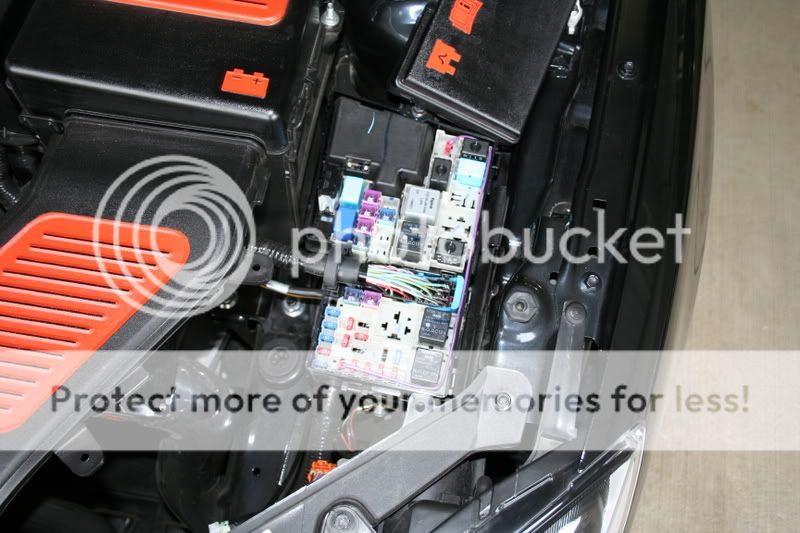

")

