
You are using an out of date browser. It may not display this or other websites correctly.
You should upgrade or use an alternative browser.
You should upgrade or use an alternative browser.
how to foglight mod. *with pics*
- Thread starter 02.5MP5
- Start date
mobilman788
Member
- :
- 2003 Mazda Protege5
Any way to get the pictures to work again?
+1
I need those pics to do this mod lol
+2
- :
- 2003 mazdaspeed protege
sub
As long as you don't mix up which red wire you connect to after you cut it, you'll be fine. I switched them on accident (couldn't get the wires to stay connected) and had low beams with parking lights and no fogs, with no change when you switch to headlights. Thank God I found out what I did wrong, cuz it was driving me nuts trying to get the wires to stay hooked together.
Just to clarify..I'll be tapping into the relay..and wiring the red wire into the fog light switch? (green wire)
I don't think that's quite right,... you'll be cutting the red wire then tapping into the green wire. (that's kinda what you said though)
One of these might make it easier,.... it's a control wire you a tapping so there is no real current through it. One could be used to join the red wire to your replacement wire too. (or a butt connector) They aren't nearly as reliable as soldering but make the install really fast and easy. (they don't always make a good or lasting connection)
Last edited:
logosnjgondfgd...I don't get how I'm having troubles understanding this how-to.
So the red wire from the relay.. that's getting cut.. and tapped off.. (where the relay is) then the red wire that is now exposed and I assume going to the fog lights themselves.. That's getting tapped into the green wire in the fog light switch...right?? -.-
So the red wire from the relay.. that's getting cut.. and tapped off.. (where the relay is) then the red wire that is now exposed and I assume going to the fog lights themselves.. That's getting tapped into the green wire in the fog light switch...right?? -.-
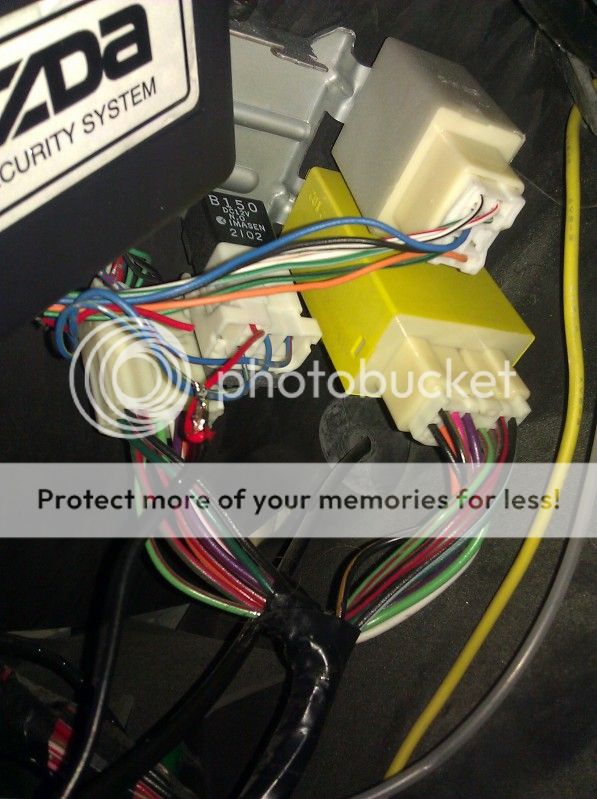
You cut the red wire going into the relay, now leaving you with two red wires. Connect your extension wire (that you are supplying) to the short piece of red wire going into the relay. (actually the plastic connector that plugs into the relay) (the other red wire leading away from the relay is no longer used and just gets tapped off.)
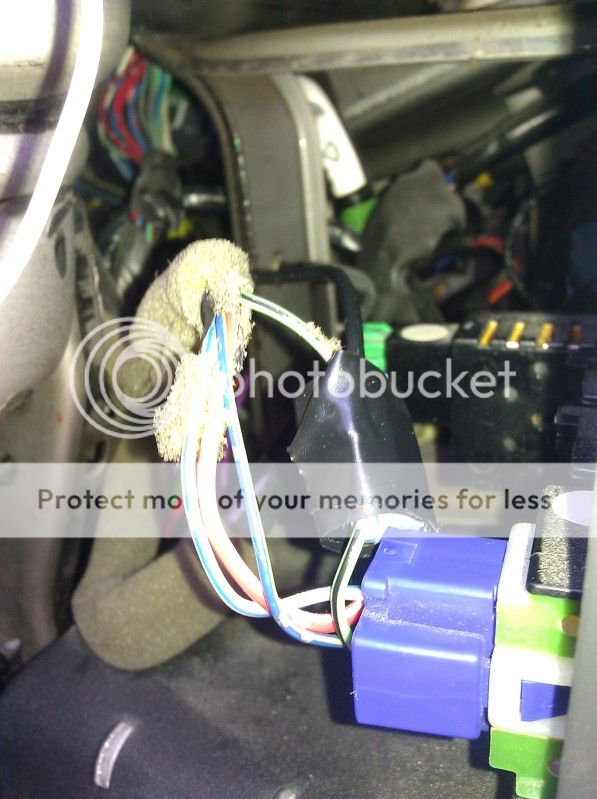
Then you "splice" or "tap" the other end of your supplied extension wire into the green wire. Meaning you don't cut the green wire just T off from it. (at least if you do cut the green wire, all three wires need to be connected together,... ie. the two ends of the cut green wire and the extension wire all need to be connected together.)
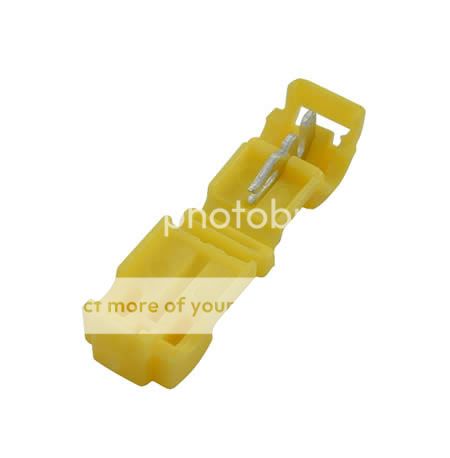
All that can be done with those T-Connectors (or one T-connector and one butt connector) if you aren't comfortable with soldering.
The T-Connector works by laying the wires onto the metal clips and when you close the cover it forces the wire into the clip and the clip "bites" through the insulation on the wire and connects to the wire inside without actually cutting the wire. These connectors do work but they may not cut all the way through the insulation or can get corroded over time "breaking" the electrical connection. (although with them being used inside the car they are protected from water and crap).
Make sure you get the right connector for the wire gauge you are using to make sure it bites enough but not too much. (the ones I have are rated 22-18 gauge wire,... I would need bigger ones for fatter wire so that they physically fit and can deliver the current required by fat wire.)
Then you "splice" or "tap" the other end of your supplied extension wire into the green wire. Meaning you don't cut the green wire just T off from it. (at least if you do cut the green wire, all three wires need to be connected together,... ie. the two ends of the cut green wire and the extension wire all need to be connected together.)
All that can be done with those T-Connectors (or one T-connector and one butt connector) if you aren't comfortable with soldering.
The T-Connector works by laying the wires onto the metal clips and when you close the cover it forces the wire into the clip and the clip "bites" through the insulation on the wire and connects to the wire inside without actually cutting the wire. These connectors do work but they may not cut all the way through the insulation or can get corroded over time "breaking" the electrical connection. (although with them being used inside the car they are protected from water and crap).
Make sure you get the right connector for the wire gauge you are using to make sure it bites enough but not too much. (the ones I have are rated 22-18 gauge wire,... I would need bigger ones for fatter wire so that they physically fit and can deliver the current required by fat wire.)

The relay is just a big switch that is turned on and off by electricity instead of physically flipping a switch. The red wire controls the switch by turning on an electro-magnet that flips the switch.
That is the wire that is being manipulated so that we can turn the switch on and off in a way that we want instead of the factory set way.
The current (or power) through the electro magnet is very low (I = E / R,... I = 12 V / 90 ohms = 0.133 amps (or 13.3 milliamps) so the T-connector just has to make contact not a really good high power one.
(I installed four relays for my fan switch (one for each speed) to bring the current flow down from over 8 amps through the switch to 13.3 milliamps,... it's been working great but my how-to is pretty lacking,... it's just a tangle of wires,... I'm thinking of making another one and installing it near the blower motor so I can make an easier how-to with lots of pictures. Most people have big issues with electronics and wiring.)
31N007
31N007
- :
- Mazda Protege5
1998 Ford Contour SVT
2017 GTI DSG PP
2007 4Runner
Don't you have DRLS Flav??? If so, isn't there another way to set this mod up? :S I have a USDM P5 so I followed this method. There's a link on the first or second page to the Canadian version. Idk if there are pics in that link though.
EDIT: since PCB gave a mini how to, I assume that's the right way seeing as he's in Canada too...
EDIT: since PCB gave a mini how to, I assume that's the right way seeing as he's in Canada too...
I did have DRLS. Every since I grabbed my DDM HID's I can chose when I want to turn my head lights on/off.
The fogs however, they can only be turned on if the head lights are on. I don't even use my fogs at the moment though since I still haven't mustered up the effort into putting HID's into those housings since I hear its a huge PITA.
The fogs however, they can only be turned on if the head lights are on. I don't even use my fogs at the moment though since I still haven't mustered up the effort into putting HID's into those housings since I hear its a huge PITA.
31N007
31N007
- :
- Mazda Protege5
1998 Ford Contour SVT
2017 GTI DSG PP
2007 4Runner
I have hids and run the fogs in the evening when it's getting slightly dark. Then the hids go on when it's darker ") keeps them usable
keeps them usable ") (I have yellow tints on them and my mate likes em)
(I have yellow tints on them and my mate likes em)
I need to look into the auto headlamps and see how difficult that would be... Probably too hard but ill try and find out as a mod.
keeps them usable (I have yellow tints on them and my mate likes em)I need to look into the auto headlamps and see how difficult that would be... Probably too hard but ill try and find out as a mod.
vltndennis
Member
- :
- 03 Mazda Protege5
Just finished doing this! (thumb)
New Posts and Comments

- Replies
- 17
- Views
- 3K
- Replies
- 3
- Views
- 122
- Replies
- 4
- Views
- 603