Has Anyone Had Their Fuel Pump/Cover Leak?

I don't recall anyone in this thread saying to go ahead and replace the pump, as long as you're in there. Pretty sturdy, are they? Moreso than the housing, I've gathered.

I ask because I'm dealing with the same issue right now, and wondering when it will be before I have to break the assembly open again because the pump finally quits.

(BTW: Used the info here to gather my supplies. Tremendously helpful. Thank you all for sharing your experience...)
 
my fuel pump has been going strong for the past 11 years and 200k+ miles. so, yeah, pretty robust.
 
I don't recall anyone in this thread saying to go ahead and replace the pump, as long as you're in there. Pretty sturdy, are they? Moreso than the housing, I've gathered.

I ask because I'm dealing with the same issue right now, and wondering when it will be before I have to break the assembly open again because the pump finally quits.

(BTW: Used the info here to gather my supplies. Tremendously helpful. Thank you all for sharing your experience...)


I recommend upgrading the fasteners to stainless steel with a more robust head. I used cap head allen but some folks have used hex. Grease or anti-seize on the threads is probably a good idea as well. It should be much easier to remove them if you ever need to get back in there to replace a pump. McMaster Carr online is an amazing resource for hardware and someone pasted a link a few pages back.
 
Beck/Arnley: Lots of parts, no instructions

OK, just received the pump assembly housing (Beck/Arnley) in the mail and there are several pieces here -- more than I was expecting. Possibly more than was previously indicated in this thread, though that's likely due to a misunderstanding on my part.

For future reference and others' benefit, I'm going to enumerate what I received. Maybe someone could help sort things out.

Referring to the diagram in mtnbiker's post (#2), I've clearly received parts 2, 3, and 4, plus the wire with the double connector (not labeled).

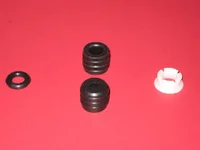
There's also a small black O-ring (bottom [R] in dia?) and two black rubber, short cylindrical pieces with ribs on the outside, completely open on one end and only partially open on the other. (Possibly labeled in the diagram by the upper left [R]?)

Finally, there's a small, white, plastic piece, flat on one side and flared on the other, with four notches. (Sits above the pump (6) in the dia?)

Besides the above questions, let me pose another: Are any of these the Washer and O-ring listed as parts needed from the dealer? If not, how are these applied in the repair?

Thanks a bunch...
 
^You could have saved a whole lot of typing by just taking a picture!

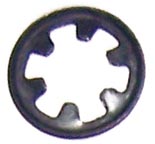
The bottom [R] in the diagram is actually not a washer, but a sort of retaining ring. It's used to hold the low-pressure fuel filter onto the pump. It kinda looks like this:

Washer8.jpg


The top-left [R] is also oddly-named, it's not really an o-ring, it's a ribbed rubber cylinder with an outer diameter roughly the same as a dime. I'm pretty confident that it can safely be re-used. If I had to do the job again, I would replace it.
 
CheeseHelmet is correct. The left hand R in the diagram is the "O-ring" which is more like a black rubber grommet. The bottom R is the "washer" and it's technically an "internal cup star washer". I didn't need the new washer...I think the parts it went between never needed separating. I might still have it if you need it and can't find one. I'm not sure what the other parts you describe are. A photo would be helpful.
internal-cup-star-washer.jpg
 
Last edited:
Yeah, haven't tried that yet. I'll see if I can get one posted.
Definitely didn't receive those clips pictured above.

-----------------------------------------
-Edit-
------


OK, as described in my initial post: O-ring, cylindrical rubber pieces, white plastic piece: IMG_1684.JPG
 
Last edited:
Highway robbery

Received the parts from Mazda yesterday. P/N ZL01-13-ZE5, which Mazda refers to as an "O-ring", appears to be the black ringed cylindrical piece that I received with the after-market pump housing. (Here again are the small pieces that came with the housing: IMG_1684.JPG.) Only from Mazda, it's $20. For one. I received two with the housing. For free.

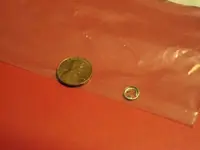
Here's an image of that washer/ringlet-clip thingy, Mazda P/N FEH2-13-ZE4: Mazda Washer - Pump.JPG. Check it out next to the penny. $5. Yeah.
 
Last edited:


OK, as described in my initial post: O-ring, cylindrical rubber pieces, white plastic piece: View attachment 197150

I don't recognize the o-ring on the left or the white plastic part on the right but it's been a few years since I did the repair so it's all a bit fuzzy now. I remember there was a small sub-assembly that I didn't need to disassemble so I wound up never using the star cup "washer". Perhaps those parts are used within the sub-assembly. The black cylinders in the center of the photo are what I refer to as O-ring ZL01-13-ZE5 in the original post. In any case I'm pretty sure that you have all the parts necessary to do the repair so you should be able to replace anything you suspect needs replacing.
 
I don't recognize the o-ring on the left or the white plastic part on the right but it's been a few years since I did the repair so it's all a bit fuzzy now. I remember there was a small sub-assembly that I didn't need to disassemble so I wound up never using the star cup "washer". Perhaps those parts are used within the sub-assembly. The black cylinders in the center of the photo are what I refer to as O-ring ZL01-13-ZE5 in the original post. In any case I'm pretty sure that you have all the parts necessary to do the repair so you should be able to replace anything you suspect needs replacing.

I don't recall seeing either of those parts when I did it too.
 
Its been a couple of weeks since I installed the after market pump housing from rockauto.com, ($25 for the part and $25 for shipping), I was able to buff and paint the old metal retainer cap and transferred the pump, strainer, and sending unit over. What a great feeling, tooling down the road with no gas smell!!!! (and at a fraction of the price mazda was going to charge me)
Thanks to all for the extremely helpful replies!!!
 
Wow, wish I had joined this forum before I started the job. The fuel pump issue appears to be a common problem in the proteges. Was there ever a recall? I am thinking there should have been. I picked up my 2002 Mazda Protege5 about a month ago for booting back and forth to work (just under a hundred kms round trip). Got it for $2400 fully certified and e-tested with 209,000 kms on it. Not two days after driving it, got that pungent odor of good old gasoline. Of course all of the garages are saying right off the bat, 'It will be a $700 job', without investigating. Then one fine gentleman advised me of the trap door under the back seat, and there it was, a leaky pump. Like the previous posts, I spotted very corroded machine screws. I could not find bolt extractors small enough and was not sure what route to take. But then on good old Kijiji, i found a shifter knob, antenna and complete gas tank for $40. At least I could experiment with the tank and pump housing. I used a drill bit, slightly smaller than the bolt head and drilled down till the head popped off (on all 8 bolts) removed the pump assembly and removed the rest of the bolt with miniature vice grips which worked great (a little trickier going through the trap door on the attched tank). Found some longer stainless steel bolts at Brafascos, which is a fastener supply store here in Canada, and used 4 small washers on each. Plastered them in anti-seize like someone else did on here for future work. Used two small flat heat screw drivers to remove the fuel lines. Used a thin film of insta-gasget on the rubber seal. And everything worked fine for a couple of weeks, but now, low and behold, the issue is back but am well prepared to replace with a much newer part.
Does anyone know exactly what leaks in the assembly?
Is it the same place each time?
Is aftermarket a better plan?
Will this cost me $300?

thanks
Rob


I live 1.3 hours from you. If you have any things like this in the future, I will help you do them yourself for free, You can use my garage.

I don't do the job for you, but I help you to do it... if you catch my drift.
 
Tying a bow on it

Just wanted to report back that this repair is complete and have been fuel-smell-free for two weeks. It's like a little piece of heaven.

Also, as I previously noted, with two "O-rings" (so named by Mazda) being supplied with the replacement pump housing, there was no need for this part which I also purchased independently from a Mazda dealer (for $20). I bought through Online Mada Parts -- which was recommended in this thread -- for this and a couple of other parts. I am sad to report that I suffered a significant problem with my return and wanted to share my experience.

After obtaining pre-approval for the return, and waiting over a week for some sign of having received it, I wrote to enquire about my return and received the following message:

I do apologize, I meant to email you yesterday but got very busy and did not have a chance to.

I did receive your envelope yesterday. However, there was a big tear in the side and the ring apparently had fell out somewhere on its trip back to me.

This was the ENTIRETY of the response. Aloof and unhelpful. Further exchanges revealed an evasiveness and sense of indignation that I should be suspicious. After all, it could have been accidental (though it was taped to and folded inside the invoice) or taken by someone at the post office (yes, clearly very useful and/or valuable to a postal worker).

My advice: Be careful who you deal with online.
 
I have the same leaky situation. My problem - how does one disconnect the fuel lines? I've never seen these types of connectors before.

The following video is really informative to how to disconnect fuel supply line ( It's in French but it's as clear as silent movies :)) It's a PITA work and took me more than an hour not to mention how did I dealt with corroded screws. Mazda should have used better screws :(

http://www.youtube.com/watch?v=hgZ6PFO1TXg

This video is also great but I do not agree his suggestion to how to disconnect. All other items are helpful and deserve a great thank.

http://www.youtube.com/watch?v=TvGrtiKnckw
 
Do me a favor.
I am looking at fixing the same problem and need to know where to get a new cover with the plastic piece that goes with it. The pump etc is working fine.
Thanks.
Rudy.

I replaced existing assembly with a used one. If screws are not corroded and if you have a tool for easy disconnect for fuel lines, it should takes an hour or so. I was about to order it from Rockauto but I did not want to wait and I prefer recycling parts.
 
I personally don't have this problem...yet...but great read.

I had been chasing a P0300 for a few months, and was starting to think it was fuel filter/pump/sending unit related...but i never had any gas smell inside the car, and only outside when the missing started when idling (it ended up being a bad coil, despite numerous 'tests' that it checked out fine with). Anyway though, i looked at the infamous top of this stuff...and the screws are so corroded and rusted that it felt as if i could simply pick them off with my finger...but everything is perfectly dry. i'm not one to usually fix things before they are broken, but considering the rust under there is something that will only get worse...i'd love to do something about it so that when i finally do start leaking gas, its a quick job to fix.

so those of you with rusted screw heads...I've read all the posts in this thread, and am a little confused. I can get access to an impact driver, or 'grab it' screw extractor relatively easy. My questions are more for those that ended up having to chisel or drill out the screw heads (as i'm fairly certain thats what i'll be faced with). You say the studs do not extend into the actual tank? Like i said, it seemed as if i could let my finger nail grow for a sick ass month, and just pop the heads off with that, leaving a stud underneath. Was it easy to grab the studs with vice grips or something to back it out? And is there no threat of dropping the studs into the exposed tank after the assembly is removed?

I've got a laundry list of stuff to do to the car over the winter (it doesn't get driven much then anyway), so i'll try the pb blaster daily routine for a week or so...and try the normal way, just trying to get a heads up on what to do if that doesn't work...as again, i'm pretty sure it won't be that easy as simply using an impact driver. honestly i can't see how those screws are even holding it in place currently...
 
Back