Has Anyone Had Their Fuel Pump/Cover Leak?

I'll take pictures when I replace my fuel filter.

I couldn't figure out how to disconnect the quick release fuel lines. I didn't want to damage them so I went online to research it, I didn't want to buy a SST from a Mazda dealership either. I read that you take two small screwdriver to lift up each green tab to clear the fuel filter's plastic input pipe's ridge and then pull the fuel line off.
 
Last edited:
I should take some pics of mine as I progress through it. Currently waiting for PB Blaster to do its work on the screws (its cleaning them up pretty good, they are 90% still intact)

@ bikingpro5 - I saw a really nice Protege5 yesterday at the corner of Regent and Montgomery around 4pm, blueish headlights and new paintjob, obviously well maintained. Was that you by any chance?

@ rit14623 - I think you have to push the green tabs inwards. I used a screw driver to stretch the black plastic around the tabs while pushing them in ... maybe I'll take a pic later how I did it after I finish work.

mine is in the driveway under a car cover for another few months so it was not me, if it was 2 tone its a good friend of mine.
 
rit you have to play with the tabs a bit but take your time and you will figure it out ,its a little tricky but just use a driver or knife to lift the tabs like you said
 
Well, I completed the replacement, in 30 degree weather. Here are some pictures.
To remove the quick release tabs - ghetto version... I couldn't get both tabs up at the same time. It was getting frustrating. Since I had a new fuel filter body, I just cut the plastic fuel extensions that go into the fuel lines. Then with the cut-off white tube in the fuel line quick-release ends, I was able to insert screw drivers from the fuel line side and pull out the white tube with needle-nose pliers.

Here's pictures. I ran out of battery power so I couldn't get every step in.

Fuel filter parts - a.k.a. high pressure filter
01_fuel_filter_uninstalled_zps5e896476.jpg


Fuel strainer parts - a.k.a. low pressure filter
02_fuel_strainer_uninstalled_zps81202ac4.jpg


Fuel pump relay - To depressurize the fuel lines, open gas cap, disconnect fuel pump relay, start car, it will die out, crank a couple more times, put fuel pump relay back in, disconnect battery.
03_fuel_pump_relay_zpsfc62a8eb.jpg


Fuel pump cover - four Phillips screws to remove
04_fuel_pump_cover_zpsd2993e4f.jpg


Fuel pump cover off - there are eight M4 Phillips screws around the metal pump pump assembly bracket. I ended up replacing them with M4 hex head screws and M4 washers.
05_fuel_pump_cover_off_zps2737d117.jpg


Close-up of the quick-release disconnect - you don't push the tabs in, they need to be lifted to clear the white raised ring as seen with the red arrow.
06_quick_release_disconnect_zpsf6a2d073.jpg


Fuel pump filter assembly out - fuel is still within the assembly so I turned it upside down and dumped the fuel back into the tank.
07_old_fuel_pump_extracted_01_zps9d41ed46.jpg


Another picture of the fuel filter assembly out of the tank.
08_old_fuel_pump_extracted_02_zps84edcec3.jpg


New fuel filter next to the old one.
09_fuel_filters_sidebyside_01_zps27227b4d.jpg


Another picture with the new fuel filter next to the old one, white cap off.
10_old_fuel_filter_cap_off_zps74de351e.jpg
 
Last edited:
Disconnected the fuel gauge meter sender plug from the fuel filter body, pulled out the fuel pump
11_fuel_pump_zps0d6ed1f5.jpg


Rubber grommet that goes on top of the fuel filter. I replaced it even though the old one appeared to be fine.
12_fuel_pump_grommet_zps7407893a.jpg


Fuel gauge meter sender removed from the fuel filter body.
13_back_of_fuel_gauge_sender_zpscefee4a5.jpg


Later steps.

Disconnect the plug into the fuel pump.
Removed the fuel strainer lock tab and pulled off the fuel strainer from the bottom of the fuel pump.
Attached the new fuel strainer and new lock tab to the bottom of the fuel pump.
Attached the fuel gauge meter sender to the new fuel filter body and inserted the electrical plug into the fuel filter assembly.
Reconnect the plug from the new fuel filter in the fuel pump.
Push the fuel pump into the fuel filter assembly.
Put the fuel strainer rubber seat into the white cap.
Put the white cap onto the bottom of the fuel filter assembly.
Remove the rubber sealing ring from the fuel pump bracket, There are three nubs that hold it in place. Be careful not to damage these.
Put the fuel pump bracket onto the new fuel filter assembly. Place the rubber sealing ring onto the new fuel filter assembly.
Put fuel filter assembly back into the tank.
Put screws back into the fuel filter bracket.
Insert plug into the fuel filter bracket and other plug into the rear electrical plug.
Reconnect quick release lines into the fuel filter assembly.
Reconnect battery.
Start car.
See if fuel leaks just in case.
Replace fuel filter cover with four screws.
 
Great pics!

I'm having problems getting my screws out. Been spraying them with PB Blaster the last week and they are 95% cleaned off, but they've gone soft from the corrosion, I'm not going to get these out with a standard screw driver. Might end up having to buy a screw extractor. Hopefully I don't screw them up so bad they have to be chiseled off.
 
Awesome pictures !!! I'm actually looking forward to doing this job now !!

So i guess there is an actual filter in the housing itself. I assume it could get plugged up and reduce fuel flow and perhaps even burn out our fuel pumps ??
I didn't consider this to be a maintenance item,... just something to be done when the housing cracks and leaks.
I'll be ordering the housing soon and plan on doing the job in the spring,... not gonna wait for it to fail.

I find it odd that there is wires and connectors right inside the fuel tank. There is oxygen in there too,... one spark and BOOM!!!
 
Great pics!

I'm having problems getting my screws out. Been spraying them with PB Blaster the last week and they are 95% cleaned off, but they've gone soft from the corrosion, I'm not going to get these out with a standard screw driver. Might end up having to buy a screw extractor. Hopefully I don't screw them up so bad they have to be chiseled off.

use a brand new screw driver and hit them with a hammer after you have PB blasted them. Mine were in terrible shape and i still managed to use a screw driver to remove them.

mine started out like this
IMG-20120724-00720-1.jpg


screws after
 
Heh damn that looks almost as bad as mine was. Mine was covered in a few handfuls of sand/moisture, and you couldn't even make out the screw heads. Here's how it looks now :

v8lg1e.jpg
 
adding an extra gasket in that area won't have any impact. its the actual housing that develops a leak over time, not the gasket. replace the housing (the white piece that the fuel lines connect to), and you should be all set.

What are you talking about? A literal coffee can lid as a gasket? If so, then the answer is no...

I'm thinking the coffee can lid would help "cushion" the new housing from vibration,... if that was leading to failure, not just age.
 
Its kind of unnerving hammering on this tank. The screwdriver head is plastic so there's probably almost no chance of spark but it vibrates the whole tank since you have to whack it pretty hard. Its also not making any difference so far, the screw heads are fused with the plate underneath so the PB Blaster hasn't been able to get into the thread. Not sure if I can get these damn screws out.. maybe I'll have to try a screw remover - http://www.canadiantire.ca/AST/browse/6/Tools/PowerToolAccessories/DrillBitsSetsAccessories/PRD~0543809P/GraBit+Damaged+Screw+Remover.jsp?locale=en
 
Umm, Spark will do nothing on a sealed tank.

You can try dropping lit matches in the tank all day if you like, you will never get anything significant in the way of a BOOM..
 
Ok thanks, I'll get back at it then. If I blow up though, I've bookmarked this site so when they go through my stuff, they'll eventually find out you killed me...
 
I got ALL of the screws out except one, so I tried to make a new flat head groove in the head but it ended up disintegrating. So problem solved =)

Now the only problem is those damn quick release fuel nozzles. What a pain those things are, can't get them off even with the two tabs pushed out with two small screwdrivers.
 
Last edited:
I seriously thank all of you for the help. I have a lot going on right now financially and in school, so you have no idea how much you helped me, I was clueless before this thread.
r7pzxs.jpg


NO MORE FREAKING GAS !!! BOOYAH!
 
Umm, Spark will do nothing on a sealed tank.

You can try dropping lit matches in the tank all day if you like, you will never get anything significant in the way of a BOOM..

OK,... I have to pipe up on this one,...

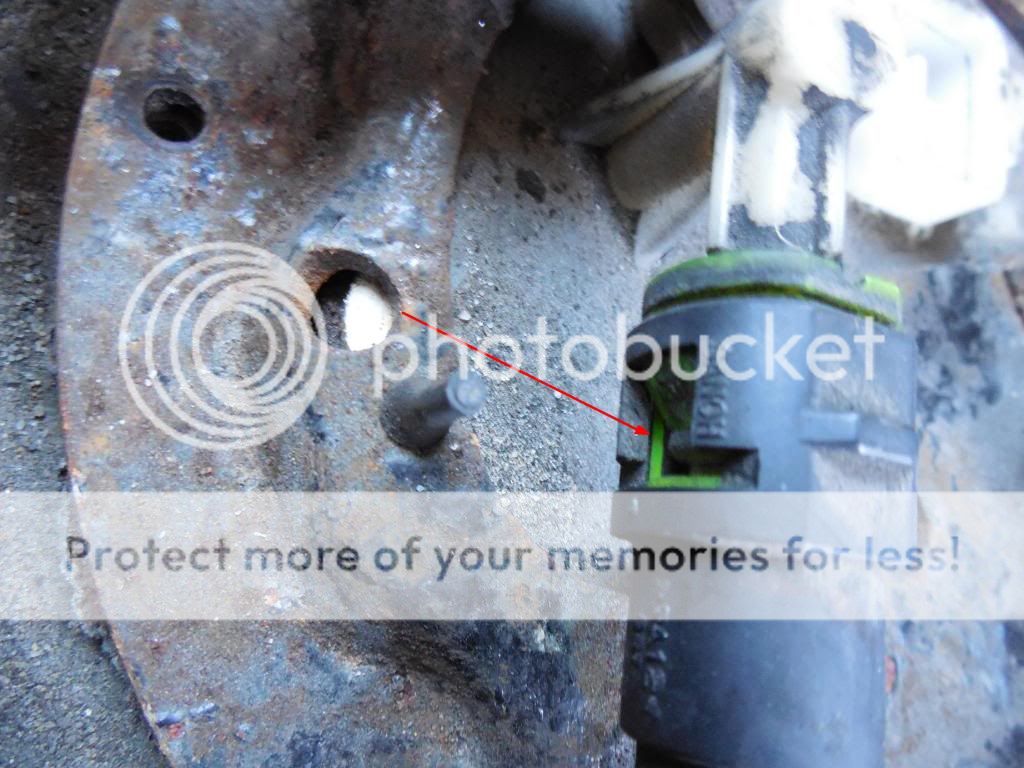
I agree with you completely that a sealed system will not ignite but if there is liquid gas leaking around the top of the sender unit, that can certainly ignite. Even a spark inside a sealed gas tank can ignite if there is air (O2) in the tank and there always is. But I believe the whole gas danger thing is over rated. If you're working on those screws and you can't smell gas (mine isn't leaking yet so I'm gonna do mine before it does) then I really don't think there is a snowball's chance in hell of any kind of explosion and I'm gonna prove it by using my Dremel tool when I do mine. (just to be an a$$)
My friends wife's Grandfather delivered gas,... smoking cigarettes while standing right beside the big hose filling the underground tank. He was fine, for decades, then one day it all went bad,...RIP. I had friends that rinsed out their dirt bikes sponge air filters in gas smoking the whole time, flicking the ashes in the gas then putting out the cigarette in the gas.
I was working on a gas leak on my 85 626,... I lifted up the rear end almost two feet then detached the filler and filler vent tubes and tipped the tank down a foot to get access to the weld around the vent fitting where it was leaking. I was told everything is safe if there is no spark or open flame so a soldering gun is fine. (except for the sparking in the switch for my Weller soldering gun so I put an elastic band on the trigger to hold it on). It was kinda working except I couldn't get enough heat to melt the solder at the weld spot,... So I was figuring that the whole gas explosion thing was way over rated an decided to open the garage door (it was winter), cool the place down, air it out and then give go with my Bensomatic micro torch.
I got it lite and got the flame about 8" away from the fitting and POOF,... I jumped back two feet then stared at a 12" blue flame jetting straight out horizontally from the 2" filler fitting. It was making a serious jetting sound as it sucked air in the vent fitting to feed the jet blast. I just sat there in the snow three feet away like a deer caught in the headlights with my mouth and eyes wide open and just waited to see what was gonna happen next. Then the flame slowed down and shrunk until it was right at the fitting,.. then another small puff and the flame was now inside my tank,... the whole inside of my tank was on fire and was giving off a very pretty orange glow that shone out the filler neck. I figured it was about time to do some thing,.. so I reached behind me and scooped two hand fulls of snow and made a snow ball to plug the filler neck which I figured would be pretty hot,... I jammed it in there sealing the end with my palm and used my other thumb to plug the filler vent,... Then I turned my head away, pinched my eyes shut and waited,... I may have prayed but I don't recall,... After what felt like ten minutes but was probably about three seconds, I heard my final poof and the fire was dead.
I even managed to get the snowball out and put in some gas line antifreeze then blew through the vent to blow all the black smoke out of the tank. So I salvaged my tank and the 1/3 tank of gas and finished up my soldering with the Weller soldering gun.
The really stupid thing was that I had a fire extinguisher about 4 feet away,... I don't know if I forgot or if I was seriously trying not to waste all that gas and the tank,... I dunno,... I tend to learn the hard way,... I'm just lucky I've lived through each of my life lessons.
I'm pretty sure the addition of ethanol to gas changed the game quite a bit. I think that's why the flame was blue at first, just the alcohol vapors.
 
Last edited:
Back