You are using an out of date browser. It may not display this or other websites correctly.
You should upgrade or use an alternative browser.
You should upgrade or use an alternative browser.
CX-5 Sport and Touring AC Knob Replacement
- Thread starter mentalcase
- Start date
undergrad.
Member
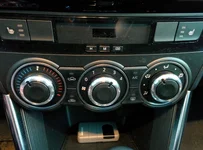
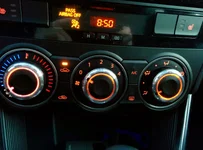
Bummer. Just got mine, prepped them as per paris1's post (#30); even painted black dots for easy spotting the pointer mark in daylight. When I tried to put them on though, they would not fit right. They appear to be 90 degree offset. For example, when the fan is set to 0 the knob will point between 3 and 4, when set to 1 it will point beyond 4, etc. All 3 of them are like that. Did I get faulty ones or am I missing something?
View attachment 207444View attachment 207445
Try putting the stock ones back in and make sure you put the new ones in on the exact same angle. Otherwise you will have the problem you mentioned. It took me a few tries to get them in properly as well.
- :
- Mazda 6 iTouring 6MT
just installed the new knobs and what a difference, the console looks so much better thanks OP for this thread. btw the stock knobs came off w little to no effort, we must have some weak cx-5 owners who needed pliers to take them off 
- :
- 2023 CX-5 Premium; 2018 Mazda 3 GT hatch
I think they're all a little different. 2 of mine came off by hand and I had to use pliers to get enuf grip on the third.just installed the new knobs and what a difference, the console looks so much better thanks OP for this thread. btw the stock knobs came off w little to no effort, we must have some weak cx-5 owners who needed pliers to take them off
- :
- Mazda 6 iTouring 6MT
I think they're all a little different. 2 of mine came off by hand and I had to use pliers to get enuf grip on the third.
i was just joshin, yeah the first 2 was a breeze the 3rd was the only one that gave me a problem until i got a good grip on the knob then was able to get it off
- :
- 2023 CX-5 Premium; 2018 Mazda 3 GT hatch
I hear tell y'all do that a lot in NC!i was just joshin, yeah the first 2 was a breeze the 3rd was the only one that gave me a problem until i got a good grip on the knob then was able to get it off
- :
- Mazda 6 iTouring 6MT
I hear tell y'all do that a lot in NC!
I wouldn't know im a jersey boy... then again idk if that's better or worse :-/
I have the same problem as zorobg, did we get bad knobs or is it possible different model year/trims/country for the CX-5 could be set up different. If you look closely at his first pic you can see that in both case the indicators on the front are pointing down in the picture (you can see the white line on the left and if you look closely the clear spot on the right). Can anyone who's knobs fit look at the picture and see if their original and replacement knobs are configured the same? (white stripe on original lined up with where the tabs that need to be removed would be, clear area on replacement perpendicular to tab).
- :
- 2023 CX-5 Premium; 2018 Mazda 3 GT hatch
If memory serves, I believe it is possible to get the knobs on in more than one position, but they only fit correctly in one position. Are you sure you removed the old knobs with all controls turned left and then put the new knobs on in the same position?
Knobs were definitely turned all the way left, I did try putting it on in different positions and didn't seem to go, but I can't say I spent a whole lot of time trying. Again, look at zorobg's first picture and look at the notches, there are two the same size (the ones with the tabs across from each other) and then the other two are of different sizes with the one small one clearly smaller than the other 3. Again with both knobs pointing down the one on the left shows the small notch facing left, and the one on the right that notch is facing up. If you can actually check either the original or replacements to see which way that notch is facing when the control is pointing down would be great. Thanks for the help!
- :
- 2023 CX-5 Premium; 2018 Mazda 3 GT hatch
With the right and left knobs turned all the way left, when I remove the knobs the small notch is approximately in the 3 o'clock position on both. The center one is about at the 5 o'clock position. Did you remove the clear plastic tabs inside the female part of the knob?
I'm assuming you're talking about male part in the car, and if so then that seems to be the difference, because the left one for me is around 5 and the middle around 7 if they were in the positions you're saying I think it would line up perfectly. Sorry for the bother, but any chance you could take a pic of the knobs themselves from the back, like zorobg's first pic just to compare? I did not remove the tabs because I didn't have a screw driver on me and was just anxious to see the difference, they did actually go in far enough that no light leaked out the contour.
- :
- 2023 CX-5 Premium; 2018 Mazda 3 GT hatch
I don't have a camera that can get that kind of close-up. Something sounds terribly wrong in your install if you didn't remove the clear tabs. I really think you need to go back to square one and follow the instructions I gave in an earlier post. This shouldn't be that difficult unless you insist on cutting corners like it appears you have.
I appreciate the help, and I did cut corners, I can try tomorrow, but I'm thinking it won't change the problem that's occurring because zorobg did follow all your instructions and the picture clearly shows that his original knobs and replacements (as is the case with mine) do not line up the same way.
Ok, thanks for the help, problem solved, turns out you can force the knobs in the wrong way even if the notches don't line up. Looks like this is why we have to remove those tabs, because when it's put in the correct way it fits properly, when you force it in the wrong way it sticks out until you snap off those tabs which then lets it slide in all the way.
I second that trucx; did the same thing yesterday. The problem we were having is trying to put in the knobs the "proper" way. By proper I mean trying to line up the shaft with the knob. I guess the Mazda 3 knobs are 90 degree offset compared to the CX-5 ones. With the tensioners removed, the knobs can be forced in to line up with the CX-5 markings. The middle one went in easy, but the left and right ones definitely needed a hard shove. This is how they look "properly" lined up and then forced in 90 degree counterclockwise (the knobs all way to the left).


undergrad.
Member
Has anyone had any luck getting the back-light on the air control knob (far left knob) to look more orange?
Thanks guys. The entire process took about two minutes thanks to the thread. I didn't mess with anything but small lock grip pliers and a microsoft cloth to take them off and did not modify the male in dash receiver. They went on all the way in and indicators were spot on.
Again-Thanks. Easiest upgrade ever and looks like it should have originally.
Again-Thanks. Easiest upgrade ever and looks like it should have originally.
New Posts and Comments
- Replies
- 222
- Views
- 120K
- Replies
- 6
- Views
- 3K
