Guide: CX-5 Battery Installation

Jack Rabbit

Banned
:
18 Mazda CX5 AW
CX-5 Battery Installation:

My suggestion- Get the battery you want and have your local mechanic put it in or just buy your battery from a store that offers free installation.

Otherwise read on.

The OEM battery only lasted 42 months.

Mazda has turned what should be a 5 minute battery swap into a major 1/2 hour operation plus extra drive time to return the core.

On my other vehicles(Ford/Toyota) I'd go to Napa, get a battery off the shelf, plop it in barehanded while in the parking lot and return the core all within 5-10 minutes.

Not so with my Mazda. Walmart was out of Everstarts so drove to Home Depot and got an Exide 35 with 640 CCA. Popped the hood, loosened the brackets & cables and then couldn't get the damn battery out. You cant pull the battery straight up and out because it's wedged in there and the frames is in the way of pulling it up. I didnt have gloves and last thing you want to do is tip the battery at night in store parking lot and not be able to see if acid is leaking out.

So it becomes a next day operation.
First : in case things go wrong,
1.) make sure your windows are closed and the doors unlocked.
2.) Keep the keyfob on top of the cowl near windshield so the door doesnt autolock. Everytime I tried to walk to hood with keys in pocket, the CX-5 would lock.
3.) Wear gloves and long sleeve shirt.
4. ) Loosen brackets and pull off
5.) Disconnect Negative cable.
6.) Disconnect Positives cable.
7.) Pull out the battery insulator sleeve cover. Place it on top of engine so you will see it and not forget to put it back on. It's a pain to disconnect everything and redo.
8.) Make sure you have gloves on.
* Did you put your gloves on?
9.) Spend 10 minutes seeing if there is anything else you can remove to get the battery out easier. Nope there isn't without it taking alot more time.
10.) Carefully tilt battery almost completely sideways on the long end in order to get hand underneath and pull out while watching for battery acid to leak. This is no small tilt job. Do this quickly, get it out and set it down.
Sealed lead acids can still leak. Make sure acid isn't eating your clothes.
11.) Even though your new battery comes with a handle, it does no good when you cant set it straight down onto the plate. Again, you will need to tip it to get it in. It's a miracle neither one leaked. Or did it? Again check for leaks. Neutralize any spills/leaks with heavy baking soda solution.
12.) DO NOT forget the insulation sleeve.
13.) spray/lube with silicone grease or vaseline.
14.) Connects positive.
15.) Connects Negative
16)Make sure vehicle starts
17.) Tighten hold-down brackets down.
18.) Grab your tools
19.) Close hood
20.) Grab your keyfob off the cowl so you dont drive down the road with it.
21.) Make sure your trunk/liftgate works.
22.) Reset any radio stations, seat settings, windows, etc.
23.) Drive another 15 to 30 minutes(depending on store distance) to return the core and then another 15-30 minutes back home. Add the gas bill to your total battery cost.
24.) Major PITA
 
Last edited:
I dunno why your cx5 seems so difficult? I lifted the battery straight up no fuss on our 2016.5 touring. Easy change. Used the battery charger connected to the terminal cables to keep electric flowing to the car. Didn't need to reset anything.

My 2019 diesel looks just as easy.

🤔
 
I dunno why your cx5 seems so difficult? I lifted the battery straight up no fuss on our 2016.5 touring. Easy change. Used the battery charger connected to the terminal cables to keep electric flowing to the car. Didn't need to reset anything.

My 2019 diesel looks just as easy.

🤔
For some reason on this model year the battery is partially tucked under the metal frame.
Didnt think about using a battery charger. Thought the cx-5 had a hard memory. Will try the charger next time. Thanks.
 
Coincidentally, I replaced the battery on my daughters 2019 GT a couple weeks ago, and it is indeed tucked in as tight as you described - impossible IMO to be able to get enough grip with 2 hands to be able to pull it up and out of the vehicle. There's just not enough extra space anywhere to allow hands to slide far enough down any of the 4 sides of the battery.

I had good success by first working a thin, heavy duty strap underneath each end of the battery. The straps I used are semi-rigid, which works well to retain a rectangular shape, while working them down and under the battery. Then I linked those 2 straps together with another one, and used a 2x4 propped against the body on the other side of the hood to lever it up and out by the middle strap. I used a piece of rug to protect the body, but any decent padding will work, because there's not much force being applied at that fulcrum point. I didn't watch the time, but the whole thing probably didn't take more than 5 minutes.
Your a modern day Archimedes!

Thanks for the advice, hopefully won't forget it by the next battery change.
 
after changing 4 batteries , the trick is to tilt it and get it out that way on the non turbo models. Not nice but doable after few times. Right hand has to go and reach out/grab the bottom of the bayteru that is near the windshield, tilt and get it out. Same way for the new battery in.
On the turbo the computer is not near the battery and there is plenty of space.
What year is your vehicle?
 
For some reason on this model year the battery is partially tucked under the metal frame.
Didnt think about using a battery charger. Thought the cx-5 had a hard memory. Will try the charger next time. Thanks.
Looks like there’s a difference on space around the car battery between Gen-1 and Gen-2 CX-5’s. I’m glad I have a Gen-1 CX-5, and removing and installing the battery isn’t too difficult with a little tilt from the side.
 
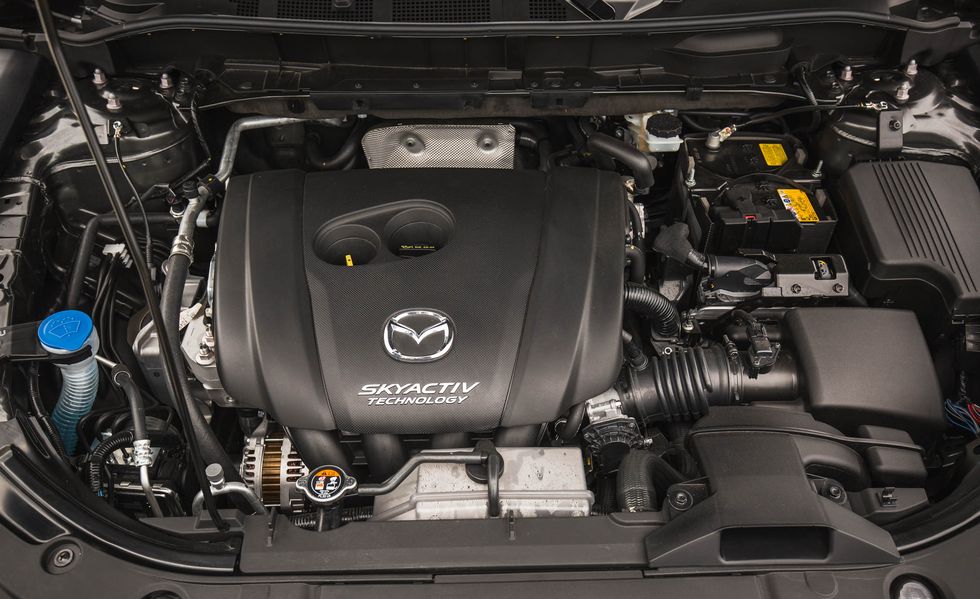
Here's a picture of the 2018 engine bay. I looked it up because I wanted to see just how difficult @Jack Rabbit is making this process out to be.

2018-Mazda-CX-5-218.jpg


It's certainly not easy to remove the battery given it's location close to the firewall, which requires you to lean over the fender or the front bumper to lift the battery out. I guess they put it there for better protection in a collision? But the guy who wrote the DIY below didn't mention any issues getting his battery out.


2017-2022-Mazda-CX-5-12V-Automotive-Battery-Replacement-Guide-017.JPG


It's a tighter fit than my CX-9, which doesn't have that plastic part between the battery and the air box, but it still looks plenty doable. Using straps as @edmaz mentioned is an excellent idea. I guess I'll never know how difficult it is until I have the opportunity to change the battery on a CX-5, but IMO the majority of the 24 steps Jack outlined stem from his frustration of not being as easy as working on a much simpler 13 or 14 year old Toyota or Ford.

Changing the AGM battery on my dad's 2018 Equinox was difficult the first time (in 2020). Way more tilting involved, and more stuff to unbolt. Changing it the second time (in 2022) was easier, but still a bit annoying. Current gen Ford Escape looks just as annoying, but the RAV4 battery looks much, much easier to swap out than all of the above.
Unfortunately, neither of those pictures on that dudes website looks like my engine bay.

It's alot more difficult than it looks.

I'll post pic later but the battery is really tucked in there under the frame. Can't pull it straight up. Even with the positives cables shoved out of the way, a slight tilt forward is difficult as you cant move the battery any further forward because the battery plate has sides that come up on all four sides. Next time I change, might switch to a flat battery plate. Trying to get your hands in and get leverage to tilt forward then out is difficult plus last thing i would do is tilt a battery towards me for acid to spills towards me. Only other option at the time was to tilt it backwards on it's side and get hand under the side and pull out that way, hoping no acid leaks.

Will definitely be trying @edmaz idea for the next swap if keep the CX-5 and maybe shove an AGM in too then no worry about future spillage during changes.
 
I just looked at my 2019 touring and it doesn’t look like it will be a problem, but I’m not sure. It seems that there is room to move the positive wiring harness out of the way so the battery can be slid forward and then tilted up from the back and lifted out. What am I missing.
 

I just looked at my 2019 touring and it doesn’t look like it will be a problem, but I’m not sure. It seems that there is room to move the positive wiring harness out of the way so the battery can be slid forward and then tilted up from the back and lifted out. What am I missing.
Depends on how far back your battery is and whether you have a flat battery plate or not. If it's not that far under the frame and it's on a flat plate/tray, you could shove the cable out of the way, slide it forward and possibly tilt slightly and lift it out. Otherwise, it's a beeyotch... So try @edmaz belt and pully solution.

Also by a flat plate or flat try, I mean one with very minimal lip...had one on my other vehicles.

And maybe buy an extra minimal lip battery tray so you have it on hand to switch out and make future installs easier. That or an AGM battery would make this process easier and safer.
 
Last edited:
positive cable , the whole harness goes away. it can be tucked bottom righ in the gap/space between the fuse and the ecu. You have to do that on non-turbo trims otherwise you cant tilt the battery in that direction and get it out easily. It is not as easy as on other cars but its also better than other brands :)
also once you remove the vracket the battery has space to slide a bit on the bottom plate on which it sits. You can remove the plastic cover if you want prior to removing the battery. I usually take it out all together. But after doing it many times its actually easy. As long as you can lift 15-20kg.
the lack of handle on the oem is a b***

on the turbo is a lot easier as there is no ecu there.

3FAE2F69-4465-416E-9944-E45D70A85BAB.jpeg
 
Last edited:
positive cable , the whole harness goes away. it can be tucked bottom righ in the gap/space between the fuse and the ecu. You have to do that on non-turbo trims otherwise you cant tilt the battery in that direction and get it out easily. It is not as easy as on other cars but its also better than other brands :)
also once you remove the vracket the battery has space to slide a bit on the bottom plate on which it sits. You can remove the plastic cover if you want prior to removing the battery. I usually take it out all together. But after doing it many times its actually easy. As long as you can lift 15-20kg.
the lack of handle on the oem is a b***

on the turbo is a lot easier as there is no ecu there.

View attachment 316987
Wow, you got alot more space than I do... I have only a little gap to shove my positives out of the way and minimal space to slide battery forward if I had it on a flat tray, the battery negative terminal is completely behind the top of the brake fluid reservoir and my battery so far back that's it's midway between the frame ground.
 
Last edited:
Yours seems the non turbo. the space is tight there. My last picture is the Turbo which has much more space. my first picture is from the non turbo. The only option for non turbo is to get it out tilted as much as you can and right hand has to grab the bottom of the batter from the opossite side near the windshield but all battery cables have to be moved away otherwise it wont be easy
 
Here’s my 2019 touring. Looks lIke mine is a little more forward.
 

Attachments

  • 9B5161EE-B8A8-4CED-A30A-C8C166DCA24A.jpeg
    9B5161EE-B8A8-4CED-A30A-C8C166DCA24A.jpeg
    102.6 KB · Views: 252
  • 8935D655-7786-49F3-B613-800EB8252465.jpeg
    8935D655-7786-49F3-B613-800EB8252465.jpeg
    112.7 KB · Views: 244

New Posts

Back