Guide 2nd Generation CX-9: Sequential LED turn signal installation (side mirrors)

sm1ke

2018 Mazda CX-9 Signature
Moderator
Contributor
:
Canada
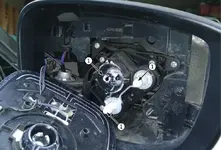
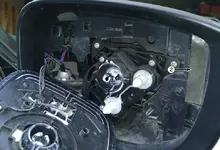
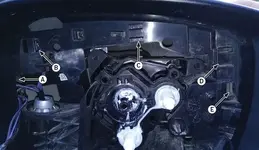
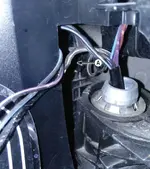
This is a DIY How-To for an aftermarket sequential LED turn signal installation on the side mirrors of a 2nd Generation Mazda CX-9. I decided to document this process because I haven't seen anyone else document the process, and the parts didn't come with any instructions. Note that these instructions should be very similar (if not the exact same) for the 2017+ CX-5 and the CX-8.

This process was documented/photographed by myself, using my crappy cellphone camera and my 2018 Mazda CX-9 Signature as the "demo" vehicle. This DIY is provided as a learning aid and reference guide. I assume no responsibility for any warranties this process may void, or damages you may inflict on yourself or your vehicle.

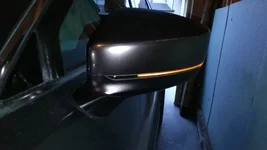
The CX-9 comes factory equipped with LED turn signals on the side mirrors. I came across these sequential LEDs on AliExpress and decided to give them a shot. I'm very happy with them! The sequential LEDs look great. The only downside is that I can no longer see the turn signal blinking on the side mirror from inside the car in the daytime (this may be a pro for you if you're easily distracted by that light at the edge).


What you'll need:

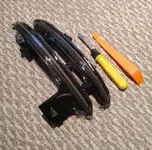
- Aftermarket sequential LED turn signal housings (I bought these ones)
- A flat head screwdriver (preferably longer)
- Phillips head screwdriver
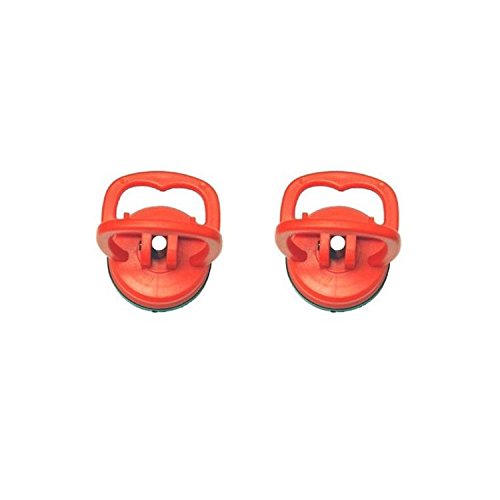
- Plastic pry tool
- Towel to catch the side mirror caps in case they fall

The LED turn signals I bought came with a flat head screwdriver and a pry tool in the package.

attachment.php


There are also two color options, clear and smoked. I got the smoked version, and it looks very close to the OEM in appearance:

attachment.php


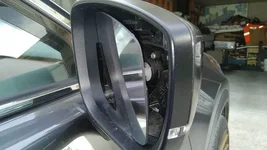
Finally, it seems the the OEM turn signal doesn't illuminate the entire length of the strip. There's a small portion that stays dark, while the entire strip is illuminated on the aftermarket turn signal. OEM signal shown here.
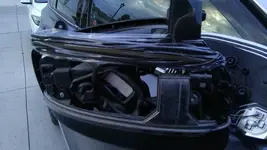
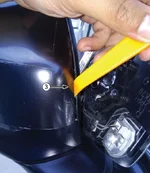
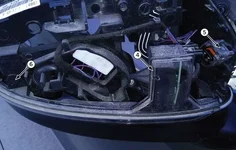
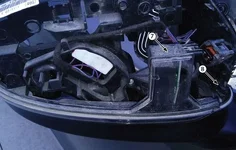
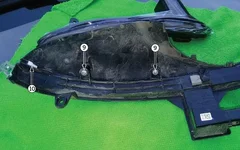
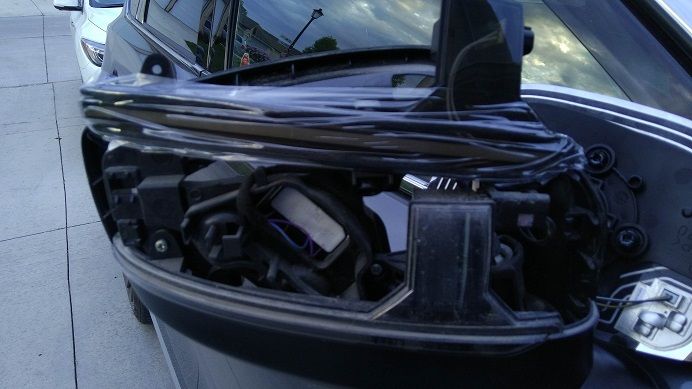
attachment.php


On to the install!
 

Attachments

  • IMG_20190614_172516.jpg
    IMG_20190614_172516.jpg
    174.7 KB · Views: 2,740
  • comparison1.jpg
    comparison1.jpg
    45 KB · Views: 2,700
  • comparison2.jpg
    comparison2.jpg
    30.5 KB · Views: 2,675
Side mirror glass removal

First, turn the car on to the ACC position (or start it). Using the mirror adjustment control, turn the mirror "in" so that you can reach in behind it with your fingers.

attachment.php


EDIT: For vehicles with the 360 Camera feature, take extra care during these next few steps to ensure you don't damage the camera wiring in the mirror housing. Unfortunately, my 2018 does not have the 360 Camera, so I'm unable to show you what to be mindful of, but it should be fairly obvious. Thanks Turborascal for the heads up!

Here's a photo of the mirror detached. The back of the mirror is held in at 3 points, one right at the center, one just below the center and one off to the side (1). You'll want to pull from the back, not from the edge. I found that it does take a bit of force to get it to come loose, but this can vary depending on how much grease you have at those points. Hopefully this photo helps you figure out how to pull it out, and reassures you that the glass will come out with enough force. Again, do not pull from the edges, pull from the back.

attachment.php


EDIT: Here's a video that shows you how to "pull from the back" (skip to 0:45).


Attachments

  • sidemirrorglass1.jpg
    sidemirrorglass1.jpg
    45.7 KB · Views: 2,564
  • sidemirrorglass2.JPG
    sidemirrorglass2.JPG
    77.5 KB · Views: 2,509
Last edited:
Side mirror cap removal

Remove the adhesive tape (2) and set it aside for reinstallation. Lay a towel down on the ground in case the mirror cap falls.

attachment.php


With the glass out of the way, you can now see how the mirror cap attaches to the housing at points A-E.

attachment.php


EDIT: Two other users have reported that it was easier for them to start releasing clips from the outside in (starting at "E"). Truth be told, I hadn't even tried starting at E, and given that clip E is much more accessible than clip A, it probably is much easier. Thanks for the tips Cx-9 Guy and Turborascal!

Insert a flat head screwdriver and push on the clip shown (A). Apologies for the s*** photo. This should be enough to wedge a pry tool in from the other side (3).

attachment.php


attachment.php


Work the pry tool up and down to loosen the other 2 clips in that area, then work your way along the top of the mirror cap, using the flat head screwdriver to release clips B-E as you go.

attachment.php
 

Attachments

  • sidemirrorglass3.JPG
    sidemirrorglass3.JPG
    74.7 KB · Views: 2,527
  • sidemirrorglass4.JPG
    sidemirrorglass4.JPG
    45.9 KB · Views: 2,535
  • sidemirrorcap1.JPG
    sidemirrorcap1.JPG
    93.8 KB · Views: 2,431
  • sidemirrorcap2.JPG
    sidemirrorcap2.JPG
    68.8 KB · Views: 2,431
Last edited:
LED turn signal removal

With the mirror cap set aside, the turn signal housing (4) will be exposed. Use a flat head screwdriver to lift the tab on the harness connector (5), then pull the connector off of the turn signal housing. Using a Philips screwdriver, remove the screw shown (6).

attachment.php


Grab the housing where the connector was installed (7) and work it back and forth a little bit to loosen the clips along the bottom of the mirror. Use a flat head screwdriver to release the last clip (8) from the housing.

attachment.php


With the turn signal off of the car, remove the two screws shown (9) using a Philips screwdriver.

Note 1: On the OEM turn signal, you'll see a small white spacer (1O) near the end of the housing. Remove this spacer and reinstall it in the same spot on the new turn signals. This will prevent a gap from developing during reinstallation.

attachment.php


Note 2: When screwing the two screws back in, ensure that the housings "seat over" the screw pegs before tightening the screws.


Installation is the reverse of removal, just replace the OEM turn signal housing with the new one. Ensure that you test each signal once the harness is plugged back in, just in case. Also be sure to replace the adhesive tape that was removed in the previous post. Repeat for the other side, and that's it!

EDIT: One thing I forgot to mention. When pressing the mirror glass back into place, if you're able to tilt the glass to the left/right or up/down easily, one of the attachment points is still loose. This is usually one of the white pegs shown in the second picture of post #2. If it tilts up/down, line the mirror up with the lower white peg and press it in until it clicks. If it tilts left/right, line the mirror up with the outer white peg and press it in until it clicks. You'll know its attached correctly if there's resistance when you try to tilt the mirror with your fingers.
 

Attachments

  • turnsignalhousing1.JPG
    turnsignalhousing1.JPG
    54.2 KB · Views: 2,418
  • turnsignalhousing2.JPG
    turnsignalhousing2.JPG
    52.7 KB · Views: 2,381
  • turnsignalhousing3.JPG
    turnsignalhousing3.JPG
    57.7 KB · Views: 2,423
Last edited:
Great write up. but the video is not showing up. The only advice I would add cost me $10 on Amazon. https://www.amazon.com/dp/ (commissions earned) When I was removing this mirror glass to replace the back cover I bought these suction cups, attached to the center of the mirror, so you could have an evenly distributed pull on the outside of the mirror while your pried from underneath, they were on there tight. These suction cups had a very thick rubber pad and did not slip a bit, really helped remove the glass. I didn't want to break it because it wasn't cheap.

31UM65lg6pL.jpg
 
Great write up. but the video is not showing up. The only advice I would add cost me $10 on Amazon. https://www.amazon.com/dp/ (commissions earned) When I was removing this mirror glass to replace the back cover I bought these suction cups, attached to the center of the mirror, so you could have an evenly distributed pull on the outside of the mirror while your pried from underneath, they were on there tight. These suction cups had a very thick rubber pad and did not slip a bit, really helped remove the glass. I didn't want to break it because it wasn't cheap.

Great suggestion. The only reason I didn't use these was because I've removed mirror glass on other cars before, so I'm a little more familiar with the process. They certainly would have been nice to have though!

One thing I will suggest though. When pulling the mirror glass off (using the suction cups or not), apply constant, building pressure until the glass comes out. You don't want to yank it loose because the wires that connect to the BSM indicators aren't that long, and you may accidentally pull them out.
 
Is anyone else having issues with the link to the product or viewing the video? I've tested both the link and the video on my work computer and my phone, and both seem to be working fine.

If the product link isn't working, search "mazda cx-9 sequential" on AliExpress.com.
If the video link isn't working, the video is titled "2018 Mazda CX-9 Sequential LED Turn Signals" on YouTube.
 
Last edited:
Is anyone else having issues with the link to the product or viewing the video? I've tested both the link and the video on my work computer and my phone, and both seem to be working fine.

If the product link isn't working, search "mazda cx-9 sequential" on AliExpress.com.
If the video link isn't working, the video is titled "2018 Mazda CX-9 Sequential LED Turn Signals" on YouTube.

Apparently the login page popped up only when using my iPad.
I just tried on my Mac and the product page appeared!
Thank you once again ... the price is surprisingly affordable and I ordered a set for my Signature CX-5.
Your comprehensive installation instructions will make the job relatively painless.
bowdown.gif
 
Awesome looking mod! I'm planning on doing the same. Any chance you can do a quick vid on just removing the mirror part? No biggie if you can't, I think I can manage it. Just a quick question, when you mentioned pull from the back and not from the side, are you saying once the mirror is turned to stick your hand inside the mirror enclosure and pull toward you with even force? I'm confused on which "back" part. Thanks

Update: I should have a done a YouTube search earlier. I think this video demonstrates what you're saying : https://www.youtube.com/watch?v=ixz8l2Eyo84
 
Last edited:
In the second picture of post #2, you can see the 3 attachment points. The two white posts will usually come undone first, then the middle one is a little harder. There is a plastic plate on the back of the mirror, you will feel it when you put your hand in there. Try to keep your hands or pry tool on that plastic connector piece.
 
Awesome looking mod! I'm planning on doing the same. Any chance you can do a quick vid on just removing the mirror part? No biggie if you can't, I think I can manage it. Just a quick question, when you mentioned pull from the back and not from the side, are you saying once the mirror is turned to stick your hand inside the mirror enclosure and pull toward you with even force? I'm confused on which "back" part. Thanks

Update: I should have a done a YouTube search earlier. I think this video demonstrates what you're saying : https://www.youtube.com/watch?v=ixz8l2Eyo84

Yep that's exactly what I meant, sorry if it wasn't clear. I actually saw that exact video when I was trying to see if anyone else had done it for the CX-5 or CX-9. In that video, you can see that the back of the mirror glass is reinforced with some black plastic. It's the same with the CX-5 and CX-9. I'll link the video in the OP, thanks.
 
I added an edit to the end of post #4 for pressing the mirror glass back into place.
 
Give this man a beer! Yet another fantastic DIY guide with detailed instructions. Gonna add this to my to-do list.

You ever thought of adding paddle shifters? If so, check-out this thread: https://www.mazdas247.com/forum/showthread.php?123862825-install-paddle-shifters-in-my-CX-9/page2

I had considered it, but it would just be a mod for the sake of doing the mod, i.e. I wouldn't actually use them. I had paddle shifters on my IS250 and I rarely ever used them, maybe only once when I first got the car. Thanks for the link though!
 
I had considered it, but it would just be a mod for the sake of doing the mod, i.e. I wouldn't actually use them. I had paddle shifters on my IS250 and I rarely ever used them, maybe only once when I first got the car. Thanks for the link though!

Hmm, very interesting. I have them installed on my CX-5 and I use them all the time. Have been wishing to add them to my CX-9 for a while now, but haven't yet taken the plunge.
 
Thanks again Sm1ke for introducing me to this mod. I received the indicator today and installed it in a little over a hour. The hardest part for me was actually not removing the mirror itself but the outer casing. Those tabs was on tight and every time I managed to loosen one as I moved onto the next tab it would snap back in. I found it easier to go in reverse order from E to A on your diagram. The E tab would stay popped out and actually creates a wedge on its own. From there the rest of tabs pops off quite easily. Overall a great mod that adds a cool touch to your ride.
 
Last edited:
Back