If you applied the RTV around the pan continuously without any breaking point, I’d imagine chances are very slim the pan will leak. If unfortunately it does leak, I’d get another 4 ~ 5 quarts of FZ ATF and consider It the lesson learned for applying the RTV, and the 4th drain-and-fill which increases the fresh ATF ratio from 87.5% to 93.75%! You really don’t want taking any chances to re-use the drained-out ATF which may have been contaminated, especially in a system which simply can only do 50% draining.
I did go in a continuous line in the inner pan side. I have a diagram of what I did, the only thing that wasn't continuous was the semi-circles on the bolt edges. True, I figured that since I didn't even start the car yet, then I may have a chance to reuse it but better safe than sorry I guess.
If you look at the video, the guy’s CX-5 diesel has only 13,121 km / 8,153 miles, and the magnetic has similar amount of metal shavings like your transmission with 63K miles. Those metal shavings should have been there since early stage of the transmission life. They should make no harms to the transmission because they got stuck by the magnet and filter strainer.
To be honest, it still doesn't make me feel at ease with the magnet all covered up with crud. Seems like it would be a good idea to add some extra magnets like what he did in the video to even out the distribution of the extra stuff remaining. Not sure if it would make sense to purchase the magnets from Mazda or go aftermarket in the future.
Several questions:
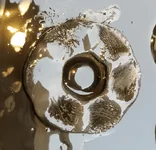
1. Are these 2 o-rings which need to be replaced included in the new Mazda OEM ATF “oil strainer” FZ01-21-500?
The new filter (strainer) already comes with the two green o-rings preinstalled so you do not have to take off the old ones and place them over the new filter. The only thing I recommend doing is lubricating the o-rings, male surface of the new filter so that it slides in easily and you don't damage the o-ring. I used the fluid from the transmission that's already leaking.
2. “Oil strainer“ bolts can be re-used?
The bolts that were already inside of the filter prior to removal looked fine but I guess I just wanted to play it safe and replace them.
3.Mazda Factory Workshop Manual says “Apply a light coat of silicon sealant (TB1217E) to the contact surfaces of the oil pan and transaxle case.” Did you apply RTV both sides or just on the pan?
I did not bother to apply anything to the contact surfaces of the transaxle case because the RTV that is already on the pan will touch the transaxle case anyways and it seems a little extra. In the videos that I watched on YouTube, I did not see them apply it on the case as well. I guess I'll find out if it's extra very soon.
4.Pan bolts should be replaced with new ones?
When I did my research, there were some people that mentioned to replace the pan/filter bolts and the manual recommends it as well. I paid about
$13.76 for the (16) bolts and they were also starting to get rusty. In a lot of the videos I watched, I saw them reusing the old bolts but if you don't have rust or anything on them, I figure you could possibly reuse them.
5.Did you tighten the pan bolts with cross-pattern? It seems strange that FSM doesn’t say that?
I attempted to do the cross-pattern for only 6-10 bolts then I forgot which ones I haven't tightened because I was rushing to beat the 5-minute drying time from the RTV so I ended up just going in a circle afterwards to see which ones I missed.
IMO cork / rubber transmission pan gasket usually won’t last long to prevent ATF leak. If Mazda designed the pan using the RTV sealant, I’d use it again without hesitation. Once the initial metal shavings are cleaned with a new filter strainer, I’d believe we won’t see too many of these the next time we drop the pan. Your experience and the YouTube video, make me think that I should drop the pan to clean up the metal shavings during my first ATF drain-and-fill.
One thing for sure is I won’t use Permatex® the Right Stuff® 1 Minute Gasket™ GREY Gasket Maker as I hate to do the job in very limited time frame. Besides, the data sheet still says it needs 24 hours to cure fully. I may try OEM RTV TB1217E or something similar to "ThreeBond 1207C Liquid Gasket Reddish Brown" showing in the video when I plan to drop the pan. Mazda Factory Workshop Manual says “Apply a light coat of silicon sealant (TB1217E) to the contact surfaces of the oil pan and transaxle case.” Again, did you apply RTV both sides or just on the pan?
Honestly, applying RTV seems more like an art than anything, the nozzle from the permatex tube sucks and I would've liked to apply it evenly throughout like Felix Dan, rather than going in a continuous line with no breaks. Also, I thought you would do (2) drain and fill and (1) pan drop to get rid of 87% of the old stuff

? I'm debating whether or not it's worth it to drop the pan again at around 30k miles just to see how it looks and just skip the drain and fill.
Yep, it says 24 hours to fully cure but it also mentions that it can be ready to be used right away in their TDS. That's the only reason why I thought it was worth it but let me know how the ThreeBond goes when you drop your pan.
I only applied the RTV to the pan since it would be touching the mating surface.
Most may have already noticed, but still a warning here about the torque range (Mazda special) value listed: most of them are in-lb, which is 1/12 of the ft-lb torque we usually see. So make sure don’t over-tighten these bolts!
Very true, I also used a digital torque wrench instead of the regular click-types that you can purchase. I'm actually scared sometimes because the click-torque wrench can be defective and if it doesn't click when tightening, you'll eventually snap the bolt in half so I decided to invest in a better tool. Obviously, that's just me hehe.
Oh, in addition, here are the prices I've paid so far:
- Mazda OEM Filter (Strainer) (FZ01-21-500): $26.89
- Transmission (Filter) Strainer Bolts (9945-40-616): 2 bolts for $3.16
- Transmission (Pan) Bolts (9YA0-10-615A): 16 bolts for $13.76
- Transmission/Oil Washer (9956-41-400): 14 bottles for $152.12
- Permatex® the Right Stuff® 1 Minute Gasket™ GREY Gasket Maker: $15.93
- Permatex High Temperature RTV Silicone Gasket Maker: $9.65
- Pittsburgh Non-Marring Scraper Set, 4 Pc.: $12.99
So in total, around $235 for (2) drain and fills (1) pan drop.