FS Intake Manifol Removal

mapa19

Member
:
'91 Miata BRG, '95 MX-6 LS, '02 Mazdaspeed5, '04 Mazda3 S-w
After reding a few VTCS removal threads, i saw some members asking for the intake mani removal procedures, and no posts about that.
so i decided to make a how-to. and i named it "fs intake manifold removal" to make it simple to find....cuz i know some people DO know how to use the "search" button...sometimes just don't know what to put. lol


Please note, i'm an experienced, ASE cert. mechanic, but...... i'm going to try to make this as detailed as possible.

if there are any Qs, feel free to ask.
simple steps like removing the batt and the air pipes i won't bother with for sakes of saving space...lol...plus if you need help removing your batt or air pipe...you prob shouldn't be doing this....

ok.
tools:

10mm (deep and shallow)
12mm (d and s)
12mm ratcheting wrench, AND non-ratcheting.
14mm (s)
ratchet, screw drivers, one VERY long extension, small extension, swivel or u-joint, breaker bar, needle nose pliers


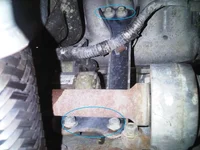
ok....let's begin with removing the batt, air pipe, and the strut bar. you should see this when you look from the driver's side fender into your engine...
Inverness-20121024-00754.jpg
next, you need to remove all the wiring that goes around the intake mani.
start with the a/c, ps, then crank and cam sensors, then coils, then a pesky lil one right above the alty, on to the 2 on top of the intake mani (control virs and vtcs), then the fuel press regulator solenoid, then the iac, then the tps. should look like this...
Inverness-20121024-00755.jpg
Inverness-20121024-00756.jpg
remove the pcv valve FROM THE INTAKE MANIFOLD AND THE VC.
next, we'll remove the fuel rail. you'll need the 12mm socket for the 4 bolts that hold it into place. BE BERRY CAREFUL, there are 4 plastic spacers that go right under the rail, and if you lose them, you're sol...they are black, and hide in places you'd never believe. i spent 3 days waiting on a replacement for one when i dropped it only to find it right under the cv joint...this was a very long time ago, so i learned from that.
here's the intake mani without the FR...
Inverness-20121024-00757.jpg
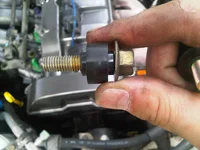
and here's the plastic doo-dah i was talking about....
Inverness-20121024-00755.jpg
 

Attachments

  • Inverness-20121025-00767.jpg
    Inverness-20121025-00767.jpg
    254.6 KB · Views: 765
Last edited:
next, we separate the 2 manis.
yes, this is a 2-piece mani, so you have to separate it to make it easier to work with. remember to get a PLENUM gasket when you're going to assemble it. this is NOT the same as the intake manifold gasket, so make sure you have both.
you'll need the 12mm and remove 4 bolts and 2 nuts. they go: 2 nuts on the upper edges, 2 bolts vertical, and 2 extra-long bolts on the lower edges. i circled them on the pics so you guys have an idea as to where they go. i had to 3ple check to make sure...
Inverness-20121024-00758rep.jpg
ok, here comes the fun part.... the intake to head bolts.
your 12mm again, you've got 4 (or 5) bolts up top, and 3 at the bottom.... top ones are easy, the bottom ones...well, that's a whole new story.
take the toolant hoses going to the TB off, one on top, one on bottom. here's the bottom one...
Inverness-20121024-00759.jpg
next, use your 12mm wrench. there is a bolt there, trust me. you've gotta come at it at an odd angle. you can use your finger between cyl 3 and 4 to help you guide it in...break it loose....then swap to your wratcheting wrench. you can use the regular wrench...if you have a week to do this...lol. if not, then this is the only way. it gets tricky, but it can be done.
next, the pass side...this is a bit easier. a 6" extension on your 12mm socket tackles this easily. insert it in this way....
Inverness-20121025-00769.jpg sorry, this is a diff mani....if it confuses anyone, i'll take a diff pic. i just thought this way everyone could see the angle of attack. :)
ok, now jack your car up, and take your 14mm, looooooong extension, breaker bar, swivel, and tell your kids to walk away....we tackle...the brace.
4 14mm bolts are all that stand in your way...
Inverness-20121025-00769.jpg
ok. you're done.
just kitten!!!!

carefully pry the upper from the lower mani, then separate the upper from the head. once their gaskets have been separated, then you can fiddle with getting it out. REMEMBER the EGR pipe is STILL CONNECTED, so you're going to have to be cautios here. what i did was to push down on the TB, you have the 2 studs where the 2 nuts (rem the step before with the 4 bolts, 2 long and the 2 nuts) on the upper edge of the manis met.... those are keeping you. after those two are separated, carefully push back (from the front of the car towards the bulkhead) on the upper mani, while also pulling up. this is at an angle. play with it. but be careful of any vaccum hoses on the back, brakets, or any other doo-hicky that can jam.
you whould end up with this on your lap...
Inverness-20121025-00769.jpg
 

Attachments

  • Inverness-20121024-00761rep.jpg
    Inverness-20121024-00761rep.jpg
    276.7 KB · Views: 773
Last edited:
if you want to remove the EGR pipe because you're swapping out for a diff mani, i suggest you put on the brace (yes, crawl under the car again) back on so you have a sturdier surface. the EGR IS A B$%#$ to get off, so be careful. i suggest spraying the nut with PB blaster and let soak.

it took me a work day (aprox 8 hrs) to remove mani, remove vtcs, fill holes, clean up, and assemble. so this is possible on your driveway.
don't try it on grass, since you're going to be man-handling the crap outta those brace bolts, and i woulnd't wanna have to hear someone "died by being hammered in the a$$ with a hammer".

hope this helps, and if anyone has any Qs, let me know.
thanks, and enjoy vcts-less driving!!!
 
Last edited:
Excellent write up, saved me the trouble of rookieing it. Now I know how to at least take it off. Many thanks
 
yeah, great post man, thanks.

I've never removed the intake manifold without first having the entire engine out...so i apologize if i'm off here...but when you are 'removing the fuel rail' are you simply disconnecting it from the manifold, and getting it out of the way? Or are you pulling the thing out entirely? If so, i would say...before you start working on the car...lift the rear access panel to the fuel pump/sending unit under the rear seat...start the engine, and pull the electrical connection to the housing...the engine will idle for a few more seconds, and vacuum all the fuel out of the lines leading to the engine. Its much safer to then remove that stuff up front without the possibility of pressurized gasoline still in the lines/rail. I know its not always pressurized, depends on some other conditions and how long the car sits before you start the work...but it takes less than a minute to this...

also, many still talk about this infamous 'fuel pump fuse/relay' somewhere in the fuse panels...i've never found this...i've pulled injection fuses, ignition fuses, etc...and they all end up doing the same thing...which is immediately stalling the engine without it cleaning out the fuel lines first...the only one i've found for 01-03 protege's is the connection on the top of the fuel pump housing...which does exactly whats needed when disconnected...shuts ONLY the pump off (your fuel gauge will drop to E also, but w/e)...but continues idle until its completely gas starved...you'll also throw a code related to lean mixture most likely, but you're resetting the ecu for this work anyway...
 
No need to disconnect anything fuel related, just throw it over the side while u work with the mani... along with the wire loom too. Now, there will be some coolant spillage when u separate the mani from block. How much depends on how u anticipate it
 
ok, i was unsure of if he was completely disconnecting it or not. I know you don't have to, but thought i throw that up in case.
 
Back