Round 2: GRM $2006 Challenge Turbo Miater

So it's been 3 weeks....

...and I've been a real slack ass keeping this thread up to date. Between work and the necessities of life, I've actually accomplished quite a bit. Meh, so I thought I would have it running a few weeks ago. Hell, I thought I'd have her running this weekend. Well, I've come to the determination that I can't even come close to guessing the amount of time required to design/build/assemble one thing or the other. I really do suck at that.

But anyway, the bits and peices, odds and ends, and crap that I found in the isles of the junk yard some where are starting to come together. Since it's been so long since the last update, I'll just give a brief rundown of the major areas of completion. Remember, however, that a large amount of time is, unfortunately, required in cleaning, sanding, grinding, painting, and overall unseen cosmetic crap.

The ever so brief rundown:

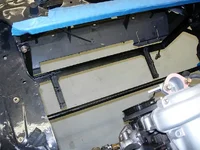
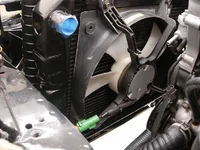
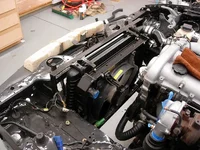
-the intercooler and radiator are permanantly mounted
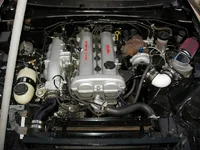
-the intake manifold is connected to the intercooler
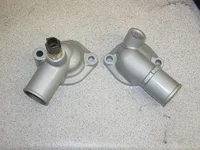
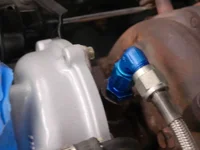
-the new coolant overflow reservoir is installed
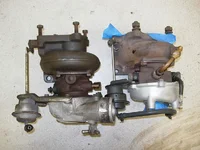
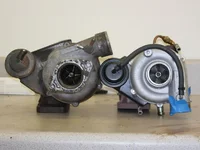
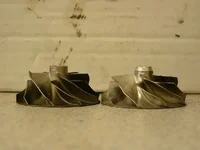
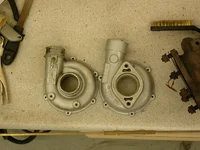
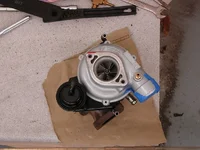
-the turbo is upgraded and installed (larger compressor wheel/housing)
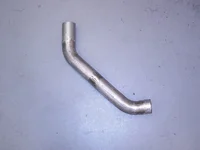
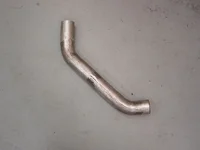
-the pre-I/C charge pipe is mostly complete
-the turbo outlet flange is CAD'ed and off to the machine shop (a new downpipe will be constructed)
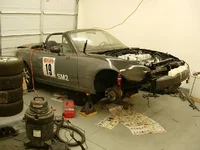
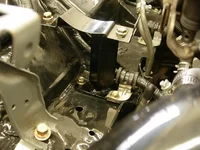
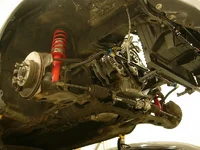
-the front suspension is reassembled (yay, i have a front sway bar again)
-reassembly of the forward body panels has begun

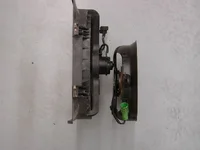
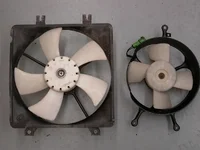
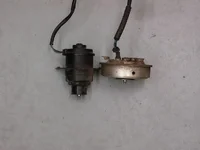
The next step is to complete the intake charge piping, install the radaitor fans and associated bracketry, and plumb the cooling system. I already have the majority of the materials required, so that shouldn't take too long. After that, it's just a matter of changing the oil, installing the plugs, and installing the down pipe.

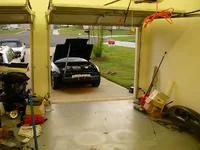
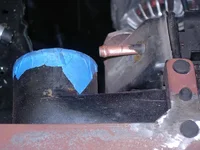
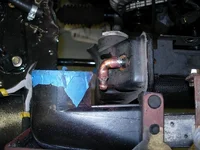
I leave you with a few pictures....
 

Attachments

  • DSCN4043.webp
    DSCN4043.webp
    89.1 KB · Views: 280
  • DSCN4045.webp
    DSCN4045.webp
    96.3 KB · Views: 289
  • DSCN4047.webp
    DSCN4047.webp
    190.2 KB · Views: 295
  • DSCN4070.webp
    DSCN4070.webp
    81.5 KB · Views: 285
  • DSCN4109.webp
    DSCN4109.webp
    73.4 KB · Views: 315
Last edited:
Various points in the turbocharger handling....
 

Attachments

  • DSCN4057.webp
    DSCN4057.webp
    88.3 KB · Views: 306
  • DSCN4058.webp
    DSCN4058.webp
    54.3 KB · Views: 289
  • DSCN4124.webp
    DSCN4124.webp
    29.2 KB · Views: 280
  • DSCN4127.webp
    DSCN4127.webp
    90.5 KB · Views: 288
  • DSCN4129.webp
    DSCN4129.webp
    85.8 KB · Views: 291
And the last for now....
 

Attachments

  • DSCN4142.webp
    DSCN4142.webp
    27.1 KB · Views: 325
  • DSCN4116.webp
    DSCN4116.webp
    69.8 KB · Views: 286
  • DSCN4111.webp
    DSCN4111.webp
    79.4 KB · Views: 392
  • DSCN4139.webp
    DSCN4139.webp
    119.1 KB · Views: 350
Ouch

Today's mod: a busted thumb due to a wayward sway bar. My thumb has a very nice gash and a split nail....and it hurts like hell. I'm just a bit perturbed in that I was planning on finishing the down pipe as well as the rigged cooling fan tonight.

I'll be mowing the lawn tomorrow evening and traveling to Charleston for the weekend on Friday to assist a friend with his challenger, so no progress til next week(pissed) .

I'll withhold on the pics for this one.
 
Moving onward

SHE LIVES!!!

Details and pics this week (glare) .

(Sorry for the teaser)
 
Cool.

man, I wish I was more motivated to work on my car.. Not having my own garage sux.
 
It's OFFICIAL...she's running under boost VERY well...especially AFTER I redid ALL the vacuum lines & rubber hoses under the bonnet. Thanks for the HELP Kevin!!
Here are the pics YOU requested:
(lol)
The line that I'm holding...that's the one I was asking about. Plug it for sure?
 
Last edited:
Argg. You have ABS. Oh well. :D Nonetheless, I'm very happy that you got her running well. Once you get an I/C on there, she'll be screaming.(headbang)
 
JDM-P5 said:
It's OFFICIAL...she's running under boost VERY well...especially AFTER I redid ALL the vacuum lines & rubber hoses under the bonnet. Thanks for the HELP Kevin!!
Here are the pics YOU requested:
(lol)
The line that I'm holding...that's the one I was asking about. Plug it for sure?
questions/comments:
1: love your radiator overflow container :)
2: what radiator are you using?
3: I know you're just up and running, but I would add more heat sheilding between the turbo and other stuff. I've melted my speedo-cable, brake fluid resevoir, and a heater hose using just the blanket stuff. I made a shield out of metal, and never had another worry.
 
Last edited:
MiaTurbo said:
questions/comments:
1: love your radiator overflow container :)
2: what radiator are you using?
3: I know you're just up and running, but I would add more heat sheilding between the turbo and other stuff. I've melted my speedo-cable, brake fluid resevoir, and a heater hose using just the blanket stuff. I made a shield out of metal, and never had another worry.
I see.
1 - Going to borrow Kev's stock one for the challenge (will get one after that)
2 - 1986 Fiero radiator
3 - I'll def have to do that then.

Here's the complete list (sorry for the thread jack Kev):
Greddy Turbo Kit
Greddy Fuel Pressure Regulator
Runs Excelent
0-Rust Anywere Car lived in California until about 8 months ago
1.8L brakes
Stainless Steel Brake lines
Viscous Limited Slip
ABS
Power Steering
Power Windows
All electronics function
Have all the A/C stuff, but is out of car
RX-7 Fuel Pump
2100lbs full of gas
Bignose Motor
86 Fiero Radiator/Flexlite fan
Blitz turbo timer
Clean title
05 mazdaspeed miata cloth top W/ no zipper glass rear window. Has small cut, and some "crushed" fabric. still looks great, very servicable. 0-leaks .
All was had for $1800. :)
 
Not to out-do Phil, but....

...it's time to post an update. So, yeah, it's been a while, but I've been in the garage almost every day since the last update screwing around with this and that, save for the occasional auto-x and Petite LeMans.

All in all, she is running, and running beautifully FWIW. There are a few things I need to work out like a supposed boost spike to 15PSI. I'm not actually sure that's how high it went as I caught only a glimpse of the gauge out of the corner of my eye. However, I didn't want to attempt to reproduce that and it's quite easy to get her to 12 PSI - way more than the car can currently handle. The waste gate isn't opening as much as it should, so I'll extend the actuator arm a bit to correct that. Only one coolant leak popped up, but that was just an insecure clamp. Other than that, the car is FAST, a lot faster than before.

The previous setup had quite a few detectable vac/boost leaks. They were small, but cumulatively they posed a problem. With the current installation, there are no detectable leaks. The idle is much improved, tip in is better, and acceleration is so much quicker. I hope to get the car on the dyno in the next couple of weeks to see what the stats are.

Three weeks are left until the challenge and I have lots to do, not to mention at least a week's worth of business travel ARGGG. I still have to install the LSD, race seat, harness, arm restraints, wet sand, clear coat, and a bunch of other things that skip my mind at the moment.

Anyway, on to the pics and a few highlights.....

The first set of pictures briefly depicts the homologation of the stock fan and one of the Honda fans that I previously used. Since the new I/C and radiator setup protruded so much further into the engine bay than the previous as well as stock setup, I needed a lower profile fan. Therefore, I combined the two and it made it fit.
 

Attachments

  • DSCN4159.webp
    DSCN4159.webp
    30.5 KB · Views: 221
  • DSCN4157.webp
    DSCN4157.webp
    46.4 KB · Views: 197
  • DSCN4168.webp
    DSCN4168.webp
    32.7 KB · Views: 204
  • DSCN4180.webp
    DSCN4180.webp
    69.9 KB · Views: 209
  • DSCN4182.webp
    DSCN4182.webp
    103.2 KB · Views: 233
More...

The first three pics in the second set briefly show the cheesy oil restrictor that I had to make. Since I am no longer using the original fitting with built in restrictor, I had to cobble one out of a piece of sheet aluminum. Basically, I drilled a hole of nearly the exact size and cut a disk out of the sheet. It was then crushed into AN flare fitting. I checked and rechecked and everything lines up and should work the way it is supposed to.


The last two pictures show the solidification of one of the OE engine mounts. I cut two pieces of 1/4 steel plate and welded them to the side of the stock mount. It's neither the prettiest nor best way to do this, but it is effective and this is Grassroots afterall :).
 

Attachments

  • DSCN4197.webp
    DSCN4197.webp
    58.4 KB · Views: 198
  • DSCN4203.webp
    DSCN4203.webp
    36.8 KB · Views: 211
  • DSCN4210.webp
    DSCN4210.webp
    28.1 KB · Views: 193
  • DSCN4229.webp
    DSCN4229.webp
    86.8 KB · Views: 206
  • DSCN4227.webp
    DSCN4227.webp
    142.8 KB · Views: 221
Lastly...for now

The first of the last set shows the rough beginning of the TC to I/C charge pipe. It has since been painted and fitted onto the car. The last few are of how the car currently stands. A bit more refinement is still needed with the vacuum portion of the intake, but that'll take no time. Furthermore, I will be bending a heat sheild for the turbo tomorrow. Hopefully things in the area of the master cylinder area will stay a bit cooler.

Pay no attenion to the PVC elbow as it is only your imagination ;).
 

Attachments

  • DSCN4143.webp
    DSCN4143.webp
    36.9 KB · Views: 202
  • DSCN4323.webp
    DSCN4323.webp
    91.9 KB · Views: 321
  • DSCN4326.webp
    DSCN4326.webp
    74.8 KB · Views: 251
  • DSCN4322.webp
    DSCN4322.webp
    74.4 KB · Views: 232
  • DSCN4327.webp
    DSCN4327.webp
    72.4 KB · Views: 228
Back