Round 2: GRM $2006 Challenge Turbo Miater

6/10 Update - Still Prepping

Well things are progressing ever so slowly. With having been sick and travelling for business (again and again and again), I'm still in the process of prepping the engine bay for a re-spray. I did this once already (a year ago) and had forgotten how badly this process sucked. That said, a word to the wise....don't EVER use spray paint to paint your engine bay. This was obviously inexperience -slash- brain fart on my part, but spray paint will not stand up to the harsh [chemical/dirty/hot] environment of an engine bay. This time around, I'll be painting it properly using the same paint that was applied to the exterior of the car, an actual automotive finish.

Once the under hood paint is complete, fabrication of the radiator and intercooler mounts will commence.

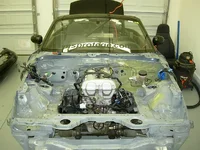
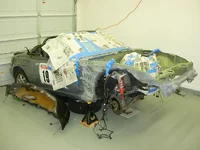
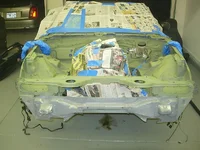
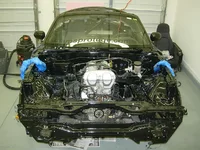
Here's a pic just to illustrate the progress (or lack there of). Unfortunately, the prep work (sanding, grinding, etc) isn't at all obvious.
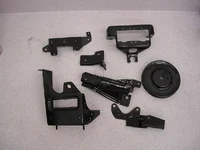
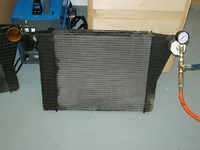
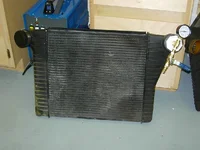
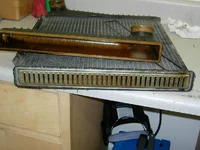
 

Attachments

  • DSCN3602.webp
    DSCN3602.webp
    89.9 KB · Views: 386
Last edited:
Update 6/24/06

I guess it's better late than never for an update. I haven't had much time to work on the car considering I spent last week in NC on business and was tied up with another project this week. Alas, some progress has been made. The engine bay got painted with an actual automotive finish and is ready to go back together. Unfortnuately, it's not as smooth as I'd like it. I'm assuming that a bit of airborn overspray landed on the painted bits as I progressed. It's a bit rough in some places, but it'll have to do.

As soon as I get my hands on a welder, I'll be building the bracketry for the radiator and intercooler. Tomorrow, I'll be powdercoating all of the stock brackets that are used to hold various devices within the bay. I spray painted them for the first rendition, but as previously mentioned, spray paint just doesn't hold up that well in such an extreme environment.

Pics....
 

Attachments

  • DSCN3623.webp
    DSCN3623.webp
    63.4 KB · Views: 345
  • DSCN3612.webp
    DSCN3612.webp
    77.1 KB · Views: 346
  • DSCN3631.webp
    DSCN3631.webp
    111.1 KB · Views: 645
Here are a couple of pics from the tear down. It's definately not as shiny as it was when I installed it. Also, she's obviosly been running a bit rich. It's definately not the best AFR, but it certainly beats grenading an engine.
 

Attachments

  • DSCN3620.webp
    DSCN3620.webp
    136.6 KB · Views: 377
  • DSCN3617.webp
    DSCN3617.webp
    74.5 KB · Views: 345
Jeeeeeeeez..... this thread is so gay. I think it should be closed or pooped on. In that order. Or in reverse.

triumph-the-dog-to-perform-on-tbs-special.jpg


I keed! I keed!
 
kcbhiw said:
I wouldn't miss it. You should build a car and play as well. What services will you be volunteering?

Helping GRM with what ever needs to get done so the event goes down smooth.
 
(cool) I'm looking forward to more updates and this year's GRM Challenge! She's definitely a beaut :D

Do you still have our site decal on the miater?
 
damn dude, that looks hot! Good job man :)

And it looks like you could use some megasquirt action ;)

EDIT LOL I just noticed the HIW AutoSports that was under the right fender hahaha
 
Last edited:
The engine bay looks pretty good to me. Black is always a nice color, well when it's clean that is.
 
Antoine said:
Thanks...Didn't have time to check all the pics...There it is :D

http://www.msprotege.com/forum/attachment.php?attachmentid=82990

Once I'm finished, the graphic will be a lot more prominent. I was in a time crunch last year and had to suffice with this.


Antoine said:
* Stickied for your viewing pleasure ;)
Mucho gracias, Senior!


BTW, yay for powder coating. Sand blasting sucks. Even after a shower, I'm still pulling sand out of my hair (even though I was in full "dress"). I still have a few parts to do, but this will tide me over so that I can reassemble the engine bay.
 

Attachments

  • DSCN3636.webp
    DSCN3636.webp
    153.9 KB · Views: 354
Last edited:
damn. I sure do hope you get rewarded for your efforts in the concourse portion (thumb) I'd love to take Kluge apart and rebuild from the ground up like that. Condo living FTL...
 
Nothing Special

There hasn't been much progress in the past couple of weeks. Between work, the construction of the "Christmas Tree" for the recent DoubleX Challenge, and the holiday weekend, I haven't had much time to work on the car. However, I finally bought a welder Monday, but I'm having trouble locating the stupid Cutler Hammer circuit breaker for the branch circuit that I've run to feed the thing (how hard can it be to find a circuit breaker?).

I began installing a few odds and ends under the hood tonight, nothing noteworthy however. I also removed all of the sound deadening matting from the interior firewall as well.

Stay tuned for once the welder is up and running, notable progress will once again ensue.
 
Last edited:
More of the same....

In tradition of the original build, things have been progressing quite slowly. I've about had it with cleaning, scrubbing, and polishing things for the benefit of the concourse portion of the judging (and it doen'st really look all that great in person). I just want to make this thing go -- I'm ready to move on to the engineering portion of things. I don't know how the owners of show-cars do what they do. The amount of work required to make something shiney is rediculous.

But anyway, I've been reassembling odds and ends under the hood, scrubbing/brushing brackets, wiping seals, etc. It's time consuming stuff. I finally got around to playing with the intercoolers last night. I have two from mid-80's Volvos and I'll be using both -- in a way. I pressure tested both to about 15 PSI last night. The first wouldn't hold anything more than about 3 PSI while the other took almost a day to drop below 10 PSI. I will be using parts from both to assemble a modified intercooler that will suit my needs and fit will in the car. Additionally, I've decided to de-power the power steering rack. I've removed the rack from the car and dissasembled it following the "suggestions" from Flyin' Miata (Reference). Unfortunately, I neglected to snap pics of the process due to the distraut state I was in at the time (let's not go into that). I have yet to re-install the rack in that I still need to clean the bellows, ugh.

Furthermore, I finally got the welder situation worked out, so I can begin constructing the bracketry for the radiator and intercooler. However, progress will be about two weeks from now as I am heading to the Carribean Sunday for a much needed vacation and will be out of town on business the following week (at a beach :D).

Pictorz....
 

Attachments

  • DSCN3691.webp
    DSCN3691.webp
    68.1 KB · Views: 362
  • DSCN3692.webp
    DSCN3692.webp
    90.5 KB · Views: 320
  • DSCN3693.webp
    DSCN3693.webp
    80.2 KB · Views: 314
  • DSCN3681.webp
    DSCN3681.webp
    18.2 KB · Views: 331
  • DSCN3702.webp
    DSCN3702.webp
    21.7 KB · Views: 316
Last edited:
And one more pic for the hell of it. :D
 

Attachments

  • DSCN3699.webp
    DSCN3699.webp
    105.8 KB · Views: 392
when he bought the car it had been wrecked. the previous owners banged out and welded stuff on the front right corner.
 
pluto316 said:
Ah, so it's like my car then.

HOORAY FOR REBUILD TITLE.

Strangely, the title is currently clean as of 1/96. Even stranger is that Carfax shows there was a salvage title was issued on 10/93. My guess is that at some point, the title was lost or the car was auctioned and a new court-ordered title was issued (guessing) at some time.
 
Back