Although you are outa town and wont see this you need to un knot you panties and get moving on this thing all you have been doing is whineing about what you havent done and how you sit around doin nothing like installing suspension until one in the morning....Newho hurry back dude so i can learn you some welding and get some work done on the car....top ten finish this year

You are using an out of date browser. It may not display this or other websites correctly.
You should upgrade or use an alternative browser.
You should upgrade or use an alternative browser.
Round 2: GRM $2006 Challenge Turbo Miater
- Thread starter kcbhiw
- Start date
Shadow102 said:Although you are outa town and wont see this you need to un knot you panties and get moving on this thing all you have been doing is whineing about what you havent done and how you sit around doin nothing like installing suspension until one in the morning....Newho hurry back dude so i can learn you some welding and get some work done on the car....top ten finish this year
lol, I've got you're whining. Work will resume this coming weekend.
SilverBulletES
Member
- :
- '90 MX-5, '00 328i
Depowering the steering rack seems like a fun project. I need to take my A/C out first. It was 108 degrees today and I was driving around with the top down. Why would I need A/C?
On to the Intercooler
I've had it with cleaning stuff. Total PITA.
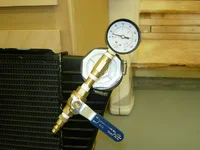
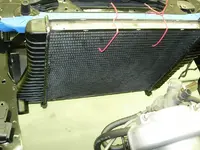
That said, I put a little work into the intercooler today. I took parts from two Volvo I/C's to make one that would work with my application. After cleaning all of the oil and crust from the tanks and core, I pieced it together. Once assembled, I applied a static 15PSI to the unit and let it sit. It held pressure for about 2 hours while I grabbed lunch and made a trip to the store.
Usable interercooler: Check
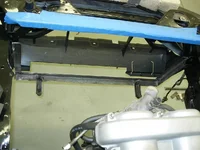
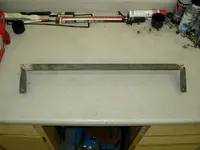
Later I began work on a mounting solution and started with the lower bracket. The stock rubber mounts that came with the I/C were reused to support and cushion the unit (no jokes about the shoddy quality of my metal mount brackets") ). The bracket is attached to the car using two existing [threaded] holes in the unibody rails. It seems sturdy enough, but I'll probably add additional rigidity once all of the I/C and radiator bracketry is completed.
). The bracket is attached to the car using two existing [threaded] holes in the unibody rails. It seems sturdy enough, but I'll probably add additional rigidity once all of the I/C and radiator bracketry is completed.
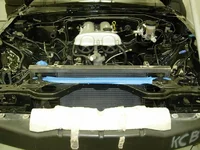
The bottom of the I/C sits at about the same level as the very bottom of the bumper while the top sits about 2.5" above the radiator support. But there are no worries as adequate ground clearance is maintained all the while clearing the hood. Granted, the intercooler is a bit large for the Miata, but I think it'll work fine for what I'm using it for. I hope to build a rudimentary "duct" to channel air more effectively from the opening in the bumper to the face of the I/C (and thusly the radiator).
I know it doesn't look like much, but this took me the better part of the day (though I didn't start til around 2, heh). All of the cutting, measuring, checking, aligning, etc. takes more time than I would like it to. After mowing the lawn tomorrow, I hope to get the top bracket fashioned as well as part, if not all, of the bracketry for the radiator. Looking a bit ahead, the radiator will be sitting further back than I would like and I foresee clearance issues with the cooling fans and sway bar, but we'll see.
I've had it with cleaning stuff. Total PITA.
That said, I put a little work into the intercooler today. I took parts from two Volvo I/C's to make one that would work with my application. After cleaning all of the oil and crust from the tanks and core, I pieced it together. Once assembled, I applied a static 15PSI to the unit and let it sit. It held pressure for about 2 hours while I grabbed lunch and made a trip to the store.
Usable interercooler: Check
Later I began work on a mounting solution and started with the lower bracket. The stock rubber mounts that came with the I/C were reused to support and cushion the unit (no jokes about the shoddy quality of my metal mount brackets
). The bracket is attached to the car using two existing [threaded] holes in the unibody rails. It seems sturdy enough, but I'll probably add additional rigidity once all of the I/C and radiator bracketry is completed.The bottom of the I/C sits at about the same level as the very bottom of the bumper while the top sits about 2.5" above the radiator support. But there are no worries as adequate ground clearance is maintained all the while clearing the hood. Granted, the intercooler is a bit large for the Miata, but I think it'll work fine for what I'm using it for. I hope to build a rudimentary "duct" to channel air more effectively from the opening in the bumper to the face of the I/C (and thusly the radiator).
I know it doesn't look like much, but this took me the better part of the day (though I didn't start til around 2, heh). All of the cutting, measuring, checking, aligning, etc. takes more time than I would like it to. After mowing the lawn tomorrow, I hope to get the top bracket fashioned as well as part, if not all, of the bracketry for the radiator. Looking a bit ahead, the radiator will be sitting further back than I would like and I foresee clearance issues with the cooling fans and sway bar, but we'll see.
Attachments

Last edited:

- :
- 2001 Pro 2.0 LX
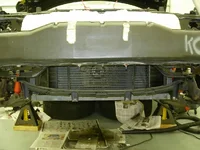
looks like it's higher than the bumpstops for the hood? Is it gonna be able to close?
vindication said:looks like it's higher than the bumpstops for the hood? Is it gonna be able to close?
The hood clears it by 1/4" at the closest "rib". I didn't want to redo this thing, so I made sure it would clear.
- :
- 2001 Pro 2.0 LX
cool. keep up the good work.kcbhiw said:The hood clears it by 1/4" at the closest "rib". I didn't want to redo this thing, so I made sure it would clear.
SilverBulletES said:Depowering the steering rack seems like a fun project. I need to take my A/C out first. It was 108 degrees today and I was driving around with the top down. Why would I need A/C?
The A/C stays in my Miata forever, it's one of the few things that work.
Excellent job Kev!
Subbing to this because I want to pick up as much as possible so I know wtf your are talking about once I start deconstructing mine. (ughdance).
*Scratch my post in the GA thread about you not being on the list over @ GRM)*
But you SHOULD sign up...before you forget!
Subbing to this because I want to pick up as much as possible so I know wtf your are talking about once I start deconstructing mine. (ughdance).
*Scratch my post in the GA thread about you not being on the list over @ GRM)*
But you SHOULD sign up...before you forget!
JDM-P5 said:Excellent job Kev!
Subbing to this because I want to pick up as much as possible so I know wtf your are talking about once I start deconstructing mine. (ughdance).
*Scratch my post in the GA thread about you not being on the list over @ GRM)*
But you SHOULD sign up...before you forget!
Stay tuned as I'm just now getting into the meat and potatos of things.
I hear that!kcbhiw said:Stay tuned as I'm just now getting into the meat and potatos of things.
I'm so slow.
(bump)
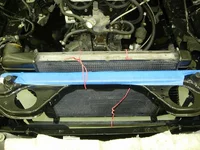
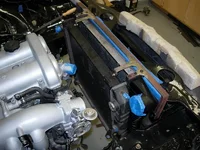
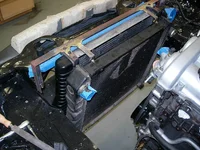
Where to start. I'm willing to say that progress is steady...that is if steady = slow. A lot of things have been going on, though not too many are noteworty. I've spent quite a bit of time in the junkyards perusing parts to see what I like and if anything stands out at me. The most noteworthy score was a T3 turbo from a Thunder-chicken, but it won't work on the car. I'll probably be going back again tomorrow.
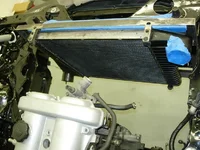
As my last updated noted, the intercooler was firmly attached to the car. Unfortunately, I'd mis-judged a measurement somewhere and thought the Isuzu Pup radiator that I had been using would fit between the ports of the Volvo I/C. Wrong! The damn thing was 1/4" too long. It fit OK until I put the couplings on the intercooler inlet and outlet ports. I attempted to shorten the radiator by replacing the original mounting brackets (each side) with a peice of bar stock, but to no avail. I've never been that good with a measuring tape anyway.
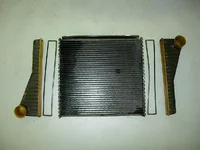
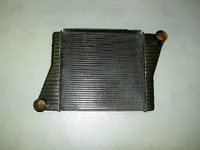
That said, I figured since I'm using a Volvo intercooler, a matching radiator would fit just fine....and indeed it did. I scavenged a full-brass radiator from the yard for $30 or so. However, unlike the Miata radiator, the Volvo unit uses a presurized reservoir, so I had to snag the Volvo's reservoir along with the radiator. Furthermore, the inlet and outlet of the Volvo radiator is reversed from that of the Miata's.
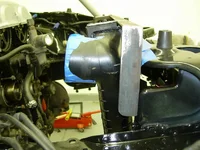
Unlike my brainfart during the original build, I installed the front sway bar before I attached the radiator and I/C....so that I can plan around it this time. Now that the car has a front bar, perhaps I can keep it's ass end behind me.
The existing I/C bracketry had to be modified to accomidate the new radiator. So now that everything is mounted, another problem surfaced. The water neck on the front of the engine is very close to the radiator. It'll work, but with some very tight angles in the hose. I think I may attempt to perform the coolant re-route that is (vaguely) depicted HERE . The result will be a much more managable tubing system as well as a more efficient cooling system.
And lastly, it seems as though the Honda Accord fans that I've been using will work with this rig, but that'll require confirmation with a measuring tape.
Anyway, enough rambling. A few pics....
(bump)
Where to start. I'm willing to say that progress is steady...that is if steady = slow. A lot of things have been going on, though not too many are noteworty. I've spent quite a bit of time in the junkyards perusing parts to see what I like and if anything stands out at me. The most noteworthy score was a T3 turbo from a Thunder-chicken, but it won't work on the car. I'll probably be going back again tomorrow.
As my last updated noted, the intercooler was firmly attached to the car. Unfortunately, I'd mis-judged a measurement somewhere and thought the Isuzu Pup radiator that I had been using would fit between the ports of the Volvo I/C. Wrong! The damn thing was 1/4" too long. It fit OK until I put the couplings on the intercooler inlet and outlet ports. I attempted to shorten the radiator by replacing the original mounting brackets (each side) with a peice of bar stock, but to no avail. I've never been that good with a measuring tape anyway.
That said, I figured since I'm using a Volvo intercooler, a matching radiator would fit just fine....and indeed it did. I scavenged a full-brass radiator from the yard for $30 or so. However, unlike the Miata radiator, the Volvo unit uses a presurized reservoir, so I had to snag the Volvo's reservoir along with the radiator. Furthermore, the inlet and outlet of the Volvo radiator is reversed from that of the Miata's.
Unlike my brainfart during the original build, I installed the front sway bar before I attached the radiator and I/C....so that I can plan around it this time. Now that the car has a front bar, perhaps I can keep it's ass end behind me.
The existing I/C bracketry had to be modified to accomidate the new radiator. So now that everything is mounted, another problem surfaced. The water neck on the front of the engine is very close to the radiator. It'll work, but with some very tight angles in the hose. I think I may attempt to perform the coolant re-route that is (vaguely) depicted HERE . The result will be a much more managable tubing system as well as a more efficient cooling system.
And lastly, it seems as though the Honda Accord fans that I've been using will work with this rig, but that'll require confirmation with a measuring tape.
Anyway, enough rambling. A few pics....
Attachments

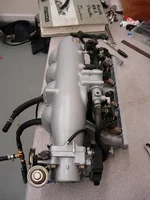
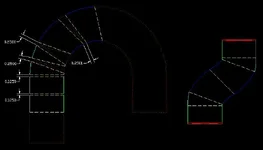
...and that leads me to....
...charge piping!
I only worked on the intake manifold to I/C piping for a little while, but I'm finally at the point where I can start connecting the independant systems. So to begin, I thought I'd get "high-tech" and sketch up the proposed routing.
I still have a TON to do, but it's a start.
...charge piping!
I only worked on the intake manifold to I/C piping for a little while, but I'm finally at the point where I can start connecting the independant systems. So to begin, I thought I'd get "high-tech" and sketch up the proposed routing.
I still have a TON to do, but it's a start.
Attachments
Last edited:
Hey, progress IS progress...this reminds me...you were supposed to see about a cheap i/c for me.
Since I definitely want to use the bigger turbo I have in storage...you KNOW I'm gonna wanna up the boost just a tad. So, let me know what you find since you are going back tomorrow. I can paypal you some funds if you find something.
Since I definitely want to use the bigger turbo I have in storage...you KNOW I'm gonna wanna up the boost just a tad. So, let me know what you find since you are going back tomorrow. I can paypal you some funds if you find something.
Last edited:
aMaff said:If it is, will you run it? If not this weekend, in one of the upcoming ones?
That's a big negative. I'm going for points with the CSP car. Perhaps I will attend a test and tune if one is available down the road.
New Posts and Comments

- Replies
- 304
- Views
- 220K
- Replies
- 3K
- Views
- 2M
- Replies
- 98
- Views
- 40K
- Replies
- 268
- Views
- 27K


- Replies
- 76
- Views
- 10K
New Threads and Articles
-
-
2017~2025 CX-5 Clunk noise in cabin when turning right over uneven road
- By H_mishima
- Replies: 0
-