
You are using an out of date browser. It may not display this or other websites correctly.
You should upgrade or use an alternative browser.
You should upgrade or use an alternative browser.
NEEDED: how to install a boost gauge in a ms3
- Thread starter Nutari
- Start date
desperado-c
Member
- :
- Mazdaspeed3
Vermilion said:Awesome write up man.. Love the pics and everything. Good job!
Thanks. I complain but it was still fun overall. Hey, you ordered a different pod, right? Let me know how it works out. I might want to upgrade the one that comes in the box since it looks cheap and the mount is pretty sucky.
I went out today and bought 3 of those Add-a-Circuits like you used. Anyway.. since you say the wires are to short to reach the fuse box what gauge wire did you use? I'm not good with electronics so this could be a dumb question if any type works as long as it fits into the add a circuit or whatever. Also, any type of wire should be fine right? I guess it all boils down to copper wire with a plastic coating huh?
desperado-c
Member
- :
- Mazdaspeed3
Vermilion said:I went out today and bought 3 of those Add-a-Circuits like you used. Anyway.. since you say the wires are to short to reach the fuse box what gauge wire did you use? I'm not good with electronics so this could be a dumb question if any type works as long as it fits into the add a circuit or whatever. Also, any type of wire should be fine right? I guess it all boils down to copper wire with a plastic coating huh?
Yeah, I used 22 gauge which is about the same as the wires coming out of the unit.
I'll be using the same pod but, just a different mounting kit. The mounting kit I bought is called the Defi Link Fitting Kit.
Defi Link Fitting Kit
For this kit you have to drill holes as the bolts that come with it do not have a point for you to hand turn it into the piece your working on. It has a rubber base which makes no noise plus won't marr or scratch your steering column (even though you just drilled two holes in it lol)
It also comes with a buffer which you install around the front of the gauge which keeps your gauge from turning side to side.
Just got done making a .PDF file of your how-to installation. I mainly made it so I can send it to myself at work and can print it out to use for this weekend for my own installation. But, if ya want I can email you the pdf file and you can upload it on here. I changed around some of the wording to make it more to the point but, thats all. Also, left out the night pic but, figured most people wouldn't print it all out in color.
desperado-c
Member
- :
- Mazdaspeed3
Better yet, after you do it, make whatever changes you think make it easier and THEN we can post it in the how-to. Oh, and the mount you bought is a much cleaner install so maybe include it in the changes, too.
Last edited:
")
Got it installed last night.. took me longer than expected.. course I did have some buddies over and we were shooting the s*** most of the time.
Anyway.. I had to end up using the double sided tape to stick my gauge on the steering column. What I wanted to ask you was how did you get the top part of the steering column off? I took the two screws out and I saw a 3rd in the back but not really anyway to get to it. I really want to mount it with screws as I don't see this tape lasting but a few days.
Thanks
desperado-c
Member
- :
- Mazdaspeed3
Vermilion said:Got it installed last night.. took me longer than expected.. course I did have some buddies over and we were shooting the s*** most of the time.
Anyway.. I had to end up using the double sided tape to stick my gauge on the steering column. What I wanted to ask you was how did you get the top part of the steering column off? I took the two screws out and I saw a 3rd in the back but not really anyway to get to it. I really want to mount it with screws as I don't see this tape lasting but a few days.
Thanks
I think I got to the 3rd screw by pulling the steering wheel all the way up and all the way out toward the seat. Sounds like it will be a revelation to you like it was to me that the thing telescopes!

THe top of the steering column just pops off. Its held in with the little pressure clips, easy to get off. I made the mistake of pulling out all 3 screws to find that there was no point to it. Got my ProSport electric gauge in. Now i just have to go for a drive and see how it works. Thanks for the coat hanger idea BTW it worked great.
javanc said:THe top of the steering column just pops off. Its held in with the little pressure clips, easy to get off. I made the mistake of pulling out all 3 screws to find that there was no point to it. Got my ProSport electric gauge in. Now i just have to go for a drive and see how it works. Thanks for the coat hanger idea BTW it worked great.
Yah, after I took the 3 screws out as well I noticed the 3 screws had nothing to do with holding it on.
desperado-c
Member
- :
- Mazdaspeed3
redms3gt said:Will an electronic boost gauge elimitate the need for a resticter to reduce flutter or vibration of the needle? I have mechanical gauges now but was thinking of upgrading.
No flutter if you fork over the big bucks for a Defi. I think it's the stepping function. So maybe any electric gauge with that function won't flutter?
I used the vacuum 'tee that came with the Defi gauge. I cut the vacuum hose running off the BPV in half, popped the tee in there.. got some zip ties and cut em extra tight, popped the vacuum like from the tee to the Defi Sensor and it works very nice for me. No flutter or vibration at all.
No reducers or restrictors or anything of the sort. Everything that came with the Defi gauges I used except the Add-a-Circuits from Autozone.
No reducers or restrictors or anything of the sort. Everything that came with the Defi gauges I used except the Add-a-Circuits from Autozone.
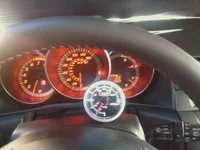
With many thanks to AG DesignWorks and Desperado-C, I thought I would post a few pictures of my Prosport BG installation. Apologies for the quality of the shots. I basically used all of the tips from the long posting earlier in this thread. I did a few things a bit differently:
- I made a couple of wiring harnesses for the sections of wire from the engine and from the drivers side across to the fuse box. I did this to keep it clean and make sure I didnt miss anything.
- The engine-to-cockpit harness was about 5 feet long using 22 gauge green, black and red wires. I split the black ground wire off from the others about half way so that it would be able to run to the ground under the drivers side left kick panel.
- The drivers side to fusebox bundle was also about 5 feet long using orange, red and white 22 gauge wire.
- I also bundled the wires coming off the gauge unit with electical tape to keep that section running behind the steering column clean.
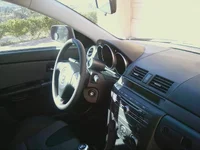
- I mounted the unit using a modified version of the mounting "cup" from Prosport. I did not want the gauge up high enough to block anything. So I basically wanted to use the cup but mount it almost flush with the steering column panel. So I very carefully measured exactly where I wanted it (using tape on the panel) and then cut a small 1" x 1/2" hole approx 1 1/2" back on the panel behind the steering wheel for the "feet" to go through. I also cut a small hole behind that rectangle for the wires. I then cut all but about 1/2" off the feet of the mounting cup and drilled a small hole through the portion of the both feet remaining. The trick is that the hole is drilled so that it's very close to being flush with the bottom of the panel when the feet are put through the larger rectangular hole. I put the feet through the hole in the panel and used a 2" cotter pin through the hole I drilled in the feet to secure the unit. The result is that it's rock-solid and the mount is completely invisible. It does not block anything on the other gauges.
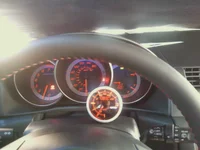
I should mention that I'm still dealing with a glitch of some kind related to the automatic headlights. The unit's lighting works perfectly when the headlights are operated manually. But there is something in the interaction with the automatic headlights that confuses the unit and it often stays "white" instead of going "amber" when the headlights go on automatically at night. Not a huge deal though...
- I made a couple of wiring harnesses for the sections of wire from the engine and from the drivers side across to the fuse box. I did this to keep it clean and make sure I didnt miss anything.
- The engine-to-cockpit harness was about 5 feet long using 22 gauge green, black and red wires. I split the black ground wire off from the others about half way so that it would be able to run to the ground under the drivers side left kick panel.
- The drivers side to fusebox bundle was also about 5 feet long using orange, red and white 22 gauge wire.
- I also bundled the wires coming off the gauge unit with electical tape to keep that section running behind the steering column clean.
- I mounted the unit using a modified version of the mounting "cup" from Prosport. I did not want the gauge up high enough to block anything. So I basically wanted to use the cup but mount it almost flush with the steering column panel. So I very carefully measured exactly where I wanted it (using tape on the panel) and then cut a small 1" x 1/2" hole approx 1 1/2" back on the panel behind the steering wheel for the "feet" to go through. I also cut a small hole behind that rectangle for the wires. I then cut all but about 1/2" off the feet of the mounting cup and drilled a small hole through the portion of the both feet remaining. The trick is that the hole is drilled so that it's very close to being flush with the bottom of the panel when the feet are put through the larger rectangular hole. I put the feet through the hole in the panel and used a 2" cotter pin through the hole I drilled in the feet to secure the unit. The result is that it's rock-solid and the mount is completely invisible. It does not block anything on the other gauges.
I should mention that I'm still dealing with a glitch of some kind related to the automatic headlights. The unit's lighting works perfectly when the headlights are operated manually. But there is something in the interaction with the automatic headlights that confuses the unit and it often stays "white" instead of going "amber" when the headlights go on automatically at night. Not a huge deal though...
Attachments
nighthawk358
Member
- :
- 2008.5 Mazdaspeed 3
I just installed my Prosport Electrical Boost Gauge and the Automatic headlight sensor stopped working and I dont know why..Its in auto and its at night and the headlights dont turn on. I used the Add a circuits and used Ig Sig for Orange and Red (did not use the white). Tomorrow Im going to check everything again and Im going to plug the Red in a Constant. Can anyone tell me what went wrong?
New Posts and Comments
- Replies
- 18
- Views
- 537
- Replies
- 61
- Views
- 32K