magnumP5's RX-7 Build Thread

Progress!

Okay, not really but you have to start somewhere, right? Got the rear end in the air and started pulling things off between studying for exams and doing house stuff.

Before I can get to any of the drivetrain about 1/2 the exhaust has to come out. Despite being 21 years-old and rusty as hell, none of the bolts gave me any grief. The big alumimum thing is the exhaust heat shield for the differential.

2011-03-16_09-32-41_981.jpg


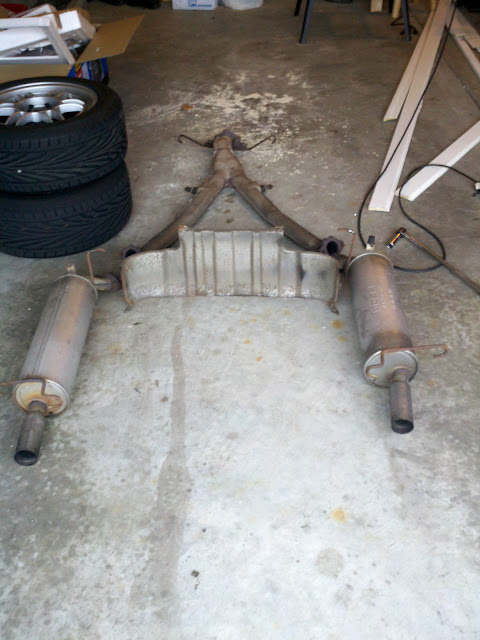
So here's what has to come out. I think I this point I had just finished marking everything (so everything can go back together correctly).

2011-03-16_09-33-44_266.jpg


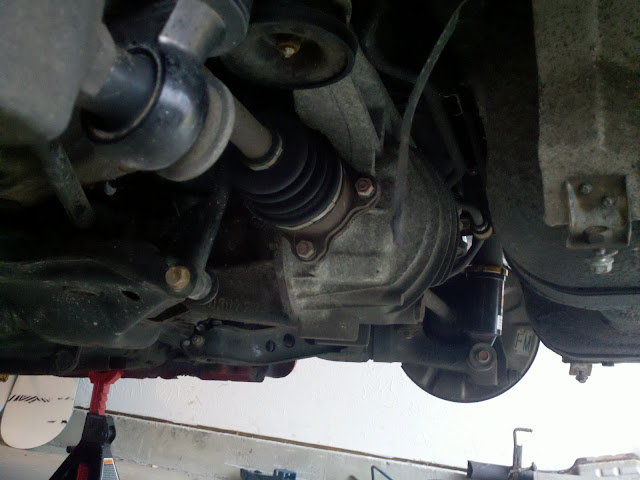
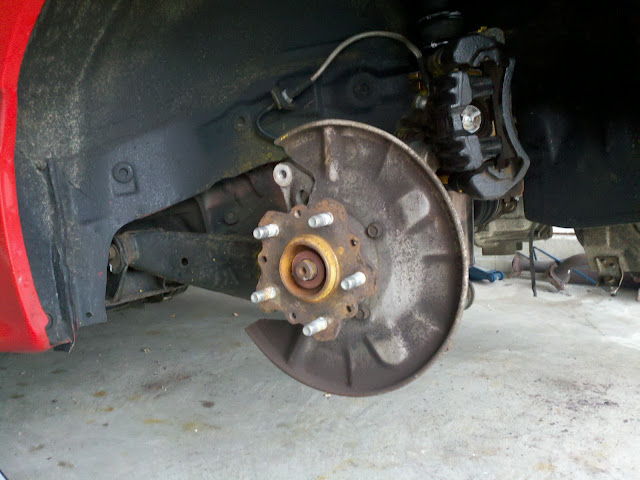
At this point I turned to the hubs as they'll need to come off before removing the control arms. I'll also be replacing the lower bushing (hidden) with a delrin insert to elmininate the rear steering feature (more on that next). Yes, the brake caliper is hanging from the coil spring via zip tie, LOL!

2011-03-16_10-25-54_6.jpg


This is as far as I've made it today (need to study!). Rear hubs and CV shafts removed. It turns out both rear steer bushings were completely shot so they fell apart as soon as everything was unbolted so I suppose it's a good thing they're being replaced.

2011-03-16_11-18-59_849.jpg


Next will be the control arms and then I need to figure out how to lower the subframe/differential assembly (80+ lbs). Hopefully I'll have everything remove tomorrow so then I can start replacing bushings and swapping the differential cover.

That's all for now - need to go study so an entire quarter of graduate classes (and the associated cost) doesn't go to waste!
 
Let's see who drops their diff first!

Gotta do mine to take two bolts out. Grrr.
 
Teardown complete

Wrapped up the teardown this afternoon. Ran into some issues...

Picking up where I left off. Unbolted the propeller shaft and loosened all bolts. Not pictured is the rear swaybar bracket fail (Mazda must really not like people messing with their swaybars). The RX-7 actually has a bracket that bolts to the body to which the swaybar u-brackets bolt, which has two integral studs. They were pretty rusted so go figure the first stud sheared as I tried to remove it. I ended up cutting off the brackets (I have new ones to use with polyurethane bushings) and I went ahead and ordered new ones from OnlineMazdaParts.

2011-03-17_12-28-40_902.jpg


Stub shafts removed from the differential. I took a risk assuming the S5 N/A (w/o LSD) stub shafts were equal length and it looks like it paid off. These will get shoved back into the cover once everything is put back together (need to paint the cover and replace 10 bolts).

2011-03-17_12-35-27_221.jpg


And finally, everything removed. Note my clever use of a pneumatic jack, the stock scissor jack and a creeper. It was either this or have 80+ lbs of rear suspension fall on me.

2011-03-17_12-57-19_997.jpg


Something is missing...

2011-03-17_12-57-48_59.jpg


Lastly, we have the differential separated from the subframe.

2011-03-17_13-38-06_482.jpg


Since the last picture I have removed the differential cover, pulled out the old oil seals and attempted to remove the stock bushings. I've failed pretty hard at that last one so the subframe, control arms and differential cover are all currently at a machine shop where they will be pressing out the old bushings. Hopefully they will be done tomorrow so I can start putting everything back together again.

In other news I just realized I won't be able to use the adjustable vertical link. I purchased it before knowing I would be buying delrin subframe mounts and obviously they don't give so I guess that'll be up for sale. Such as shame as it's a nice, solid piece.
 
Last edited:
A little off-topic, but I was struck by what looks like a pretty clean under-side of the car given it's age. Even the exhaust...though that's probably not original.
I forgot if you mentioned it earlier in the thread, but where did you buy it? If it was the midwest, the previous owner(s) must have been taken decent care of it. I've seen alot worse on cars much newer.
The car was purchased in the DC area and as far as I know it's always been a VA/MD car. I have a lot of the receipts from the previous owner so I know at least the mufflers were replaced at one point. I know it looks pretty good but it does have a fair amount of rust. The differential housing (big cast iron thing) itself is covered in surface rust and all the bolts holding the cover on were pretty bad too. Because I'm still waiting for my parts from the machine shop I went and catalogged what bolts/nuts were the worst and I plan on replacing them.

Really, the biggest thing that bothers me about this car is one of the previous owners didn't use the proper jacking points so the thin "rails" that run along both sides of the car are pretty banged and bent up.
 
About 75% done

So I actually got more work into it this weekend than I thought. It's funny, I either take no pictures at all, or too many - you tell me...

Some shots of the new mounts. First are the delrin subframe mounts. For anyone curious that mounting point with the bolt through it controls the amount of toe in the rear wheel.

2011-03-20_14-15-01_147.jpg


To that point mounts the control arm via the new spherical bearing bushing. Basically, the insert (pictured) can "gyrate" about the bushing's axis while still being a "solid" connection.

2011-03-20_14-15-52_397.jpg


Here is the rear steer/DTSS delete. Basically, it's a delrin bushing with a metal insert through which the mounting bolt goes. These were a pain in the ass to install.

2011-03-20_14-16-16_452.jpg


Here is the new differential mount. Nothing really special here - looks the same as the stock mount but supposedly 40% stiffer rubber. There is a damper on the stock mount that is transferrable but I've currently left that off. Notice the new hardware!

2011-03-20_14-16-35_751.jpg


Speaking of new hardware, here are all-new bolts for the differential cover (old ones are on left). I literally spent more time looking for the right hardware than I did working on the car this weekend. Who knew a 100mm M8x1.25 bolt would be so hard to find!?

2011-03-20_15-49-35_499.jpg


So with this I was able to assemble the differential. Yes, I painted the cover silver - I felt it would look better with the gloss black differential. It came out kind of bad but it probably won't last anyway so I don't care too much. Note the new mounts as well (also 40% stiffer).

2011-03-20_16-27-05_472.jpg


Next the subframe was reassembled. Having a physical copy of the FSM (top left) is so convenient!

2011-03-20_15-50-04_93.jpg


Once again my clever use of a creeper, stock scissor jack and pneumatic jack allowed me to reinstall the differential and subframe assembly.

2011-03-20_18-04-56_964.jpg


Again, for the curious, here is the casualty of the swap. It looks so sad sitting in the corner of the garage, slowly bleeding gear oil onto the floor. Such is the slow, deserved death of an open differential.

2011-03-20_18-05-19_244.jpg


That's as far as I got over the weekend. I guess it's about 75% done and I hope to have everything wrapped up by Wednesday night (famous last words).

A question to anyone familiar with Torsen LSDs (or perhaps LSDs in general): if you turn one axle, should the other rotate the same or opposite direction? I know with open differentials they turn in opposite directions but I've read conflicting information regarding LSDs. When I spin one side the other rotates the same direction, but they are capable of moving at different speeds and even in the opposite direction (with significant effort) so the stub shafts did not cross over and "fuse" the differential and everything appears to be working. I suppose adding gear oil will free-up everything a bit - does this make sense?
 
I don't even know what them parts do, I just like all the pics. haha

Keep up the good work and keep taking pics. I try to add as many pics into my build thread too.
 
As you've already discovered, the Torsen LSD should turn the same direction. And obviously able to spin at differing speeds.
 
Spent a couple hours working on it this afternoon and it's about 95% done. All that remains is to bolt up the differential heat shield and exhaust, and install the different speedo gear for the 4.30 rear end. I just found out today that my swaybar brackets won't ship until Wednesday so it's unlikely I'll have that until next week. Because the mufflers and heat shield have to be off to install that I'm left with a couple options: 1) install everything and run w/o rear swaybar and then remove everything, install swaybar and reinstall everything, 2) keep car jacked up and wait for the brackets to arrive and then install everything or 3) don't install mufflers and heat shield, drive around like that for a bit, then finish installing everything once the brackets arrive.

As you've already discovered, the Torsen LSD should turn the same direction. And obviously able to spin at differing speeds.
This is what I thought but now I'm even more confused. When just the stub shafts were inserted into the differential and it was dry both sides spun the same direction. Next, with the CV shafts and rear hubs bolted on and the differential filled with gear oil they spun in either the same direction or the opposite direction depending on how hard turned (hard/fast made them spin oppositely, slow made them spin in the same direction). Now, with the brakes and everything bolted up they will either turn in opposite directions or not turn at all (fast and only the one being turned will move, slow and they will counter rotate). Is this what they're supposed to do?!
 
My car has the stock torsen and both turn the same direction.... but I don't remember ever trying to turn them fast/hard.
 
My car has the stock torsen and both turn the same direction.... but I don't remember ever trying to turn them fast/hard.
Just so we're talking about the same thing, when I say "turn" I'm applying torque to the stub shaft or wheel hub, not the propeller shaft. If I turn the propeller shaft, they both turn the same direction (as they should).

From reading, the only real way Torsen units can fail is if something mechanically "fails" and this would involve lots of grinding and/or thumping noises. Since I have neither and everything turns without any unusual resistance spots I guess I just have to assume everything is working as it should.

Should be wrapping up today. Going to just put everything back together and deal with the swaybar when its brackets come in. I need more space in the garage for flooring work...

Sorry no new pictures. Everything has just been "put back together the opposite it came apart" so the pictures would look the same. I'll snap a shot or two of the helper springs and speedo gear install though.
 
Damn...

I got all the way to the end before buggering something up. The car drives just fine - feels great with the new mounts! But...

First some info: The 2nd Gen. RX-7 speedometer is cable driven. There is a driven gear on the transmission mainshaft that rotates with with it (similar to a pinion gear). The speedometer cable is connected to a driver gear (similar to a ring gear). These two gears interact, causing the driver gear to spin, and therefore the speedometer cable to spin and allow the speedometer to function.

From what I can tell, all 2nd Gen. RX-7's have the same driven gear. However, to account for the different rear end ratios (3.90, 4.10 and 4.30) there are different driver gears. What I failed to notice before cramming my new GTUs driver gear into the transmission is that they are all different diameters, the GTUs gear being larger than the GXL gear. As a result, when I forced it into the transmission, I shattered the plastic driven gear in the transmission. After doing some searching/reading, it seems the driver gear "housing", which is the actual part that bolts to the transmission into which the driver gear is inserted and held in place with a pin, is actually somewhat different between models. To account for the difference in driver gear diameter the housing is offset slightly.

So now I have a perfectly fine running car, without a working speedometer. It looks like the only way to replace the driven gear is to disassemble the transmission (to a degree), which looks like it requires the transmission to be removed from the car. That, and I have been unable to find any part numbers whatsoever for the driven gear or a GTUs driver gear housing. All this ~2 weeks before the first track event of the year.

Yeah, damn...
 
GPS speedometer FTW.
LOL, math FTW. Knowing gear ratios, final drive ratio and engine speed allows me to back-calculate speed pretty easily - it's just not something I want to do during multi-hour trips.

Will a non-functioning speedometer not pass Tech at a NASA event? I would think not, but you never know...
 
^Minor detail.You really don't need to know how fast you are going, just need to hear the rev of the motor. For the most part I can tell how fast I'm going to the sound of my car and looking just at the tac.
 
^Minor detail.You really don't need to know how fast you are going, just need to hear the rev of the motor. For the most part I can tell how fast I'm going to the sound of my car and looking just at the tac.

Yeah, but doing that "by feel" on a brand new gear ratio, you'd be wrong every time.
 
OnlineMazdaParts FTMFW! Jason has been invaluable with this swap. I just got off the phone with him and hopefully by early next week I'll have a new driven gear, housing (called a "sleeve") and a host of other "replaceable" parts. Now I need to decide if this is something I want to tackle myself, or just take it to a shop. Fortunately, once the transmission is out it looks relatively easy to do - the hard part is removing the transmission itself!
 
I just looked at the exploded view of the transmission for your car and it looks like you just need to pull a 10mm bolt and remove the sleeve and remove the gear. It looks like you need a new oring, oil seal, and gear. I see a pin but I don't know what it slides thru. I pulled it up on the mazdaspeedmotorsports web site under "manual trans. case" I don't think you need to drop the trans for that unless you need to take the trans apart to remove the pin, Which would be stupid but I've seen dumber things.
 
Back