
You are using an out of date browser. It may not display this or other websites correctly.
You should upgrade or use an alternative browser.
You should upgrade or use an alternative browser.
magnumP5's RX-7 Build Thread
- Thread starter magnumP5
- Start date
Is that the ****** from The Mitty? God that thing was sexy...
Yep, that's the Defined Autoworks N/A 20B FD; it's making nearly 500 whp N/A. My intake and exhaust porting configuration and header design are derived from those on that car.It is indeed.
I don't have a spare. I don't think it would be too difficult to actually cut the hood; just tape off the area to be cut out and attack it with a cut-off wheel, right? I think the really difficult part would be figuring out exactly where the hood needs to be cut. Either way this likely isn't something I'll be doing right away, but I'm going to try to design my fan shroud so I can easily add ducting in the future. I really need to figure out what I'm going to do with the fan shroud and radiator/oil cooler ducting. I'm also going to need to find a way to get cooler air to the air filters as well...I would have such a hard time cutting my hood. Do you have a spare, or can you find one at a local yard?
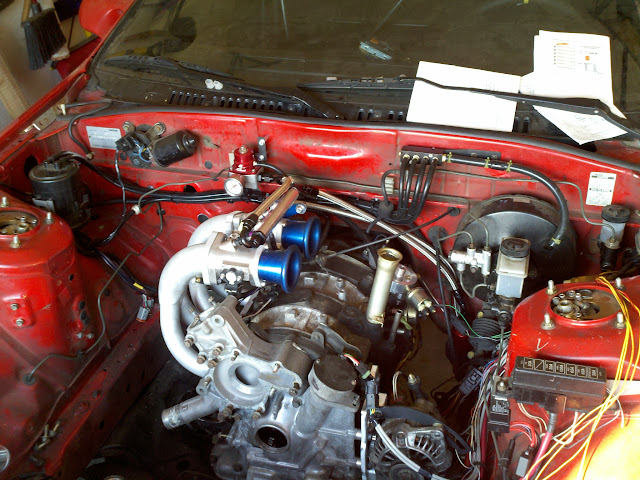
I finished the vacuum block last night and spent most of the day today finishing up the fuel lines and working out the vacuum line routing. Here's the standard "current engine bay" shot:

I decided to make a new fuel feed line (the one on about a 45 degree angle) after I took that picture. If held pressure just fine but I didn't like how it looked in the engine bay, LOL! The new line is more aligned with the fuel return line. Here's why the vacuum lines took so long:


It's hard to see from those pictures but all the vacuum lines are neatly secured to the firewall. Everything is nice and straight, and there are no kinks anywhere. I guess a little OCD came out today; hopefully this meets Evan's standards.
The only other task I completed today was tidying up the front wiring harness. I covered the wires in corrugated loom and wrapped in electrical tape. Now I just need to tackle the driver's side mess, but I need to mount the coil/ignitors and air filters and IAT sensor first.
This week I'm going to redo some of the fuel pump wiring I finished that a while ago because I'm not really happy with how it turned out.
mymmeryloss
Member
- :
- 13bT Mazda B2600i
Looks really good!
Haha, yeah I realized I should have cleaned off the firewall before I ran all the lines. I think once I get everything laid out and pull out the dummy engine I'll roll it outside and give the engine bay a good hosing down. Everything would just get dirty again if I were to clean it now. No plans to respray just yet; I need to focus my money on getting it running first. The paint in the engine bay is in pretty good shape save for some scratches; it's the exterior of the car that really needs help.Yeah, buddy! Looks good! Now pick up some Purple Power and clean the bay up, please. That dirt on the firewall is killing me. haha. Are you planning on respraying the bay?
The front of the car has been recently resprayed, but it's not a very good job. I'm pretty sure this car was in an undocumented front end collision at some point because some of the bumper/radiator support sheet metal is a little twisted. Either someone thought they could do bodywork themselves or they were trying to cover it up. Either way, I'll get that addressed if/when I do get the car resprayed. The back of the car is quite faded and there's a little spot of rust on the sunroof as well.Right on. I didn't know if that was a mock up motor or not. Your bay paint does look really good, so no need to paint it. And even the exterior didn't look nearly as bad as you make it sound.
Looking good, man.")
I spent most of the day yesterday cleaning up the garage as it was getting difficult to move around. I decided to take the car off jack stands for the first time in over a year. I forgot how low it actually is. It's funny; even with 8k (~450 lb) front springs the front of the car is about 1" higher with the dummy engine than it was before. Granted I'm still missing an exhaust manifold, two air filters, 4 coil packs, a hood, the electric fan and shroud, etc. I think that's a good sign the car is losing some weight. I played with the interior some as well. I put the stock rear bins back in minus their lids. The roll bar prevents the lids from fully opening so I need to figure something out there. I also played with the old harness Marc sent me. I think I'll be able to use the stock mounting points after all. I'm also thinking about shifting my seat forward one bolt hole (~1/2") for a slightly better driving position.
Enough of my rambling and onto some pictures! Here's the current state of the engine with new fuel line:
The next order of business is getting these mounted:

They're got to go somewhere in this area:

My original plan was to mount them on the strut tower but with the alternator relocated that area's getting pretty crowded. I'm thinking now about mounting them behind the headlight near where they've been set in the picture above. This is where the stock leading coil packs were mounting (see the two vertically aligned studs?). This makes for longer spark plugs leads and I'd need to extend some wires but over all I think it's a cleaner spot.
mymmeryloss
Member
- :
- 13bT Mazda B2600i
Lol those things are huge!
Yeah, they really are; it makes finding a spot to mount them a pain! I think I'm actually going to mount them all in a line (1x4) instead of the 2x2 setup I've shown above, and I've pretty much committed to mounting them behind the headlight. If I finish screwing with the fuel pump again I might get to work on this tonight.Lol those things are huge!
I've been messing with the fuel pump assembly for the last few days. I had an epiphany regarding my wiring: normal heat shrink tubing is NOT fuel resistant. Sure enough, when I pulled the assembly the heat shrink had swollen and was very loose. Apparently I need "viton" heat shrink tubing and the stuff isn't cheap. I found a 12" length on Amazon (Raychem RW-200) for $23 and went for it. The stuff usually sells in large spools for several hundred dollars. So while I'm redoing the fuel pump in-tank wiring I think I'll go back and clean and re-tighten all the fittings since I now know they require more torque than I had originally thiough. I think I'll also add some FUEL RESISTANT sealant around the fittings I added because I'm thinking the silicone stuff I used isn't.
PrinceValorum
Member
- :
- 95 626 FS, 89 Toyota Derux 4x4
I don't have a spare. I don't think it would be too difficult to actually cut the hood; just tape off the area to be cut out and attack it with a cut-off wheel, right? I think the really difficult part would be figuring out exactly where the hood needs to be cut.
I meant it would be hard to bring myself to cut my hood. Either a cut off wheel or plasma cutter would work great and fly through that thin metal. It's a lot easier to use a guide with the plasma, as well and get those straight lines to appease the OCD.
")
mymmeryloss
Member
- :
- 13bT Mazda B2600i
its really all about taking your time and not warping the sheetmetal while doing it is the rel big problem here...
AzteCypher
black ops modifications..
- :
- 2001 Mazda Protege LX
Subbin..
I'd probably use a cut-off wheel as I think it'd be easier to cut a straight line. Just tape off, mark, and go, right?I meant it would be hard to bring myself to cut my hood. Either a cut off wheel or plasma cutter would work great and fly through that thin metal. It's a lot easier to use a guide with the plasma, as well and get those straight lines to appease the OCD.
I imagine this is mostly an issue with plasma cutters? If I do this it'll more than likely be to an aftermarket fiberglass hood. That is if I could find a normal, OEM style fiberglass hood; all I've found have vents or are the TII style. If I got really fancy I'd take the metal hood to a fabricator and have him build the duct right into the hood. I also have pipe dreams of an all fiberglass hood/duct combination held to the car with Dzus fasteners. Either option is $$$!its really all about taking your time and not warping the sheetmetal while doing it is the rel big problem here...
I played with the fuel pump assembly again last night. No pictures because it looks the same as before. The only differences this time are:
1. I ground down and smoothed some more metal on the inside of the cover so the bulkhead fitting gaskets have a better sealing surface.
2. I used some (supposedly) fuel-resistant gasket maker (Permatex #1 and #2) instead of silicone RTV (Permatex Gray) on the bulkhead fittings.
3. I used fuel-resistant Viton heat shrink instead of normal heat shrink on the in-tank butt connectors for the fuel pump.
All that and made sure all the AN fittings were nice and tight when reassembly. I'm still nervous but short of welding threaded blocks for the bulkheads onto the fuel cover this is the best it'll be.
In other news, one of the struts on the hatch is blown so now the hatch won't stay open on its own. I'm tempted just to remove both of them now because they are costly to replace.
If I don't go to the range tonight I'll be working on making the coil mounting bracket.
PrinceValorum
Member
- :
- 95 626 FS, 89 Toyota Derux 4x4
I'd probably use a cut-off wheel as I think it'd be easier to cut a straight line. Just tape off, mark, and go, right?
I imagine this is mostly an issue with plasma cutters?
The abrasive wheel can generate plenty of heat as well. I've not really cut any sheet metal with either process, so I can't say, but the heat/power is adjustable on a plasma, and IMO it's much easier to use with a guide. I cut this 3//16 on the plasma and could have never gotten a cut this straight with an abrasive wheel. It would still be close, but I have a hard time keeping it square. The plasma flew right through it, literally in seconds.. It looks like a shear cut it, and it left almost no dross.


I imagine it would go through sheet metal as fast as you could drag it.
mymmeryloss
Member
- :
- 13bT Mazda B2600i
Plasma is the way to go in sheetmetal. Chtoff wheels warp like crazy...
Very hard to get a straight cut also.
Didnt realize u would be cutting a fiberglass hood though...
In for more pics!
Very hard to get a straight cut also.
Didnt realize u would be cutting a fiberglass hood though...
In for more pics!
PrinceValorum
Member
- :
- 95 626 FS, 89 Toyota Derux 4x4
What's the best way to cut fiberglass? Tape the surface and use a coping saw? I have a body kit to cut up and mail to Norway! 
mymmeryloss
Member
- :
- 13bT Mazda B2600i
Jigsaw
PrinceValorum
Member
- :
- 95 626 FS, 89 Toyota Derux 4x4
Well I mean a coping saw is like a hand powered jigsaw...
Definitely noted. Unfortunately I don't have access to a plasma cover and it's not really something I need right now. I ultimately want to go with a fiberglass hood because my stock one is steel and is SO heavy. I'm with Wes though, what is the best way to cut fiberglass?Plasma is the way to go in sheetmetal. Chtoff wheels warp like crazy...
Very hard to get a straight cut also.
Didnt realize u would be cutting a fiberglass hood though...
In for more pics!
I've been working on mounting the coils today. I've got the bracket made; my welding still sucks, but it'll hold. The bracket's being primed for paint right now. I'll try to upload some pictures a little later. I ended up sticking them behind the driver's headlight after all.
mymmeryloss
Member
- :
- 13bT Mazda B2600i
(nailbyt)
New Posts and Comments

- Replies
- 41
- Views
- 50K
- Replies
- 147
- Views
- 15K
- Replies
- 1
- Views
- 98

- Replies
- 10K
- Views
- 3M