Maxx Mazda
Contributor
- :
- Stock P5
First off, you require ALOT of patience to do this. Read that again. There is alot of sanding and prepwork involved.
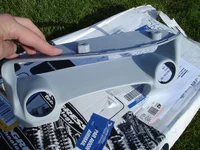
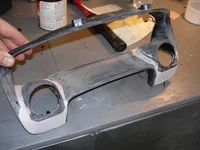
1. To start, I grabbed a generic two pod autometer mount from my performance shop. Any generic one will do great. Start by trimming the pod down to get the gauges mounted roughly where you'd like them. (Pic 1.)
2. Mark and cut some holes for your gauges to sit into, mark them with the gauge pods mounted (I used tape) and then cut with them off. I used a dremel. (Pic 2.)
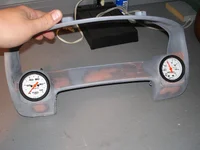
3. Clean up the holes you just cut, and spend some time cleaning up the finish on the pods themselves. The tighter you make the fit here, the less prepwork involved. There are many ways to mount the gauges, all of the pods availavle here have the gauges coming straight out, I wanted mine tilted up towards the driver. I used hot glue and bumper repair epoxy to mount the pods once they were finished up. (Pic 3.)
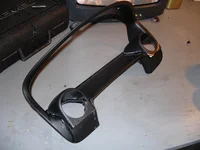
4. Now comes the fun. I used some 3M body filler, whatever you can find will do. I filled in all the gaps, and then god to work with the sander. This is after rough sanding with 120 grit to get the rough shape. This is the most time consuming part. Getting the shape correct, and even on both sides. Move on once you're happy with the rough shape. (Pic 4.)
5. I sprayed on a coat of high-build primer, and did a few tiny touch ups with more body filler. The surround is starting to take shape. (Pic 5.)
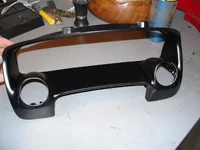
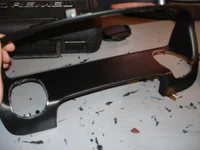
6. Here's where the fun begins. Prime, sand. Prime, sand. Prime, sand... You get the idea. Maybe I'm a freak but I strive for perfection, no deficiencies were tolerated. After a final sanding, it was ready for paint. (Pic 6.)
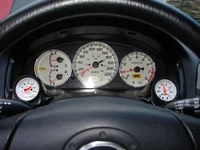
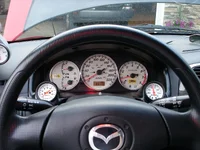
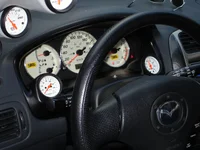
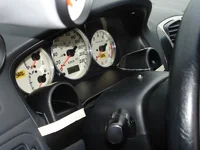
7. I used a "trim black" available most anywhere. The finished product! (Pic 7.)
1. To start, I grabbed a generic two pod autometer mount from my performance shop. Any generic one will do great. Start by trimming the pod down to get the gauges mounted roughly where you'd like them. (Pic 1.)
2. Mark and cut some holes for your gauges to sit into, mark them with the gauge pods mounted (I used tape) and then cut with them off. I used a dremel. (Pic 2.)
3. Clean up the holes you just cut, and spend some time cleaning up the finish on the pods themselves. The tighter you make the fit here, the less prepwork involved. There are many ways to mount the gauges, all of the pods availavle here have the gauges coming straight out, I wanted mine tilted up towards the driver. I used hot glue and bumper repair epoxy to mount the pods once they were finished up. (Pic 3.)
4. Now comes the fun. I used some 3M body filler, whatever you can find will do. I filled in all the gaps, and then god to work with the sander. This is after rough sanding with 120 grit to get the rough shape. This is the most time consuming part. Getting the shape correct, and even on both sides. Move on once you're happy with the rough shape. (Pic 4.)
5. I sprayed on a coat of high-build primer, and did a few tiny touch ups with more body filler. The surround is starting to take shape. (Pic 5.)
6. Here's where the fun begins. Prime, sand. Prime, sand. Prime, sand... You get the idea. Maybe I'm a freak but I strive for perfection, no deficiencies were tolerated. After a final sanding, it was ready for paint. (Pic 6.)
7. I used a "trim black" available most anywhere. The finished product! (Pic 7.)
Attachments
Last edited: