Jacking Points - Actual Info

Lexx

Member
:
2007 Mazda CX-9 AWD GT, 2010 Mazda3 Sport, 2005 BMW M3
It's unfortunate that the last post on this topic was so non-constructive. However, I think the actual info is useful to have online. Be warned that all info in my post is with regard to 2007 CX-9 and may be different for later years.

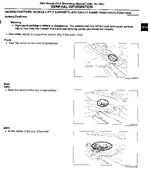
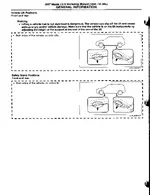
The CX-9 owner manual defines the 4 side jacking points for the Mazda jack. It does not define the central jack points for a hydraulic jack, but the service manual does. Please see attachment for both, from the 2007 CX-9 service manual.
 

Attachments

  • Jack_Points_p1.gif
    Jack_Points_p1.gif
    85.3 KB · Views: 18,936
  • Jack_Points_p2.gif
    Jack_Points_p2.gif
    79.1 KB · Views: 9,397
I'm bumping up this relatively old but useful post as the cold season approaches and people look to swap the dueller's out for something that actually works in the snow (I just got a set of blizzak's and wheels off of tirerack).

For my previous BMWs, I would just use the factory jack to change the wheels each season since the jack points have a special rectangular notch that fits with the provided jack, and I was too lazy/cheap to buy a better jack and figure out how to jack it up using that.

Now that I've gotten the CX-9 I'm going to be buying a better hydraulic floor jack, but I'd like to better understand the jacking points and procedure. The owner's manual shows the jacking points next to each wheel, but those probably won't work for a hydraulic jack. Lexx's post shows additional jacking points for a hydraulic jack, but that is for a 2007 CX-9 and I can't exactly make out what it is showing.

So, some questions:
- Does anyone know the correct hydraulic mounting points for a 2009 CX-9, if different from 2007? Pics if you have them?
- Since these jacking points are in the middle of the crossmember, do you need to use jack stands for a safe tire change? Or is there a way to do it safely without jack stands?

Any other advice/tips welcome for this new owner.

thanks.
 
I usually use my hydraulic jack with a hockey puck on it which allows me to jack at the seem near the wheel. This has worked on my other cars. Haven't tried it on the mazda yet.
 
I've always used the center of the front crossmember or on the rear differential(if you have AWD) or the rear crossmember. Always use jackstands for added security. I put them on the jack points near the wheels. Never go under the car if you don't have jackstands. The other thing to note is that the CX-9 is a lot heavier so make sure your hydraulic jack is rated for that.
 
Last edited:
I usually use my hydraulic jack with a hockey puck on it which allows me to jack at the seem near the wheel. This has worked on my other cars. Haven't tried it on the mazda yet.

I'm afraid of the car slipping off the puck since there's no notch in it. How do you protect against that?


I've always used the center of the front crossmember or on the rear differential(if you have AWD) or the rear crossmember. Always use jackstands for added security. I put them on the jack points near the wheels. Never go under the car if you don't have jackstands. The other thing to note is that the CX-9 is a lot heavier so make sure your hydraulic jack is rated for that.

So, just to clarify, you jack up using the center of front crossmember, then place the stands at the jack points you use with the factory scissor jack (along side of car just behind both front wheels)? And repeat for rears. I don't plan on getting under the car while I change my tires, but I'll do this just to make sure the car doesn't roll off to one side when jacked up from the front-center.

Can you confirm that the pic in Lexx's first attachment are the correct front/rear jacking points for the 2009?

This is jack/jack stands I just bought. Rated for 3 tons so should be ok.
 
I'm afraid of the car slipping off the puck since there's no notch in it. How do you protect against that?
Use a small block of wood. Since the wood is softer, the puck should make a nice indentation in the wood which gives it some bite. Same thing with the crossmember. I usually do this on the rear diff since the bottoms are usually smooth. You just have to make sure that the car is jacked on a level ground and put blocks behind the tires on the rears so that it doesn't move.

So, just to clarify, you jack up using the center of front crossmember, then place the stands at the jack points you use with the factory scissor jack (along side of car just behind both front wheels)? And repeat for rears. I don't plan on getting under the car while I change my tires, but I'll do this just to make sure the car doesn't roll off to one side when jacked up from the front-center.

Can you confirm that the pic in Lexx's first attachment are the correct front/rear jacking points for the 2009?

This is jack/jack stands I just bought. Rated for 3 tons so should be ok.

I have not had to jack up the CX-9 but you should be able to tell where the crossmember is. It should be the same as what's shown in the picture. Just know that even when you jack up the center, the car may still lean a little to the side but it should not tip since the rear wheels are still on the ground. Use the jackpoints(where the scissor jack does) for the jackstand and make sure they're stable. My hydraulic jack is a different one so i don't know anything about that set. Just make sure that you raise it just high enough so to get the wheels off the ground. When everything's done, turn the release screw very slowly to control the drop and you should be good.

You should also check out this post http://www.mazdas247.com/forum/showpost.php?p=4122844&postcount=4
 
Last edited:
Wish I'd read this post before jacking up my car tonight! I ended up putting my hydraulic jack on the side jacking point and now it's bent:
attachment.php


I was testing to see if my old Fast Inferno 17" wheels from my Protege would fit the CX-9 so I can use them as winter wheels. This just looks too funny with the Protege tire size:
attachment.php
 

Attachments

  • jackpoint-bent.jpg
    jackpoint-bent.jpg
    73 KB · Views: 9,853
  • protege-wheel-on-cx9.jpg
    protege-wheel-on-cx9.jpg
    179.3 KB · Views: 7,324
Last edited:
I'm slowly but surely carving out a few hockey pucks, but it looks like the pinch weld on the cx-9 is deeper than the deptch of one hockey puck, so I think I'm gonna have to glue/jb weld 2 halves of a hockey puck onto another hockey puck which also has a little carving out. What a pain.
 
I'm slowly but surely carving out a few hockey pucks, but it looks like the pinch weld on the cx-9 is deeper than the deptch of one hockey puck, so I think I'm gonna have to glue/jb weld 2 halves of a hockey puck onto another hockey puck which also has a little carving out. What a pain.

So you use the hockey pucks to jack from the side jacking points? My trouble right now is that my garage is just big enough to get the CX-9 in with very little clearance at the front and the back. That pretty much means the front and rear jacking points described in the service manual are inaccessible for me :(

Gonna have to go get some hockey pucks today and try them out... I'm just worried about slipping and also damaging the jack point the way I did in the pic...
 
Last edited:
Basically the idea is to channel the hockey pucks so the pinch weld slides into the notch/channel of the puck, and top/flat part of the puck will stop at the floor/rocker, so you are lifting the pinch weld and the floor area, with no possibility of the pinch weld bending over. But like I said, our pinch welds are deeper than the thickness of one hockey puck...so have to double em' up. Sorry to hear about the garage situation. I try to work out front in the sun (if its warm) but thankfully I have a 2 car garage and we only put our 9 in the garage and the kids junk fills up the rest of the garage.

I don't like lifting the front end at the points recommended in the service book, mainly because all the weight of that part of the car goes to one suspension part, which in my opinion can affect the alignment...kind of a lose lose.
 
Basically the idea is to channel the hockey pucks so the pinch weld slides into the notch/channel of the puck, and top/flat part of the puck will stop at the floor/rocker, so you are lifting the pinch weld and the floor area, with no possibility of the pinch weld bending over. But like I said, our pinch welds are deeper than the thickness of one hockey puck...so have to double em' up. Sorry to hear about the garage situation. I try to work out front in the sun (if its warm) but thankfully I have a 2 car garage and we only put our 9 in the garage and the kids junk fills up the rest of the garage.

Thanks I'll try that. As for the garage: it's a 2-car garage as well but the 9 is just too long lol. No space to get the jack in at the front or rear.

I don't like lifting the front end at the points recommended in the service book, mainly because all the weight of that part of the car goes to one suspension part, which in my opinion can affect the alignment...kind of a lose lose.

I agree!
 
Basically the idea is to channel the hockey pucks so the pinch weld slides into the notch/channel of the puck, and top/flat part of the puck will stop at the floor/rocker, so you are lifting the pinch weld and the floor area, with no possibility of the pinch weld bending over. But like I said, our pinch welds are deeper than the thickness of one hockey puck...so have to double em' up.

Giving this more thought and I think I have an idea of how to do this with 2 hockey pucks using machine screws, washers, and nuts to join the 2 pucks together rather than glue. This will provide more strength and reduce the risk of slippage. Basically sandwich the 2 pucks together, drill 4 holes all the way through both pucks (2 holes for each half of the top puck), cut the top puck in half, and screw each half of the top puck to the bottom puck using 2 machine screws/washers/nuts.

Gonna try this out over the weekend and post pics.
 
I used a small size 1.5 ton jack that has a 1 inch cup. It works well on the jacking point beneath door and in back of the pinch welds. However the Protech adapted look very good and they are cheap.
 
I used a small size 1.5 ton jack that has a 1 inch cup. It works well on the jacking point beneath door and in back of the pinch welds. However the Protech adapted look very good and they are cheap.

A 1.5 ton jack to life a 2.5 ton truck? You're daring :)

Seriously though, how high does your 1.5 ton jack go? I have a https://www.amazon.com/dp/ (commissions earned) that goes as high as 18" and even at the highest point I can only lift one tire at a time. With any other small car (Protege, Versa, Mazda5) that same jack lifts up the entire side of the car allowing me to change 2 tires at a time.
It goes up about 18 inches. LOL! as you know there is no issue with using a jack like that to lift one corner of the car, which is my intent if I get a flat, and don't want to take the time to use the car's stock jack :D

I recently completed a brake job lifting one tire at a time, with that jack and some hydraulic jack stands. Once I got it high enough to lift the tire and enough to get the hydraulic jack stands inplace, I then jacked it up higher using those jack stands.
 
A 1.5 ton jack should be more than enough to lift one corner of the car as long as there's enough height. Supplemented with a jackstand, it will be safe enough for any work. I do have a 3.5 ton hydraulic jack that provides enough height that I use to lift either the front or rear half supplemented by jackstands and it's more than enough for securing the CX9. I also block the wheels so that the car does not move accidentally.
 
Back