
Silver Bull3t
Member
- :
- 3s 5d MT Sunlight Silver Opt:CGN,WLK,LS1,1AB,1MC
Swapped dash trim between my wife's i and my s today..
Her i has the silver accented cloth interior and a black gloss dash trim strip.
My s has the black leather seats and silver carbon-fiber pattern dash trim strip.
So we decided it would look better if we swapped,..we did and they look great!! (thumb)
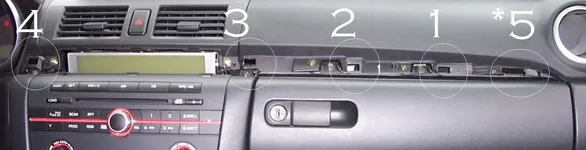
So here's how to remove your dash trim insert:
1. Open the glove box.
2. Feel the underneath of the trim insert.
3. You'll feel where you can kinda slide your fingers under a little bit.
4. Slowly work your fingers under. You should feel atleast one or two of the clips pop free. BE CAREFUL not to try and pop off where it's attached at the far right..this is NOT a clip, but more of a hook, (see pics below...*5). I learned this the hard way, (hand) thank God for super-glue...
5. After clips 1, 2 ,and 3 (as per below pics) are popped free you should be able to get a good bend (out toward you).
6. Pull clip *5 toward the center of the car to unhook it (look at the pic below, you'll see what I mean).
7. All that should be left is the clip at the far left of the trim piece (by the radio display...4).
8. Carefully work your fingers under to pop this last clip while raising the trim piece from 0 degrees to 90 degrees to the left, (this one is like the other clips that pop straight out).
9. Replacing it is ALOT easier....just slide in clip/hook *5 and then pop the clips straight in with moderate pressure from right to left.
10. DONE!!!
P.S. This is also how you get to the screws holding down the middle dash panel (where the NAV. can go), and I believe the radio faceplate screws as well.
Remember, slow and steady.")
HAVE FUN!!!
(naughty)
Her i has the silver accented cloth interior and a black gloss dash trim strip.
My s has the black leather seats and silver carbon-fiber pattern dash trim strip.
So we decided it would look better if we swapped,..we did and they look great!! (thumb)
So here's how to remove your dash trim insert:
1. Open the glove box.
2. Feel the underneath of the trim insert.
3. You'll feel where you can kinda slide your fingers under a little bit.
4. Slowly work your fingers under. You should feel atleast one or two of the clips pop free. BE CAREFUL not to try and pop off where it's attached at the far right..this is NOT a clip, but more of a hook, (see pics below...*5). I learned this the hard way, (hand) thank God for super-glue...
5. After clips 1, 2 ,and 3 (as per below pics) are popped free you should be able to get a good bend (out toward you).
6. Pull clip *5 toward the center of the car to unhook it (look at the pic below, you'll see what I mean).
7. All that should be left is the clip at the far left of the trim piece (by the radio display...4).
8. Carefully work your fingers under to pop this last clip while raising the trim piece from 0 degrees to 90 degrees to the left, (this one is like the other clips that pop straight out).
9. Replacing it is ALOT easier....just slide in clip/hook *5 and then pop the clips straight in with moderate pressure from right to left.
10. DONE!!!
P.S. This is also how you get to the screws holding down the middle dash panel (where the NAV. can go), and I believe the radio faceplate screws as well.
Remember, slow and steady.
HAVE FUN!!!
(naughty)
Attachments

Last edited:

