How To: MP3/P5/MSP Front & rear Pad/Rotor Change (No 56K)

Repair Manuals

schambach said:
Great stuff and pictures, I am going to do it myself now. I've been spending so much money on services I've decided to do it myself. Do you know of any manuals, like Chilton's or Hayne's for a 2001 Protege? I bought the front brake pads for $20.00 and Mazdadealership wanted $150.00 are they insane????? or what?
Again, I want to thank you for the motivation you've given me.


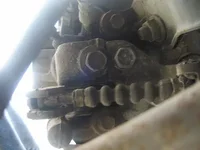
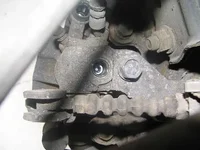
I got a shop manual - the same one the dealers would use - on ebay for my 2003 Protege for like $10 or $15. They usually have them for all years of Proteges and they're on a CD in pdf form. Really awesome guide - it tells you how to do anything and everything - from replacing the timing belt to electrical schematics. Granted, it's not an idiots guide, meaning it tells you what to do but now always exactly how to do it, but it's detailed enough that anyone who's used tools could figure it out. Don't waste your time with those Chilton's manuals when one like this is available. If you really wanted to get all 1140 pages printed into a book you could have Office Max do it for like $50 (I priced it out). cbcbd attached a thumbnail of a brake schematic - that is from this shop manual.
 
KD7000 said:
This writeup is pretty good, but I have to question the spec for red Locktite on the caliper bolts. That stuff is (theoretically) non-service removeable, so you'd need to heat the bolts with a blowtorch if you ever wanted to take 'em off again.

Does Mazda actually specify red? If so, that's wacky. I could see possibly blue Locktite if you really needed something...

-Brian
i've never had a problem braking red locktite loose
 
TXMazdaSpeeder said:
i've never had a problem braking red locktite loose
Then you're not cleaning the bolt and nut (or threaded receiver) before you applied it. Red Loctite applied correctly should require a torch... or at the very least, a huge-ass breaker bar.

I still think that Red is really excessive for caliper bolts. Until someone can point out where Mazda says to use it, I think it's questionable advice. If there's some documented proof that it's necessary or recommended, I'll happily retract my statements.

-Brian
 
KD7000 said:
Then you're not cleaning the bolt and nut (or threaded receiver) before you applied it. Red Loctite applied correctly should require a torch... or at the very least, a huge-ass breaker bar.

I still think that Red is really excessive for caliper bolts. Until someone can point out where Mazda says to use it, I think it's questionable advice. If there's some documented proof that it's necessary or recommended, I'll happily retract my statements.

-Brian
i just know i had heard alot of people's horror stories about losing caliepr bolts so i wanted to make sure that didnt happen on mine, the red might be a tad excessive i guess but mine came off just fine last night when i changed my front pads again.
 
Great How To, I wish people would stop throwing huge money to dealerships and see how easy it is to do the work yourself.

One question, you should lube the calipers/sliders right? Any tricks, ideas or is is straight forward?
 
Myk said:
Great How To, I wish people would stop throwing huge money to dealerships and see how easy it is to do the work yourself.

One question, you should lube the calipers/sliders right? Any tricks, ideas or is is straight forward?
Get some sil-glide from napa and rub it all over the caliper slides. Easy as that - you really can't screw it up.

I just did all 4 pads and rotors a few weeks ago and it was pretty easy. The rear brakes stumped my friend and I until I got out my shop manual and realized there's an allen screw to retract the caliper. Was thinking about doing a how-to but I didn't have a digital camera to take pics.
 
^^Yeah someone should really do a write up on the rears. It took me 2days to do my rear pads. I have never seen a car with the little set screw, not even on my Evo.

I got some pics of the drivers side rear caliper. First pic is with the bolt and the second is without the bolt exposing the set screw. You will need a 14mm wrench to take off the first bolt and I think the set screw is 4mm (i think). Once you pull the bolf off you need to unscrew the set screw untill it stops. I wont come out so dont try to bring it out. Once you get the new pads on push the set screw all the way in until it stops but dont put a gurilla grip on it. Just till it stops.

Hope this helps someone cause it sure wouldve helped me and save me alot of pain.
 

Attachments

  • brake1.JPG
    brake1.JPG
    22.1 KB · Views: 2,230
  • brake2.JPG
    brake2.JPG
    31.8 KB · Views: 2,894
Last edited:
TeamPlayers said:
^^Yeah someone should really do a write up on the rears. It took me 2days to do my rear pads. I have never seen a car with the little set screw, not even on my Evo.

I got some pics of the drivers side rear caliper. First pic is with the bolt and the second is without the bolt exposing the set screw. You will need a 14mm wrench to take off the first bolt and I think the set screw is 4mm (i think). Once you pull the bolf off you need to unscrew the set screw untill it stops. I wont come out so dont try to bring it out. Once you get the new pads on push the set screw all the way in until it stops but dont put a gurilla grip on it. Just till it stops.

Hope this helps someone cause it sure wouldve helped me and save me alot of pain.

Would this cause the piston not wanting to push back in? I'm trying to do my rear brakes right now and I cannot push in the piston AT ALL! It wont budge.
 
That is the exact reason why they wont go back. I broke a c-clamp (cheap one) before I found that screw.

Like I said follow the above post and you should be good. But make sure you dont put a monster grip in the set screw when you put it back in. Turn it till it stops and then back it out just alittle.
 
Also might want to adjust the ebrake screw inside the car when you are done. 3-4 turns should be good
 
Ok, I got everything put back togeather. But when I went to take it for a test drive I couldn't back out of my garage... I could move a little but I had to give it a lot of gas.

I think it could be 1 of 2 things or maybe both.

Like I said follow the above post and you should be good. But make sure you dont put a monster grip in the set screw when you put it back in. Turn it till it stops and then back it out just alittle.

About how far should I back it out? I did about half a turn.

Also might want to adjust the ebrake screw inside the car when you are done. 3-4 turns should be good

Where is this located?

Thanks again!
 
Last edited:
The ebrake screw is right next to the ebrake handle. Just lift out the plastic piece around the handle and you will see it. You may or may not need to adjust it - after I did the rear brakes in my car the adjustment screw wouldn't tighten enough so my ebrake didn't work for about a week - my rear calipers self adjusted after a week.

I would just back it out about a full turn so the car drives normally. Your e-brake probably won't work, but the caliper will self adjust. I explained it more in detail to someone else - look at this thread from when I did my brakes before: http://www.msprotege.com/forum/showthread.php?t=89477.
 
Ok, I took it out for a drive and I have a lot of resistance on the brakes. I loosened up the ebrake screw quite a bit just to see if that would help and I didn't notice much difference. The brakes were smoking when I got back. (nervous)

I'm not sure what the issue could be. Do you think it could be the set screws on the back of the brake assembly is too tight?
 
Did you loosen the screw on the backs of the rear calipers? The ebrake screw is just for minor adjustments so the ebrake lever is in the right position when it's engaged.

Loosen the screw on the backs of the calipers quite a bit so there's definitely no resistance. It will self adjust after a week or so, and the ebrake probably won't engage fully until it does self adjust, but at least you won't burn up your new brakes.

Sorry if my last post wasn't clear enough on this.
 
DrummerJim50 said:
Did you loosen the screw on the backs of the rear calipers? The ebrake screw is just for minor adjustments so the ebrake lever is in the right position when it's engaged.

Loosen the screw on the backs of the calipers quite a bit so there's definitely no resistance. It will self adjust after a week or so, and the ebrake probably won't engage fully until it does self adjust, but at least you won't burn up your new brakes.

Sorry if my last post wasn't clear enough on this.

Yeah I did this lastnight and it helped quited a bit. Thanks for all the help. :)
 
MP3-E I apolozie man I feel like I gave you bad advice. When I was finished with mine the E-brake would come up with no effort. So I adjusted the screw in side the car, and the screw behind the caliper I turned all the way and and backed it out about 1/8 of a turn. Well I guess not all cars are going to have the same problem. Once again if I gave you bad advice I do apologize.
 
MP3-E I apolozie man I feel like I gave you bad advice. When I was finished with mine the E-brake would come up with no effort. So I adjusted the screw in side the car, and the screw behind the caliper I turned all the way and and backed it out about 1/8 of a turn. Well I guess not all cars are going to have the same problem. Once again if I gave you bad advice I do apologize.

Hey, don't worry about it. I got it all figured out! Now the info is here for the next guy who needs it.(2thumbs)

I actually had the screws(the allen wrench adjustment) on the back of the callipers WAY too tight. I just backed them off and the found out the e-brake would come up with no effort like you said, then I just adjusted the e-brake screw. ALL GOOD!
 
Back