Jbcustom420
Member
- :
- 2001 Mazda Protege MP3
Tools required:
Hydraulic Jack (2 ton floor jack preferred)
Jack stand
Wheel stops
21mm lug nut wrench
Socket wrench with (8mm, 10mm, 12mm, 14mm)
Flat head screwdriver
Collecting reservoir
Paper towels (lots of them for cleaning up the brake fluid)
Step 1:
Begin loosening up the lug nuts
Step 2:
Raise your car with the jack at a point along the frame, raise it high enough to allow a jack stand to rest underneath. See picture
Step 3:
Remove your wheel(s)
Step 4:
You'll probably need to get down on the ground, get your head into the wheel well and towards the rear of the car. Locate the parking brake line. There will be a clip holding the brake line in place. This can be removed just by applying some reasonable pressure and pushing it towards the center of the vehicle. Once the clip is removed the brake line will easily be removed. I've accentuated the area you need to locate in red. See the attached picture. Afterwards it will look like:
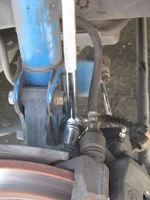
Step 5:
Remove the plastic cover on the top of the caliper. With a 12mm socket, begin undoing the bolt, and then slide the bolt out of the caliper. This will allow the brake pads to be accessed and the caliper to pivot on the floating pin. In this picture, the top arrow, is the bolt that will allow you to pivot the caliper.
Hydraulic Jack (2 ton floor jack preferred)
Jack stand
Wheel stops
21mm lug nut wrench
Socket wrench with (8mm, 10mm, 12mm, 14mm)
Flat head screwdriver
Collecting reservoir
Paper towels (lots of them for cleaning up the brake fluid)
Step 1:
Begin loosening up the lug nuts
Step 2:
Raise your car with the jack at a point along the frame, raise it high enough to allow a jack stand to rest underneath. See picture
Step 3:
Remove your wheel(s)
Step 4:
You'll probably need to get down on the ground, get your head into the wheel well and towards the rear of the car. Locate the parking brake line. There will be a clip holding the brake line in place. This can be removed just by applying some reasonable pressure and pushing it towards the center of the vehicle. Once the clip is removed the brake line will easily be removed. I've accentuated the area you need to locate in red. See the attached picture.
Afterwards it will look like:Step 5:
Remove the plastic cover on the top of the caliper. With a 12mm socket, begin undoing the bolt, and then slide the bolt out of the caliper. This will allow the brake pads to be accessed and the caliper to pivot on the floating pin. In this picture, the top arrow, is the bolt that will allow you to pivot the caliper.