The thought of such ran through my mind the entire time that i was threading that assembly into the block. God, how it would suck if it some how snapped off. With the weight of such a large oil sender so far out, some sort of support is necessary, even at least to protect the entire assebly. Such a system shouldn't be too involved to fabricate.xelderx said:I had to spend some time underneath a Pro5 with some easy-outs because of that...in the middle of a 24 hour AutoX...luckily it wasn't mine...but we live and learn.

You are using an out of date browser. It may not display this or other websites correctly.
You should upgrade or use an alternative browser.
You should upgrade or use an alternative browser.
GRM Project Miata MXR2 Status
- Thread starter kcbhiw
- Start date
Turbo #2 - headed for the dumpster?
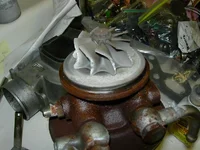
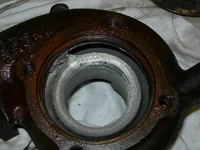
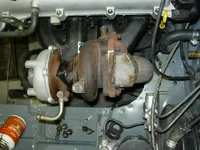
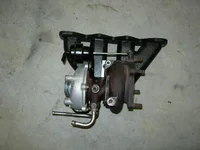
I disassembled the "good" turbo today to rotate the housings so that the oil drain has the proper downward orientation. Upon doing so and much to my dismay, it seems that the car from which it was removed had a bit of a lean-running condition. Molten aluminum is splattered all over the inside of the exhaust housing as well as the impeller. Since the plate behind the impeller is now unloaded after removing the housing, the impeller now rubs and grabs on the aluminum. I hope that I can find some way to torch the aluminum off. Suggestions?
So, the 'saga' continues.....
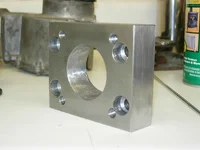
Attached are a couple pics of the issue, as well as a conversion flange that I had to manufacture to fit this turbo to my manifold.
I disassembled the "good" turbo today to rotate the housings so that the oil drain has the proper downward orientation. Upon doing so and much to my dismay, it seems that the car from which it was removed had a bit of a lean-running condition. Molten aluminum is splattered all over the inside of the exhaust housing as well as the impeller. Since the plate behind the impeller is now unloaded after removing the housing, the impeller now rubs and grabs on the aluminum. I hope that I can find some way to torch the aluminum off. Suggestions?
So, the 'saga' continues.....
Attached are a couple pics of the issue, as well as a conversion flange that I had to manufacture to fit this turbo to my manifold.
Attachments
7
70
You are probably going to have to grind it down or something.
Good luck...Hopefully you are up and running in time. Will you still come if you can't?
Good luck...Hopefully you are up and running in time. Will you still come if you can't?
StuttersC said:You are probably going to have to grind it down or something.
Good luck...Hopefully you are up and running in time. Will you still come if you can't?
I'll be there regardless, even if the car has to be N/A.
Mazdaspeedgirl
Resident Autocrosser
- :
- 99 10AE MX-5 | 2016.5 CX-5 GT
kcbhiw said:I disassembled the "good" turbo today to rotate the housings so that the oil drain has the proper downward orientation. Upon doing so and much to my dismay, it seems that the car from which it was removed had a bit of a lean-running condition. Molten aluminum is splattered all over the inside of the exhaust housing as well as the impeller.

Prodigy said:Just take a die grinder to get rid of the excess molten aluminum...
it shouldn't slow you down too much (unless you don't have the tools.. (doh))
good luck.
That's exactly what I did (except with a dremel). It also seems that the plate beneath the impeller compresses to a more concave shape. So, as it seems, I now have plenty of clearance on the impeller side.
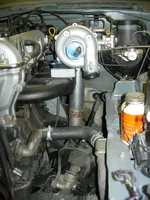
The turbo is now re-assembled and the manifold is in place. This week, I will be manufacturing the downpipe. Once completed, I can bolt the turbo in place, route the oil and coolant lines, and plumb the I/C and remaining intake lines. If all goes well, I should be boosted within two weeks.
Heh, everytime I look at it after I'm done working on it for the day, the thought of it being boosted floors me even more.
Mazdaspeedgirl
Resident Autocrosser
- :
- 99 10AE MX-5 | 2016.5 CX-5 GT
Hell yah!kcbhiw said:Heh, everytime I look at it after I'm done working on it for the day, the thought of it being boosted floors me even more.
7
70
Cool, I'm glad things are coming together for you well.
Just a thought, once the car is finished I would print this thread out and put it in your build book to turn into the judges. They kind of like stuff like this.
Just a thought, once the car is finished I would print this thread out and put it in your build book to turn into the judges. They kind of like stuff like this.
StuttersC said:Cool, I'm glad things are coming together for you well.
Just a thought, once the car is finished I would print this thread out and put it in your build book to turn into the judges. They kind of like stuff like this.
Ahh, cool. I'll definately do that. Thanks!
7
70
Update Again
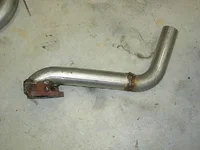
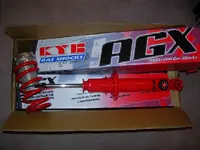
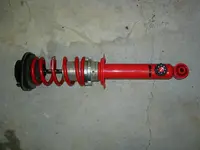
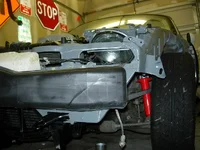
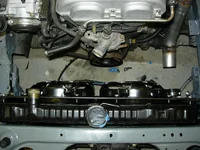
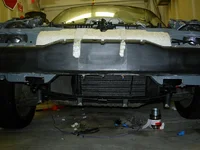
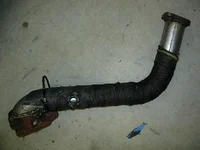
So here's the latest update. The downpipe is complete (with exception of a second O2 bung and outlet flange), the intercooler is mounted, a radiator from a 79(?) Mitsubishi truck has been test fitted, and the cowl area is painted (amongh painting other odds and ends). Typing that, it doesn't seem like much (doh). I have since recieved a new set of KYB AGX struts that will be installed as soon as the car is running, which will hopefully be within a week or two. All in all, to get this thing boosted, I need to create a mounting system for the radiator, plumb the turbocharger's oil and coolant lines (an hour max), and plumb up the intake track. However, I must also install a blowoff valve and fifth injector to the intake plumbing. Ha!
Here are a few pictures to tide you (the few watching") ) over. Yeah, I know, not the best welding, but it'll work.
) over. Yeah, I know, not the best welding, but it'll work.
So here's the latest update. The downpipe is complete (with exception of a second O2 bung and outlet flange), the intercooler is mounted, a radiator from a 79(?) Mitsubishi truck has been test fitted, and the cowl area is painted (amongh painting other odds and ends). Typing that, it doesn't seem like much (doh). I have since recieved a new set of KYB AGX struts that will be installed as soon as the car is running, which will hopefully be within a week or two. All in all, to get this thing boosted, I need to create a mounting system for the radiator, plumb the turbocharger's oil and coolant lines (an hour max), and plumb up the intake track. However, I must also install a blowoff valve and fifth injector to the intake plumbing. Ha!
Here are a few pictures to tide you (the few watching
) over. Yeah, I know, not the best welding, but it'll work.Attachments
anarchistchiken
Member
- :
- 03 Silver Protege5
Wow it's really starting to come together. When's the deadline?
anarchistchiken said:Wow it's really starting to come together. When's the deadline?
When the race starts.
anarchistchiken said:Wow it's really starting to come together. When's the deadline?
I have to have the car running by the first weekend in March. I want to attend the first local autocross to get the car dialed out. I need to have the project complete by the last weekend in March as that is when the actual competition is held.
Prodigy said:I can't wait to see the car in person.
What are you planning on using the remaining budget on?
Paint, mostly. Perhaps a custom low profile headlamp setup. Other than that, just odds and ends that I'll end up needing as I progress.
Luv2RedLine
Member
- :
- 97 Protege LX
Hmmm....give me my car back.....NOOOOWWW!!!
Looks like it's coming along nicely. Should be up and running soon huh?
I can't post from my laptop(i'm on my roomates computer) but I've still been tagging along.
Looks like it's coming along nicely. Should be up and running soon huh?
I can't post from my laptop(i'm on my roomates computer) but I've still been tagging along.
So yeah, I'm still at it.
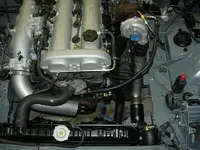
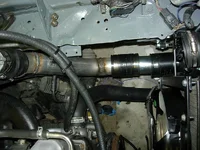
Things are still progressing on the GRM Miata, albeit slowly. All of the easy stuff has come together to create a bunch of small difficulties, of which should be expected. To make this short and sweet, the turbo is permanantly mounted, the water and oil lines are plumbed (I previously stated an hour...HA! I wish), turbo to I/C pipe is done (except for powder coat), I/C to intake is 75% done, the radiator is fitted and mounted, the two new radiator fans (Honda Accord ) are fitted and mounted, started to install the suspension, but ran into problems, and the down pipe is complete with outlet flange, O2 bung, and header wrap (to protect items in close proximity).
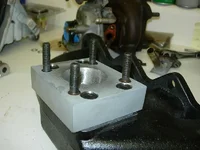
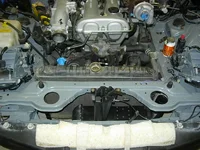
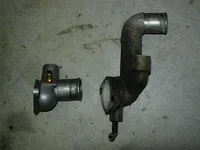
I had to use the waterpump "distribution manifold" from the Capri to allow clearance for the turbo to I/C pipe. The Capri unit is significanlty shorter (as seen in the forth pic) and allowed the perfect clearance for the piping. I had to tap and thread a fitting into it to allow for the turbo coolant return line.
I have also acquired a Bipes ACU to dynamically retard the timing, basically (hey, the chances of me grenading the engine have lessened ).
It turns out that the threaded sleeves that I'd planned to use with the adjustable coilover setup won't work [easily] with these dampers. Unless I find a different set of sleeves/perches or manfactur a different lower perch for the KYB's, I'll be forced to use the stock springs (as funds are running low).
God willing, this car WILL be running by Sunday's end (2/20).
Per the norm, here are a few pics. Enjoy, heh........
Things are still progressing on the GRM Miata, albeit slowly. All of the easy stuff has come together to create a bunch of small difficulties, of which should be expected. To make this short and sweet, the turbo is permanantly mounted, the water and oil lines are plumbed (I previously stated an hour...HA! I wish), turbo to I/C pipe is done (except for powder coat), I/C to intake is 75% done, the radiator is fitted and mounted, the two new radiator fans (Honda Accord
) are fitted and mounted, started to install the suspension, but ran into problems, and the down pipe is complete with outlet flange, O2 bung, and header wrap (to protect items in close proximity). I had to use the waterpump "distribution manifold" from the Capri to allow clearance for the turbo to I/C pipe. The Capri unit is significanlty shorter (as seen in the forth pic) and allowed the perfect clearance for the piping. I had to tap and thread a fitting into it to allow for the turbo coolant return line.
I have also acquired a Bipes ACU to dynamically retard the timing, basically (hey, the chances of me grenading the engine have lessened
).It turns out that the threaded sleeves that I'd planned to use with the adjustable coilover setup won't work [easily] with these dampers. Unless I find a different set of sleeves/perches or manfactur a different lower perch for the KYB's, I'll be forced to use the stock springs (as funds are running low).
God willing, this car WILL be running by Sunday's end (2/20).
Per the norm, here are a few pics. Enjoy, heh........
Attachments

New Posts and Comments

- Replies
- 17
- Views
- 3K
- Replies
- 3
- Views
- 131
- Replies
- 4
- Views
- 609