dual4" kicks, progress...

i was thinking of just wrapping it around the outside of my baffle about 1/2"above the baffle to give the recess then wrapping my cloth from the balso to the base.
 
I'm well aware of balsa's manipulability, but I was thinking the strip just to have a nice easy consistent edge that I wouldn't need to sand on verymuch to have it smooth and mof a nice clean matching radius, and also some re-enforcement in the strength dept.

Okay, so I resined around the sides, and onto the cloth on the bottom (hoping I'll be able to penetrate inbetween the mdf and balsa a bit) At anyrate, the balsa is now solid enough that I think I'll be alright. resin on the otherside as well as the the grillecloth will definately add some strength to the overall final piece. OF course as I talk about it, I've prettymuch concluded that I need to add some structure somehow. I'm thinking the strip of grillecloth is a pretty good idea, even if I just wrap it around the outside. Just something to hold some resin and add some structure. I guess if I'm going to do that, I could just actually fiberglass a layer, but for such a thin strip it would be a bit annoying. *sigh* maybe someday I'll actually get these in my car...
 

Attachments

  • P1040300.webp
    P1040300.webp
    94.8 KB · Views: 158
  • P1040301.webp
    P1040301.webp
    75.9 KB · Views: 127
Wow, so I've been doing a whole lot of nothing with these for awhile looks like it's been a month since I last posted. At anyrate, Progress again, finally. I've been kinda reluctant to do it, because eventhough its' ghetto just having them sitting there inplace ontop of some old crumbpled up t-shirts, it soudns really good. Also I've got weird hours at a new job...

So I've still got about a half gallon of this paint-on edead crap (It's really not good for much IMHO, as anywhere I could think on a car to deaden is just as easy to cover with mat-type deadening and there's no need for drying time.) but hey I've got it and it was spendy, so I figured it wouldn't hurt to glop it on the inside of my kicks, so I did... Also this is the shape I wound up with.

I then spent a couple hours with a hacksaw, some dowling, and a hotgluegun upside down in my car. got one side all mounted, only to notices that I'd somehow nudged it mid-process and threwoff the aim alot, so I took it apart and re-did it, but you cna see the general Idea. Getting it mounted inplace stoutly enough to now stretch my grillecloth over the back. Next up, I get to go get high on resin again.
 

Attachments

  • P1040305.webp
    P1040305.webp
    121.3 KB · Views: 133
  • P1040335.webp
    P1040335.webp
    56.9 KB · Views: 139
Taking shape

Wow, motivation is good. I might actually have these thigns done sometime this year afterall! Stretched my grillecloth and resined 'em up today. I was working for ahwile to figure out how to keep the edge that will tuck underneath the weatherstrip/doorliner thing, and remmeberd how well foil worked for my sub box, so I grabbed a bunch of Paper clamps, and pinched the cloth flat using foil to keep resin from making it a permanent affair. Not sure if that makese sense, but I've made these so that they have an edge like the stock panels that sits right against the edge of the door opening. I figure this'll for one help keep them in place, and mostly keep a fairly clean, no-seams kinda look. For the rest, Just a good ol' hotglue gun. and with grillecloth, you CAN squeeze glue right through it which makes life easy. I've also discovered a neat trick for sticking down areas that would otherwise be "hanging" I simply roll a phillips screwdriver along the glued surface after it's started to setup a bit. This cools the hotglue fast, and sticks it down in place. If you roll just right, the glue won't stick to the screwdriver.

At anyrate, then it was outside to go get high. I'm just gonna get these resined solid for now before I start trying to glass 'em in. They look to be coming out pretty good with only a couple little wrinkles that are firstoff in areas taht won't be visible, and beyond that I should be able to smooth over easily just by layingup some glass on top of 'em.
 

Attachments

  • P1040339.webp
    P1040339.webp
    77 KB · Views: 136
  • P1040342.webp
    P1040342.webp
    56 KB · Views: 153
  • P1040344.webp
    P1040344.webp
    69.9 KB · Views: 145
  • P1040346.webp
    P1040346.webp
    120.5 KB · Views: 140
Forgot a couple of pics. I'm Pretty satisfied with the shapes I've manage to come up with. Also please that they're actually fitting.

Just incase anyone was wondering, I really don't think these are the best speakers to try this with. Granted I'm addicted to the sound, but I've got alot of mounting depth times 2 to deal with and it's not easy. They're gonna be pretty intrusive, but so it goes I guess.
 

Attachments

  • P1040345.webp
    P1040345.webp
    84.9 KB · Views: 133
  • P1040343.webp
    P1040343.webp
    53.7 KB · Views: 131
Poseur said:
Forgot a couple of pics. I'm Pretty satisfied with the shapes I've manage to come up with. Also please that they're actually fitting.

Just incase anyone was wondering, I really don't think these are the best speakers to try this with. Granted I'm addicted to the sound, but I've got alot of mounting depth times 2 to deal with and it's not easy. They're gonna be pretty intrusive, but so it goes I guess.
...these pictures looks great and i am sure the final project will be sweet....how much time have you spent so far in everything??? keep up the good work.....!!
 
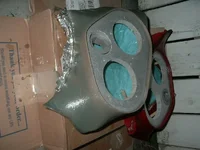
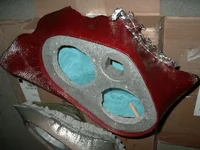
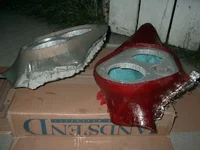
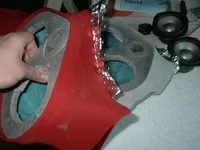
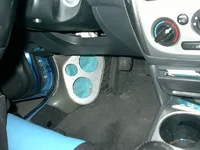
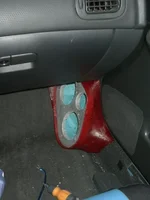
Actual time working on them, not tons, but they've been sitting on some old t-shirts on the floor of my car since early august I believe. All the while I've been playing around with putting them in different spots, different angles and such. I actually found where I wanted 'em within a week, but mostly I've just been too lazy/busy to get started with making them permanent. Of course since they haven't been fixed, I've been able to discover cool other little nuances of aiming (none of them really worth it, however) My final setup is kind of a compromise of getting things to fit and ideal imaging. Ideally, they like to be sitting more flat on the floor pointing more upwards, but not angled back at all, which is tricky to do with the baffles I've made, and I like the design of them and prettymuch any way of aiming them like I mentioned would involve a serious intrusion into footspace. The only real issue I had with them where they're at is that my soundstage is a little low, but everything else is perfect. I've got some Image tweeters that I'll be mounting in my a pillars to raise my soundstage anyway, so I think I should be alright in the end.

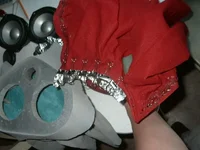
At anyrate, actual construction time I'd say about 6 hours sofar, but a good bit of playing with positioning is highly recommended. I'd say atleast a week worth of just messing with them while you drive around and do whatever you do. It's amazing the amount of difference a tiny amount of moving can or can't do on occasion. I'm not entirely decided on finish yet, depending on how you do it, that's often the biggest time-consuming part of things, but with my friends and my car being the adventure-taxi that it is I'll likely just opt for durable. Rhyno-lining is at the top of my list at the moment. Also being a flat textured surface, it'll require MUCH less finish work meaning I may actualyl get it done!
 
Sometimes I think I take toomany pics of stupid stuff in my car.
 

Attachments

  • P1040348.webp
    P1040348.webp
    65.9 KB · Views: 1,370
  • P1040351.webp
    P1040351.webp
    62.4 KB · Views: 373
glad to see them getting close, ive pulled off mine for a bit to take care of it seems endless other things on the car.
 
Back