
OZCorolla_x
Swiftly
- :
- 2009 MAZDA2 NEO 1.5lt Auto 5Door JMODE10Y1901426XXX. 204,200km
DIY MAZDA 2 DE 1.5lt ZY-VE Coolant Change
Neither myself nor Mazda247.com are responsible for your skills workmanship or errors.
Tools:
20lt rectangular low profile container
Mechanics Jack
Bent Needle Nose Small Pliers
Standard Mechanics Pliers
M10 1/4" Drive Ratchet & small extension
4 x house bricks or Wheel Chocks
A litres & a 100ml Gradiated Container for measuring the drained coolant (per Fig12 below)
NoSpill Coolant Filling Kit
OBDII Live Data PID Reader
Non Contact Thermometer
The Next two (2) Items will substantially help you do a Better Job & Confirm your Outcome:
Coolant Refractometer
Coolant Test Strips
Parts:
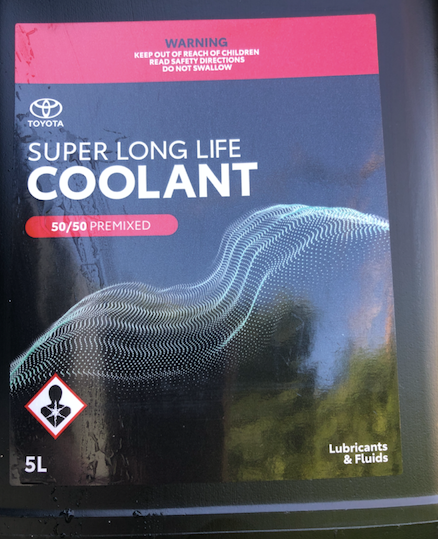
Fig1 5lt Toyota Super Long Life Coolant PartNo 08889_80431 Front

Fig2 5lt Toyota Super Long Life Coolant PartNo 08889_80431 Rear
Noting:
THREAD:mazdas247.com/forum/t/2009-mazda-2-de-1-5lt-auto-coolant-choice.123882633/
2009 MAZDA 2 DE 1.5lt Auto - Coolant Choice
Resolved best option:
5lt Toyota Super Long Life Coolant PartNo 08889_80431
Toyota Super Long Life PINK Coolant 50/50 PreMIx
Extended Life Japanese Coolant uses Phosphates for fast protection (no silicates) & a single organic acid (Sebacate) & other inhibitors.
No 2-EHA
Water (7732-18-5)
Ethylene Glycol (107-21-1)
Diethylene Glycol (111-46-6)
Sebacic Acid (111-20-6)
Potassium Hydroxide (1310-58-3)
Initial boiling point and boiling range : 108 °C (ASTM D1120)
pH : 7,7 (ASTM D1287)
#########
Noted:
MAZDA2 Service Manual Extract ma2auto.com/cooling_system-1088
Engine Coolant Replacement Section
WRT Item 7 In the instruction don’t take the Battery Out, it is not necessary see below.
Coolant Volume 5lt (5lt total with 400ml in the Header Reservoir).
Implies Block, Radiator, Heater Core & Hoses = 4.6lt Coolant Volume
#########
[1] Park car on flat surface & chock front wheels with 2 x house bricks either side
[2] Heater Knob to Hot & Also Fan Speed control on 2
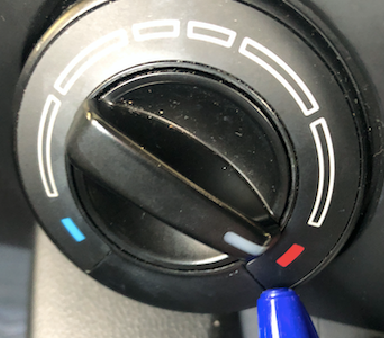
Fig3 Heater Control to Hot
[3] 20lt rectangular low profile container underneath Radiator Drain Plug (NOTED there is no "teat on the Bottom of Radiator Drain" to allow a piece of hose to be fitted to the Bottom of Radiator Drain to direct the coolant flow into a container......so a wide 20lt low profile container is recommended to avoid coolant spillage/spatter)
[4] Open the bottom of Radiator Drain Plug. Remove the Drain Plug & check the O-Ring seal make sure it is round & undamaged
[5] Remove Bottom Radiator Hose using Standard Mechanics Pliers to release the constant pressure clamp
[6] Nominal 3.5lt drains out of Radiator & Block
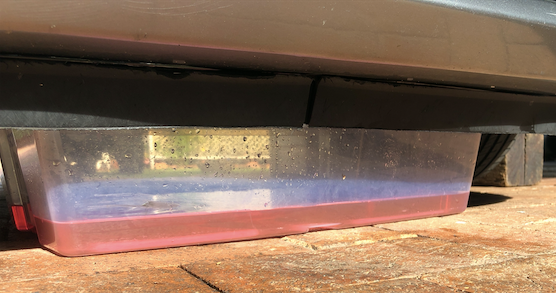
Fig4 3_5lt into 20lt Container
[7] Jack up the rear of the car using mechanics jack to Full Height, an Additional nominal 200ml will drain out
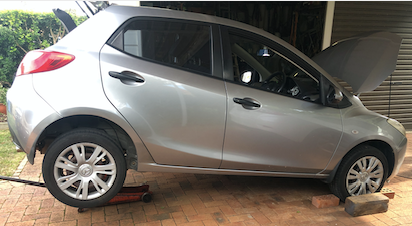
Fig5 Jack up rear of car
[8] Lower rear of car
[9] Jack Front RHS of car & slope to LHS an Additional nominal 50ml will drain out
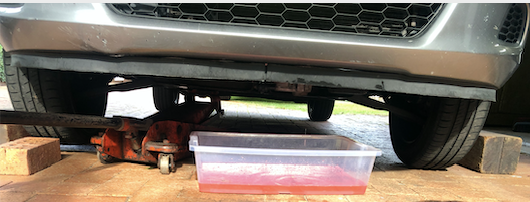
Fig6 Jack Front RHS of Car to slope car to Radiator Drainage Point
[10] Undo M10 top bolt holding Reservoir to the Radiator cowling using M10 1/4 Drive Ratchet & small extension
[11] Disconnect hose to Reservoir from side of radiator cap receptacle
[12] Remove the Reservoir
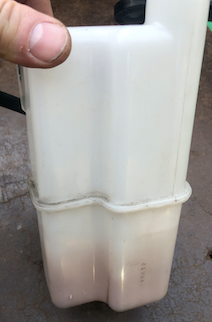
Fig7 Reservoir Removed from car Dirty Internal Base Side View

Fig8 Reservoir Removed from car Dirty Internal Base
[13] Put a “mixed handful of nuts” into the Coolant Reservoir along with some clean water, shake around to clean the old coolant scum out.

Fig9 A Few Nuts used to facilitate Internal Cleaning of Resevoir
[14] Drain water out of the Coolant Reservoir & repeat the cleaning process with new fresh clean water
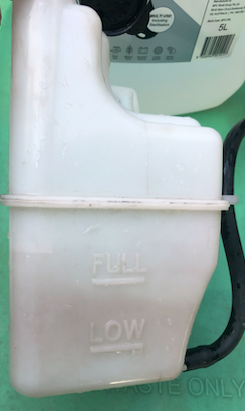
Fig10 Clean Reservoir Side View
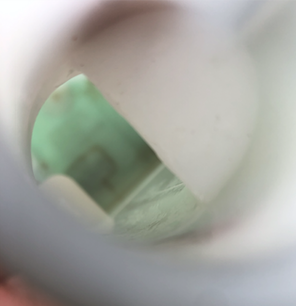
Fig11 Reservoir Following Cleaning with Nuts Internal View
[15] Reinstall Coolant Reservoir & M10 Bolt, refit reservoir hose to side of radiator cap receptacle, put bottom radiator hose back on & close the LHS bottom of Radiator Drain
(Noted The Mazda 2 Coolant Reservoir is not as good as a Toyota Corolla one, it is not sealed & the Coolant Reservoir does not breathe through the coolant in the reservoir allowing minor pressurisation of the Coolant Reservoir & the Vapours in the Coolant Reservoir to condense without loss of fluid volume due to evaporation)
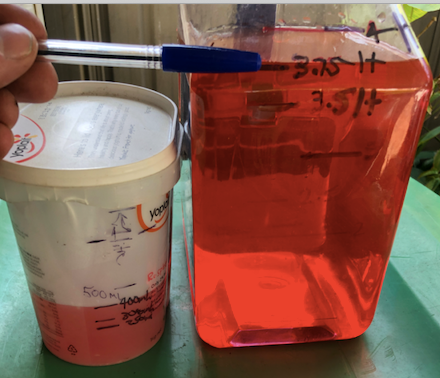
Fig12 Total Coolant Removed 3.75lt from Radiator & Block plus 400ml from Reservoir
3.75lt/4.6lt = 81.52% from the Radiator, Block, Heater Core & Hoses
Doing [16], [17] & [18]....enables access from the Brake Booster Side along the rear of the engine to the the Top of Coolant System EGR Bleed Point.
[16] UnClip Brake Booster Vacuum Line
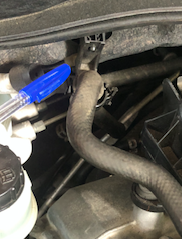
Fig 13 Unclip Brake Booster Vacuum Line
[17] Move Brake Booster Vacuum Line out of the Way
Fig 14 Move Brake Booster Vacuum Line out of the Way
[18] Rotate the Brake Booster Vacuum Line Clip 90 Degrees towards the Brake Booster Side out of the Way.
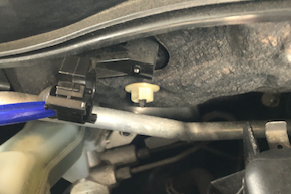
Fig15 Rotate the Brake Booster Vacuum Line Clip 90 Degrees out of the Way
With [16], [17] & [18] done....you can now access from the Brake Booster Side along the rear of the engine to the the Top of Coolant System EGR Bleed Point. NOTED you do not need to take the Battery Out MAZDA.
[19] Using “Small Bent Needle Nose Pliers” to Rotate the Top of Coolant System EGR Bleed Point “Constant Pressure Clamp” 180 Degrees

Fig16 Small Bent Needle Nose Pliers
[20] Access to Top of Coolant System EGR Bleed Point Constant Pressure Clamp with Small Bent Needle Nose Pliers is from Brake Booster side of Motor
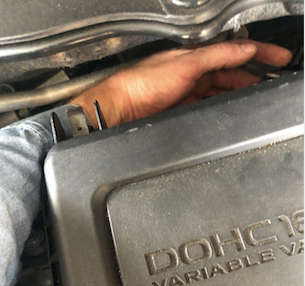
Fig17 Access to Constant Pressure Clamp
[21] 180 Degree Rotated Constant Pressure Clamp to allow Easy Access & Removal from the Brake Booster Side.
[22] Using Small Standard Pliers Remove the Top of Coolant System EGR Bleed Point Constant Pressure Clamp.
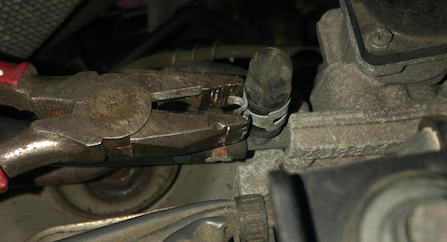
Fig18 Remove the Coolant Bleed Point Constant Pressure Clamp
[23] Carefully remove the Top of Coolant System EGR Bleed Point Rubber Cap, make sure the Rubber Cap is not damaged or perished
[24] Replace the Top of Coolant System EGR Bleed Point Rubber Cap “partially on” so its easy to remove & facilitate bleeding & place a piece of rag under the bleed point

Fig19 Rubber cap partially on & rag in place
#########
Swapping Coolant Types so need to Demin Water Flush
[25] Fit the “Cooling System Filler Funnel” & Refill with Demin Water it will take a nominal 3lt Demin Water until Water & bubbles come out of the Top of Coolant System EGR Bleed Point
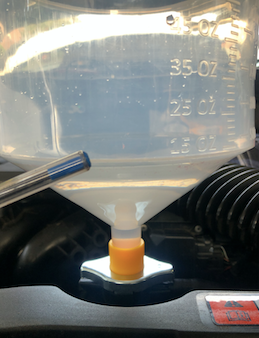
Fig20 Sedy 97764S No Spill Coolant System Filling Funnel Kit X002JP1M4N
[26] Put the Top of Coolant System EGR Bleed Point Rubber Cap back on
[27] Squeeze & slowly release the top radiator hose 15-20 times to burp the cooling system
[28] Squeeze & slowly release the bottom radiator hose 15-20 times to burp the cooling system
[29] Ensure the coolant filling funnel has sufficient Demin Water/coolant
[30] Bleed the Top of Coolant System EGR Bleed Point
[31] Squeeze & slowly release the top radiator has 10 times to burp the cooling system
[32] Squeeze & slowly release the bottom radiator house 10 times to burp the cooling system
[33] Bleed the Top of Coolant System EGR Bleed Point
[34] Start the car & idle, watch the radiator filler cup for bubbles, also watch the OBDII ECT PID, plus Monitor the Top & Bottom Radiator hose with non contact thermometer.
After 55 Deg C fit radiator cap. Take car for a gentle drive, preferably around a block that has up hill & down hill gradients. Bring car to full OP Temp of say 93 DegC return to WShop.
Check Top & Bottom radiator hoses, is the system pressurised & are the NonContact Thermometer measurements 84.5 DegC or similar, ie the Thermostat has opened

Fig21 OBDII ECT & NCT
Decide if all is Ok…..or if you think you have an air lock.
[a] If you have an air lock or trapped air allow car to cool & top up Demin Water if Flushing (or Coolant if Final Fill), squeeze top & bottom radiator hoses to burp the cooling system
Or
[‘b] If all is well, rev engine to 2800RPM for say 3minutes then allow to drop to Idle, & watch the OBDII PID ECT, wait for 100 DegC fans cut in, cuts out at 94 DegC the temp will continue to drop to 92 DegC. The Thermostatic Fans Cycle will repeat 100DegC on, 94 DegC OFF, continues to drop to 92 Deg C. Top Radiator Hose will be 84.5 Deg C or similar.
[35] Turn on heater at idle with full fan & with Demin Water (dependent on Ambient Temp) this drops the OBDII ECT PID to 85 DegC nominal. Turn off engine wait for OBDII PID ECT to cool further & drop below below 40 DegC then drop the Demin Water Flush & Repeat.
Swapping Coolant Types Best to do at least two (2) DeMin Water Flushes
(See below in [38] for Percentage of entrapped Initial Fluid Residuals based on 3.75lt drained out)
[36] NOTED that You could take the Thermostat out & blow the block out with compressed air, if you choose to do this....need to remove the alternator & replace thermostat housing gasket with a new silicon gasket
[37] Repeat Steps [25] to [35] for the 2nd Demin Water Flush
[38] Decide if a 3rd or 4th Demin Water Flush is required
Pg10-5 MAZDA 2 Owners Manual 8AB6 Form No. 8AB6-EO-08J
"MAZDA 2 with Auto Transmission = 5.0Litres Capacity"
?? Is that Plus “The Header Reservoir”? Or is the 5.0lt Capacity the total volume including the “The Header Reservoir”?
Noted 400ml is contained in the “Header Reservoir” at the Full Line
If we consider 5.0lt Capacity as the Total Volume including the “The Header Reservoir”
5.0 Lt - 0.4Lt = 4.6lt in Block, Radiator, Heater Core & Hoses
The Demin Flushes reduce by dilution the Residual Concentration of Initial Fluid:
1st Demin Flush 4.6-3.75 = 0.85lt residual, which leaves 18.48% Concentration of Initial Fluid
2nd Demin Flush leaves 4.6-3.75 = 0.85lt residual, which leaves 3.41% Concentration of Initial Fluid
3rd Demin Flush leaves 4.6-3.75 = 0.85lt residual, which leaves 0.631% Concentration of Initial Fluid
4th Demin Flush leaves 4.6-3.75 = 0.85lt residual, which leaves 0.117% Concentration of Initial Fluid
If you are DIY, you have the time & you intend to keep the car,....well you can do what you like.
If you are paying someone to do this for you.....time is money.....& You get what you get.
[39] Refill with Suitable Coolant (Repeat Steps [25] to [35])
Do not use coolants containing Alcohol, Methanol, Borate or Silicate, or 2EHA.
I can recommend:
Toyota Super Long Life PartNo 08889_80431 it is a very good choice & an EXCELLENT Coolant at $36 for 5lt
Compared to MAZDA FL22 at $186 for 5lt. FL22 is good coolant but like most things MAZDA overpriced for what it is.
[40] Drive gently for next couple of days. Check radiator level & reservoir bottle level each morning & topup as required as residual entrapped air works its way out of the Cooling System & Heater Core.
Also watch the “Waterpump Weep Hole”, along with the Bottom of Radiator Hose Sealing to the Radiator, Bottom of Radiator Drain Plug, along with the Top of Coolant System EGR Bleed Point.......Just incase the coolant change has created a challenge, but hopefully all will be well.
There are always risks in doing a Job on a 15 yr old car but FRESH FLUIDS are essential for longevity. The Top of Coolant System EGR Bleed Point Rubber Cap can be perished/cracked & split. In some cases there is no choice but to replace the Rubber Cap.
[41] Drive for a week & cycle your heater then check your Coolant Outcome
Use a Refractometer in my case:
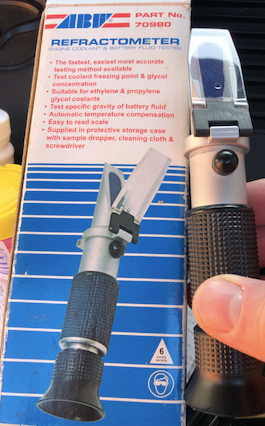
Fig22a Coolant Refractometer ABV Part 70980
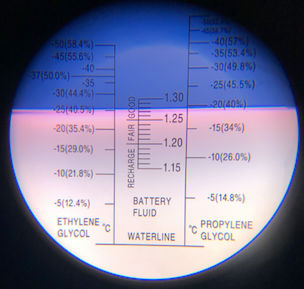
Fig22b Refractometer 40.8Perc Incar Replacement Coolant After DemIn Water Flushes
Also Check % Ethyl Glycol with test strip
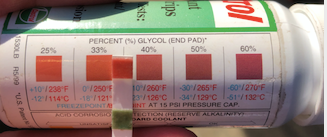
Fig23 Coolant Test Strip Perc Ethyl Glycol
Check coolant corrosion protection with test strip (pH & Reserve Alkalinity)
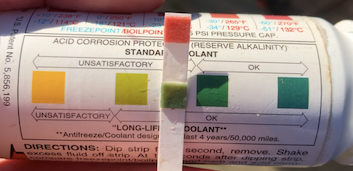
Fig24 Coolant Test Strip Corrosion Protn
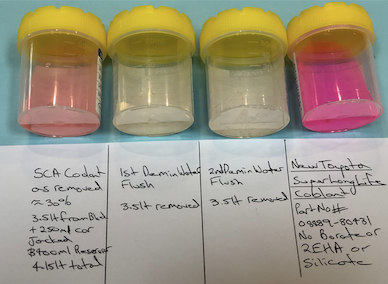
Fig25 Coolant & Demin Flush Drained Samples
L to R a) Drained Existing Coolant, b) 1st Demin Water Flush Drained, c) 2nd Demin Water Flush Drained, d) New Toyota SLLC
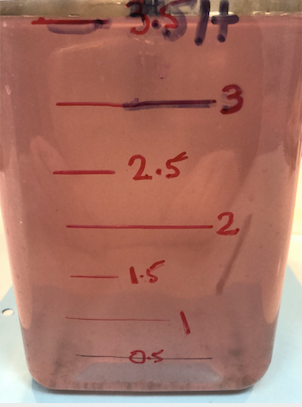
Fig26 2nd Demin Flush Drained Fluid Looks Clear in the Sample Jar But not in a 3_5lt Container
#########
Hope the above helps someone.
Rob
Neither myself nor Mazda247.com are responsible for your skills workmanship or errors.
Tools:
20lt rectangular low profile container
Mechanics Jack
Bent Needle Nose Small Pliers
Standard Mechanics Pliers
M10 1/4" Drive Ratchet & small extension
4 x house bricks or Wheel Chocks
A litres & a 100ml Gradiated Container for measuring the drained coolant (per Fig12 below)
NoSpill Coolant Filling Kit
OBDII Live Data PID Reader
Non Contact Thermometer
The Next two (2) Items will substantially help you do a Better Job & Confirm your Outcome:
Coolant Refractometer
Coolant Test Strips
Parts:
Fig1 5lt Toyota Super Long Life Coolant PartNo 08889_80431 Front
Fig2 5lt Toyota Super Long Life Coolant PartNo 08889_80431 Rear
Noting:
THREAD:mazdas247.com/forum/t/2009-mazda-2-de-1-5lt-auto-coolant-choice.123882633/
2009 MAZDA 2 DE 1.5lt Auto - Coolant Choice
Resolved best option:
5lt Toyota Super Long Life Coolant PartNo 08889_80431
Toyota Super Long Life PINK Coolant 50/50 PreMIx
Extended Life Japanese Coolant uses Phosphates for fast protection (no silicates) & a single organic acid (Sebacate) & other inhibitors.
No 2-EHA
Water (7732-18-5)
Ethylene Glycol (107-21-1)
Diethylene Glycol (111-46-6)
Sebacic Acid (111-20-6)
Potassium Hydroxide (1310-58-3)
Initial boiling point and boiling range : 108 °C (ASTM D1120)
pH : 7,7 (ASTM D1287)
#########
Noted:
MAZDA2 Service Manual Extract ma2auto.com/cooling_system-1088
Engine Coolant Replacement Section
WRT Item 7 In the instruction don’t take the Battery Out, it is not necessary see below.
Coolant Volume 5lt (5lt total with 400ml in the Header Reservoir).
Implies Block, Radiator, Heater Core & Hoses = 4.6lt Coolant Volume
#########
[1] Park car on flat surface & chock front wheels with 2 x house bricks either side
[2] Heater Knob to Hot & Also Fan Speed control on 2
Fig3 Heater Control to Hot
[3] 20lt rectangular low profile container underneath Radiator Drain Plug (NOTED there is no "teat on the Bottom of Radiator Drain" to allow a piece of hose to be fitted to the Bottom of Radiator Drain to direct the coolant flow into a container......so a wide 20lt low profile container is recommended to avoid coolant spillage/spatter)
[4] Open the bottom of Radiator Drain Plug. Remove the Drain Plug & check the O-Ring seal make sure it is round & undamaged
[5] Remove Bottom Radiator Hose using Standard Mechanics Pliers to release the constant pressure clamp
[6] Nominal 3.5lt drains out of Radiator & Block
Fig4 3_5lt into 20lt Container
[7] Jack up the rear of the car using mechanics jack to Full Height, an Additional nominal 200ml will drain out
Fig5 Jack up rear of car
[8] Lower rear of car
[9] Jack Front RHS of car & slope to LHS an Additional nominal 50ml will drain out
Fig6 Jack Front RHS of Car to slope car to Radiator Drainage Point
[10] Undo M10 top bolt holding Reservoir to the Radiator cowling using M10 1/4 Drive Ratchet & small extension
[11] Disconnect hose to Reservoir from side of radiator cap receptacle
[12] Remove the Reservoir
Fig7 Reservoir Removed from car Dirty Internal Base Side View
Fig8 Reservoir Removed from car Dirty Internal Base
[13] Put a “mixed handful of nuts” into the Coolant Reservoir along with some clean water, shake around to clean the old coolant scum out.
Fig9 A Few Nuts used to facilitate Internal Cleaning of Resevoir
[14] Drain water out of the Coolant Reservoir & repeat the cleaning process with new fresh clean water
Fig10 Clean Reservoir Side View
Fig11 Reservoir Following Cleaning with Nuts Internal View
[15] Reinstall Coolant Reservoir & M10 Bolt, refit reservoir hose to side of radiator cap receptacle, put bottom radiator hose back on & close the LHS bottom of Radiator Drain
(Noted The Mazda 2 Coolant Reservoir is not as good as a Toyota Corolla one, it is not sealed & the Coolant Reservoir does not breathe through the coolant in the reservoir allowing minor pressurisation of the Coolant Reservoir & the Vapours in the Coolant Reservoir to condense without loss of fluid volume due to evaporation)
Fig12 Total Coolant Removed 3.75lt from Radiator & Block plus 400ml from Reservoir
3.75lt/4.6lt = 81.52% from the Radiator, Block, Heater Core & Hoses
Doing [16], [17] & [18]....enables access from the Brake Booster Side along the rear of the engine to the the Top of Coolant System EGR Bleed Point.
[16] UnClip Brake Booster Vacuum Line
Fig 13 Unclip Brake Booster Vacuum Line
[17] Move Brake Booster Vacuum Line out of the Way
Fig 14 Move Brake Booster Vacuum Line out of the Way
[18] Rotate the Brake Booster Vacuum Line Clip 90 Degrees towards the Brake Booster Side out of the Way.
Fig15 Rotate the Brake Booster Vacuum Line Clip 90 Degrees out of the Way
With [16], [17] & [18] done....you can now access from the Brake Booster Side along the rear of the engine to the the Top of Coolant System EGR Bleed Point. NOTED you do not need to take the Battery Out MAZDA.
[19] Using “Small Bent Needle Nose Pliers” to Rotate the Top of Coolant System EGR Bleed Point “Constant Pressure Clamp” 180 Degrees
Fig16 Small Bent Needle Nose Pliers
[20] Access to Top of Coolant System EGR Bleed Point Constant Pressure Clamp with Small Bent Needle Nose Pliers is from Brake Booster side of Motor
Fig17 Access to Constant Pressure Clamp
[21] 180 Degree Rotated Constant Pressure Clamp to allow Easy Access & Removal from the Brake Booster Side.
[22] Using Small Standard Pliers Remove the Top of Coolant System EGR Bleed Point Constant Pressure Clamp.
Fig18 Remove the Coolant Bleed Point Constant Pressure Clamp
[23] Carefully remove the Top of Coolant System EGR Bleed Point Rubber Cap, make sure the Rubber Cap is not damaged or perished
[24] Replace the Top of Coolant System EGR Bleed Point Rubber Cap “partially on” so its easy to remove & facilitate bleeding & place a piece of rag under the bleed point
Fig19 Rubber cap partially on & rag in place
#########
Swapping Coolant Types so need to Demin Water Flush
[25] Fit the “Cooling System Filler Funnel” & Refill with Demin Water it will take a nominal 3lt Demin Water until Water & bubbles come out of the Top of Coolant System EGR Bleed Point
Fig20 Sedy 97764S No Spill Coolant System Filling Funnel Kit X002JP1M4N
[26] Put the Top of Coolant System EGR Bleed Point Rubber Cap back on
[27] Squeeze & slowly release the top radiator hose 15-20 times to burp the cooling system
[28] Squeeze & slowly release the bottom radiator hose 15-20 times to burp the cooling system
[29] Ensure the coolant filling funnel has sufficient Demin Water/coolant
[30] Bleed the Top of Coolant System EGR Bleed Point
[31] Squeeze & slowly release the top radiator has 10 times to burp the cooling system
[32] Squeeze & slowly release the bottom radiator house 10 times to burp the cooling system
[33] Bleed the Top of Coolant System EGR Bleed Point
[34] Start the car & idle, watch the radiator filler cup for bubbles, also watch the OBDII ECT PID, plus Monitor the Top & Bottom Radiator hose with non contact thermometer.
After 55 Deg C fit radiator cap. Take car for a gentle drive, preferably around a block that has up hill & down hill gradients. Bring car to full OP Temp of say 93 DegC return to WShop.
Check Top & Bottom radiator hoses, is the system pressurised & are the NonContact Thermometer measurements 84.5 DegC or similar, ie the Thermostat has opened
Fig21 OBDII ECT & NCT
Decide if all is Ok…..or if you think you have an air lock.
[a] If you have an air lock or trapped air allow car to cool & top up Demin Water if Flushing (or Coolant if Final Fill), squeeze top & bottom radiator hoses to burp the cooling system
Or
[‘b] If all is well, rev engine to 2800RPM for say 3minutes then allow to drop to Idle, & watch the OBDII PID ECT, wait for 100 DegC fans cut in, cuts out at 94 DegC the temp will continue to drop to 92 DegC. The Thermostatic Fans Cycle will repeat 100DegC on, 94 DegC OFF, continues to drop to 92 Deg C. Top Radiator Hose will be 84.5 Deg C or similar.
[35] Turn on heater at idle with full fan & with Demin Water (dependent on Ambient Temp) this drops the OBDII ECT PID to 85 DegC nominal. Turn off engine wait for OBDII PID ECT to cool further & drop below below 40 DegC then drop the Demin Water Flush & Repeat.
Swapping Coolant Types Best to do at least two (2) DeMin Water Flushes
(See below in [38] for Percentage of entrapped Initial Fluid Residuals based on 3.75lt drained out)
[36] NOTED that You could take the Thermostat out & blow the block out with compressed air, if you choose to do this....need to remove the alternator & replace thermostat housing gasket with a new silicon gasket
[37] Repeat Steps [25] to [35] for the 2nd Demin Water Flush
[38] Decide if a 3rd or 4th Demin Water Flush is required
Pg10-5 MAZDA 2 Owners Manual 8AB6 Form No. 8AB6-EO-08J
"MAZDA 2 with Auto Transmission = 5.0Litres Capacity"
?? Is that Plus “The Header Reservoir”? Or is the 5.0lt Capacity the total volume including the “The Header Reservoir”?
Noted 400ml is contained in the “Header Reservoir” at the Full Line
If we consider 5.0lt Capacity as the Total Volume including the “The Header Reservoir”
5.0 Lt - 0.4Lt = 4.6lt in Block, Radiator, Heater Core & Hoses
The Demin Flushes reduce by dilution the Residual Concentration of Initial Fluid:
1st Demin Flush 4.6-3.75 = 0.85lt residual, which leaves 18.48% Concentration of Initial Fluid
2nd Demin Flush leaves 4.6-3.75 = 0.85lt residual, which leaves 3.41% Concentration of Initial Fluid
3rd Demin Flush leaves 4.6-3.75 = 0.85lt residual, which leaves 0.631% Concentration of Initial Fluid
4th Demin Flush leaves 4.6-3.75 = 0.85lt residual, which leaves 0.117% Concentration of Initial Fluid
If you are DIY, you have the time & you intend to keep the car,....well you can do what you like.
If you are paying someone to do this for you.....time is money.....& You get what you get.
[39] Refill with Suitable Coolant (Repeat Steps [25] to [35])
Do not use coolants containing Alcohol, Methanol, Borate or Silicate, or 2EHA.
I can recommend:
Toyota Super Long Life PartNo 08889_80431 it is a very good choice & an EXCELLENT Coolant at $36 for 5lt
Compared to MAZDA FL22 at $186 for 5lt. FL22 is good coolant but like most things MAZDA overpriced for what it is.
[40] Drive gently for next couple of days. Check radiator level & reservoir bottle level each morning & topup as required as residual entrapped air works its way out of the Cooling System & Heater Core.
Also watch the “Waterpump Weep Hole”, along with the Bottom of Radiator Hose Sealing to the Radiator, Bottom of Radiator Drain Plug, along with the Top of Coolant System EGR Bleed Point.......Just incase the coolant change has created a challenge, but hopefully all will be well.
There are always risks in doing a Job on a 15 yr old car but FRESH FLUIDS are essential for longevity. The Top of Coolant System EGR Bleed Point Rubber Cap can be perished/cracked & split. In some cases there is no choice but to replace the Rubber Cap.
[41] Drive for a week & cycle your heater then check your Coolant Outcome
Use a Refractometer in my case:
Fig22a Coolant Refractometer ABV Part 70980
Fig22b Refractometer 40.8Perc Incar Replacement Coolant After DemIn Water Flushes
Also Check % Ethyl Glycol with test strip
Fig23 Coolant Test Strip Perc Ethyl Glycol
Check coolant corrosion protection with test strip (pH & Reserve Alkalinity)
Fig24 Coolant Test Strip Corrosion Protn
Fig25 Coolant & Demin Flush Drained Samples
L to R a) Drained Existing Coolant, b) 1st Demin Water Flush Drained, c) 2nd Demin Water Flush Drained, d) New Toyota SLLC
Fig26 2nd Demin Flush Drained Fluid Looks Clear in the Sample Jar But not in a 3_5lt Container
#########
Hope the above helps someone.
Rob
Last edited:


