Unintended consequences
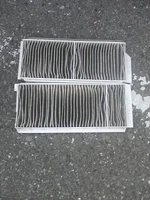
Thanks for the thread. I successfully changed my cabin air filter. One small problem afterward: The blower does not work anymore!!!!!! I checked fuses and none were blown. I checked the wires on the plate that was removed to make sure they hadn't come loose. Any ideas?
One more piece of info: while I was changing the filter, I didn't finish in one sitting, so I drove for a day with the panel open and no filter.
Any help appreciated. I'm hoping that after saving tons of cash on changing the filter myself I won't have to spend hundreds to get the blower working.