I would but the reason I plasti dipped it black is that it has a fair amount of scratches and imperfections in the silver paint and the scratches were annoying me. That, and black is cleaner
I probably will, maybe if I have a chance I'll get to do that today!
Hopefully tonight I can get some pictures of my footwell lighting up. I don't know if I'm going to wire it into the door switch, simply because the dome light over powers the foot well lighting and I don't think it's worth the trouble.
b**** please!
your engine bay looks really clean, its not something you CANT do about it
paint your valve cover/strut bar, remove headshield/stock exhaust manifold and get a header
if you're super keen, go buy a steam cleaner or use a toothbrush!
id vote against a steamer for doing the engine bay since it tends to put water and dirt into the seams you cannot get at and can cause or already fragile metal to rust faster. just use a good engine degreaser if you want to clean the engine bay and keep the water and cleaner away from direct contact with your electrical. clean engine bays are easy to if you do them often, i personally use this to clean and keep mine clean once its clean or for shows i use this
Just a suggestion, I was looking at the exact headunit but im ocd about things matching, have you thought about changing the backlight behind your gauge cluster? It seems like a more involved mod, and a somewhat costly mod if done wrong. Its just a suggestion though. I like how the cars coming along though! I'll be in your position soon. High school, car, and money are words rarely used in the same sentence...
Changing out the lights for the cluster is a bit involved, because there's actually a red film on the back of the panel you have to scrape off. but from what I understand the HVAC lights aren't as bad. I'd definitely reccomend the headunit, only complaint is that it's INSANELY bright at night, especially on dark roads. you can press and hold the clock button for a few seconds and it will put it in to a mode where the display is off and will come on for like 10 seconds when you press a button, which fixes the problem. I just wish I didn't have to do that
I just did my footwell lighting blue as well, so I have an interesting mix of blue and red... it actually kinda works
Orange peelz bike degreaser
I was searching my garage and came across this...figured if it's good enough for gears on a bike it should get rid of all the junk under there. Diluted with water and scrubbed with a cloth. Then I used a hairspray bottle with regular water and went over it with a dry microfiber to make sure nothing was going to be just sitting residue. Cleaned up really well...but to me it's still dirty! Give it a shot eh? I'm sure other degreasers work well but this was on the cheap side and I believe I bought it at walmart? Something like that.
Also... you can try and find cheap replacement parts for the things that are rusted over in the engine bay... like the rad mounts...hard to tell what else needs attention from this angle. But I'd also suggest painting the valve cover...makes the car really perk up!
Much appreciated on the heads up! I doubt I'll be driving it too much at night but u never know. School @ 7 in the morning constitutes a dark morning (if that's the right word). I read up on the lights thread, im up for it eventually. Looking forward to pics when you get the lights finished up though!
quick question with the install of the horns...did you just cut off the plug from the fatory horn and use a butt connector to attach it to the new horns?
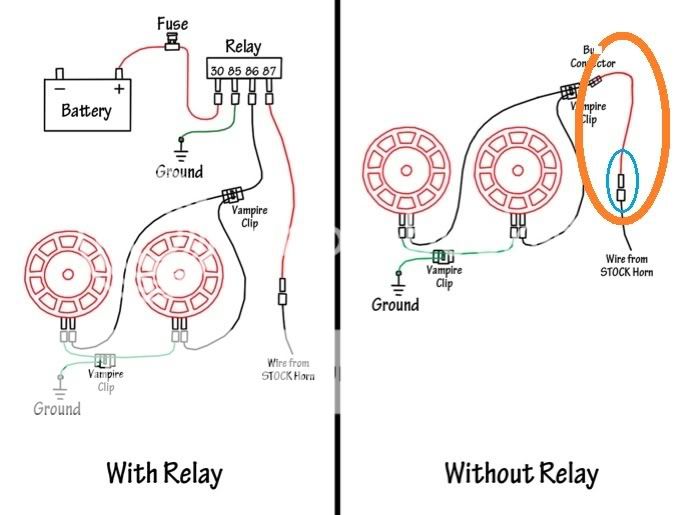
orange circle is the new wire, and the blue circle is what i am questioning...not using a relay
quick question with the install of the horns...did you just cut off the plug from the fatory horn and use a butt connector to attach it to the new horns?
orange circle is the new wire, and the blue circle is what i am questioning...not using a relay
Its quite simple.
all you have to do is twist the 3 wires (power to horn1, power to horn2, then power from stock) together, solder / heatshrink
i was confused by this diagram and was stuck where you are atm
its very simple, if im not specific enough u can pm me
the fusebox already has a relay btw**

")